cloudNet@ 팀의 가시다 님이 진행하는 쿠버네티스 CI/CD 스터디 3주차 내용입니다.
Argo CD + K8S(Kind)
1. Argo CD 설치 및 기본 설정
- Argo CD 설치
# 네임스페이스 생성 및 파라미터 파일 작성
cd cicd-labs

kubectl create ns argocd
cat <<EOF > argocd-values.yaml
dex:
  enabled: false

server:
  service:
    type: NodePort
    nodePortHttps: 30002
  extraArgs:
    - --insecure  # HTTPS 대신 HTTP 사용
EOF

# 설치 : Argo CD v3.1.9 , (참고) 책 버전 v2.10.5
helm repo add argo https://argoproj.github.io/argo-helm
helm install argocd argo/argo-cd --version 9.0.5 -f argocd-values.yaml --namespace argocd

# 확인
kubectl get pod,svc,ep,secret,cm -n argocd
kubectl get crd | grep argo
applications.argoproj.io                     2024-04-14T08:12:16Z
applicationsets.argoproj.io                  2024-04-14T08:12:17Z
appprojects.argoproj.io                      2024-04-14T08:12:16Z

kubectl get appproject -n argocd -o yaml

# configmap
kubectl get cm -n argocd argocd-cm -o yaml
kubectl get cm -n argocd argocd-rbac-cm -o yaml
...
data:
  policy.csv: ""
  policy.default: ""
  policy.matchMode: glob
  scopes: '[groups]'

# 최초 접속 암호 확인
kubectl -n argocd get secret argocd-initial-admin-secret -o jsonpath="{.data.password}" | base64 -d ;echo
XxJMMJUv8MHZa-kk

# Argo CD 웹 접속 주소 확인 : 초기 암호 입력 (admin 계정)
open "http://127.0.0.1:30002" # macOS
## Windows OS경우 직접 웹 브라우저에서 http://<Ubuntu Eth0 IP>:30002 접속
2. Argo CD 웹 접속 확인
- User info → UPDATE PASSWORD 로 admin 계정 암호 변경 (qwe12345)
- 기본 정보 확인 (Settings) : Clusters, Projects, Accounts

- ops-deploy Repo 등록 : Settings → Repositories → CONNECT REPO 클릭
- connection method : VIA HTTPS
- Type : git
- Project : default
- Repo URL : http://***<자신의 IP>***:3000/devops/ops-deploy *http://192.168.254.110:3000/devops/ops-deploy*
- Username : devops
- Password : <Gogs 토큰> ⇒ 입력 후 CONNECT 클릭

3. helm chart 를 통한 배포 실습
#
cd cicd-labs
mkdir nginx-chart
cd nginx-chart

mkdir templates

cat > templates/configmap.yaml <<EOF
apiVersion: v1
kind: ConfigMap
metadata:
  name: {{ .Release.Name }}
data:
  index.html: |
{{ .Values.indexHtml | indent 4 }}
EOF

cat > templates/deployment.yaml <<EOF
apiVersion: apps/v1
kind: Deployment
metadata:
  name: {{ .Release.Name }}
spec:
  replicas: {{ .Values.replicaCount }}
  selector:
    matchLabels:
      app: {{ .Release.Name }}
  template:
    metadata:
      labels:
        app: {{ .Release.Name }}
    spec:
      containers:
      - name: nginx
        image: {{ .Values.image.repository }}:{{ .Values.image.tag }}
        ports:
        - containerPort: 80
        volumeMounts:
        - name: index-html
          mountPath: /usr/share/nginx/html/index.html
          subPath: index.html
      volumes:
      - name: index-html
        configMap:
          name: {{ .Release.Name }}
EOF

cat > templates/service.yaml <<EOF
apiVersion: v1
kind: Service
metadata:
  name: {{ .Release.Name }}
spec:
  selector:
    app: {{ .Release.Name }}
  ports:
  - protocol: TCP
    port: 80
    targetPort: 80
    nodePort: 30000
  type: NodePort
EOF

cat > values.yaml <<EOF
indexHtml: |
  <!DOCTYPE html>
  <html>
  <head>
    <title>Welcome to Nginx!</title>
  </head>
  <body>
    <h1>Hello, Kubernetes!</h1>
    <p>Nginx version 1.26.1</p>
  </body>
  </html>

image:
  repository: nginx
  tag: 1.26.1

replicaCount: 1
EOF

cat > Chart.yaml <<EOF
apiVersion: v2
name: nginx-chart
description: A Helm chart for deploying Nginx with custom index.html
type: application
version: 1.0.0
appVersion: "1.26.1"
EOF


-------------------------------------
# (옵션) 배포 해보기

# 이전 timeserver/service(nodeport) 삭제
kubectl delete deploy,svc --all

# 직접 배포 해보기
helm template dev-nginx . -f values.yaml
helm install dev-nginx . -f values.yaml
helm list
kubectl get deploy,svc,ep,cm dev-nginx -owide

#
curl http://127.0.0.1:30000
curl -s http://127.0.0.1:30000 | grep version
open http://127.0.0.1:30000


# value 값 변경 후 적용 해보기 : version/tag, replicaCount
cat > values.yaml <<EOF
indexHtml: |
  <!DOCTYPE html>
  <html>
  <head>
    <title>Welcome to Nginx!</title>
  </head>
  <body>
    <h1>Hello, Kubernetes!</h1>
    <p>Nginx version 1.26.2</p>
  </body>
  </html>

image:
  repository: nginx
  tag: 1.26.2

replicaCount: 2
EOF

sed -i '' "s|1.26.1|1.26.2|g" Chart.yaml


# helm chart 업그레이드 적용
helm template dev-nginx . -f values.yaml # 적용 전 렌더링 확인 Render chart templates locally and display the output.
helm upgrade dev-nginx . -f values.yaml

# 확인
helm list
kubectl get deploy,svc,ep,cm dev-nginx -owide
curl http://127.0.0.1:30000
curl -s http://127.0.0.1:30000 | grep version
open http://127.0.0.1:30000

# 확인 후 삭제
helm uninstall dev-nginx
4. Repo(ops-deploy) 에 nginx helm chart 를 Argo CD를 통한 배포_1
- 코드 작성
#
cd cicd-labs

MyIP=192.168.254.110
TOKEN=418652c282eb2b73c0cce236ac47b5c372fe9d6e
echo $MyIP $TOKEN

git clone http://devops:$TOKEN@$MyIP:3000/devops/ops-deploy.git
cd ops-deploy

#
git config --local user.name "devops"
git config --local user.email "a@a.com"
git config --local init.defaultBranch main
git config --local credential.helper store
git --no-pager config --local --list
git --no-pager branch
git remote -v

#
VERSION=1.26.1
mkdir nginx-chart
mkdir nginx-chart/templates

cat > nginx-chart/VERSION <<EOF
$VERSION
EOF

cat > nginx-chart/templates/configmap.yaml <<EOF
apiVersion: v1
kind: ConfigMap
metadata:
  name: {{ .Release.Name }}
data:
  index.html: |
{{ .Values.indexHtml | indent 4 }}
EOF

cat > nginx-chart/templates/deployment.yaml <<EOF
apiVersion: apps/v1
kind: Deployment
metadata:
  name: {{ .Release.Name }}
spec:
  replicas: {{ .Values.replicaCount }}
  selector:
    matchLabels:
      app: {{ .Release.Name }}
  template:
    metadata:
      labels:
        app: {{ .Release.Name }}
    spec:
      containers:
      - name: nginx
        image: {{ .Values.image.repository }}:{{ .Values.image.tag }}
        ports:
        - containerPort: 80
        volumeMounts:
        - name: index-html
          mountPath: /usr/share/nginx/html/index.html
          subPath: index.html
      volumes:
      - name: index-html
        configMap:
          name: {{ .Release.Name }}
EOF

cat > nginx-chart/templates/service.yaml <<EOF
apiVersion: v1
kind: Service
metadata:
  name: {{ .Release.Name }}
spec:
  selector:
    app: {{ .Release.Name }}
  ports:
  - protocol: TCP
    port: 80
    targetPort: 80
    nodePort: 30000
  type: NodePort
EOF

cat > nginx-chart/values-dev.yaml <<EOF
indexHtml: |
  <!DOCTYPE html>
  <html>
  <head>
    <title>Welcome to Nginx!</title>
  </head>
  <body>
    <h1>Hello, Kubernetes!</h1>
    <p>DEV : Nginx version $VERSION</p>
  </body>
  </html>

image:
  repository: nginx
  tag: $VERSION

replicaCount: 1
EOF

cat > nginx-chart/values-prd.yaml <<EOF
indexHtml: |
  <!DOCTYPE html>
  <html>
  <head>
    <title>Welcome to Nginx!</title>
  </head>
  <body>
    <h1>Hello, Kubernetes!</h1>
    <p>PRD : Nginx version $VERSION</p>
  </body>
  </html>

image:
  repository: nginx
  tag: $VERSION

replicaCount: 2
EOF

cat > nginx-chart/Chart.yaml <<EOF
apiVersion: v2
name: nginx-chart
description: A Helm chart for deploying Nginx with custom index.html
type: application
version: 1.0.0
appVersion: "$VERSION"
EOF


tree nginx-chart
nginx-chart
├── Chart.yaml
├── VERSION
├── templates
│   ├── configmap.yaml
│   ├── deployment.yaml
│   └── service.yaml
├── values-dev.yaml
└── values-prd.yaml

# 아래 확인은 skip
helm template dev-nginx nginx-chart -f nginx-chart/values-dev.yaml
helm template prd-nginx nginx-chart -f nginx-chart/values-prd.yaml
DEVNGINX=$(helm template dev-nginx nginx-chart -f nginx-chart/values-dev.yaml | sed 's/---//g')
PRDNGINX=$(helm template prd-nginx nginx-chart -f nginx-chart/values-prd.yaml | sed 's/---//g')
diff <(echo "$DEVNGINX") <(echo "$PRDNGINX")

# git push
git status && git add . && git commit -m "Add nginx helm chart" && git push -u origin main
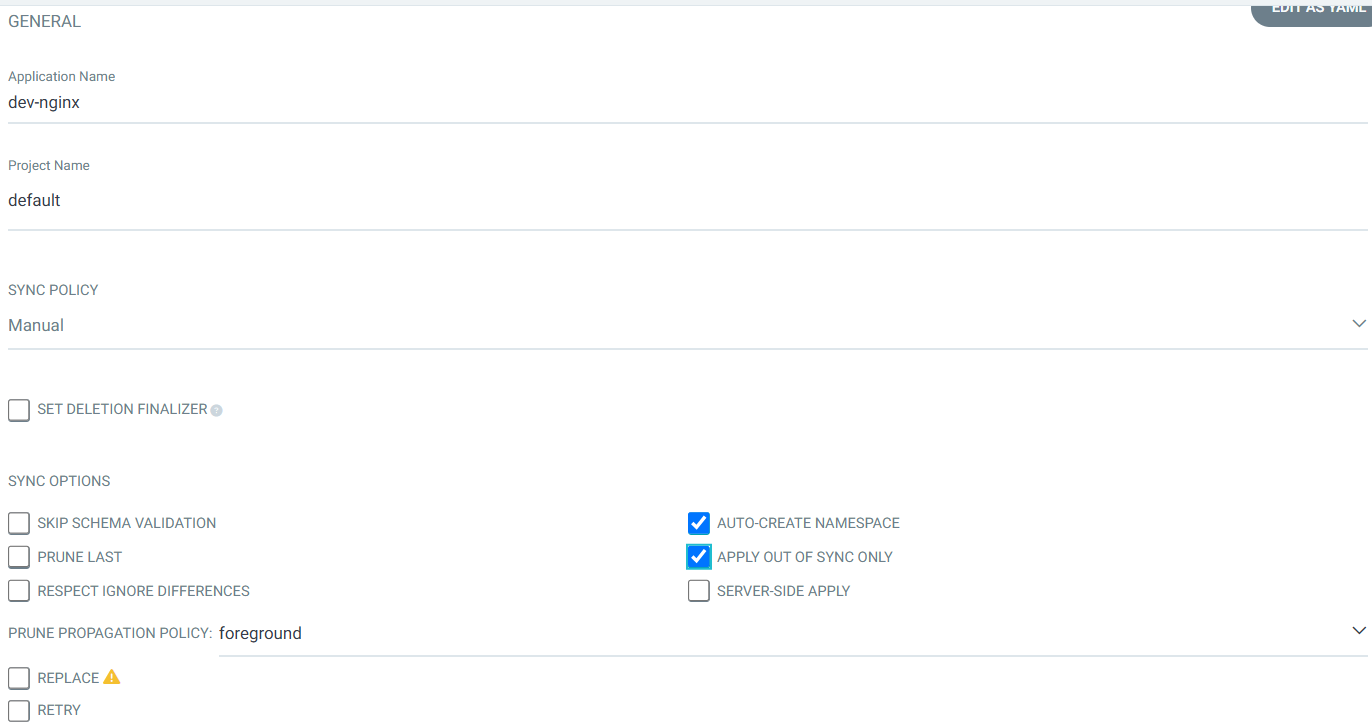
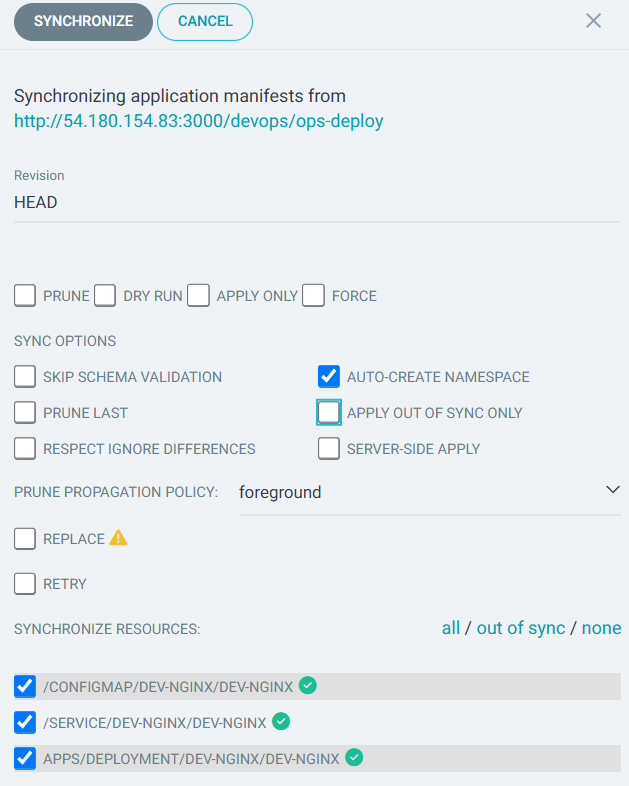
- Argo CD에 App 등록 : Application → NEW APP
- GENERAL
- App Name : dev-nginx
- Project Name : default
- SYNC POLICY : Manual
- AUTO-CREATE NAMESPACE : 클러스터에 네임스페이스가 없을 시 argocd에 입력한 이름으로 자동 생성
- APPLY OUT OF SYNC ONLY : 현재 동기화 상태가 아닌 리소스만 배포
- SYNC OPTIONS : AUTO-CREATE NAMESPACE(Check)
- PRUNE PROPAGATION POLICY
- foreground : 부모(소유자, ex. deployment) 자원을 먼저 삭제함
- background : 자식(종속자, ex. pod) 자원을 먼저 삭제함
- orphan : 고아(소유자는 삭제됐지만, 종속자가 삭제되지 않은 경우) 자원을 삭제함
- Source
- Repo URL : 설정되어 있는 것 선택
- Revision : HEAD
- PATH : nginx-chart
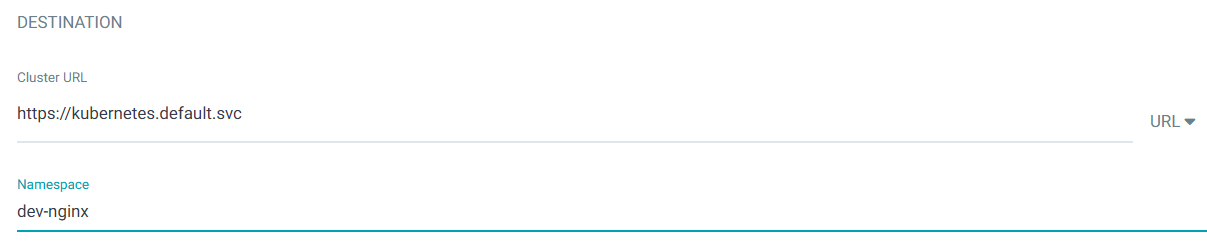
- DESTINATION
- Cluster URL : <기본값>
- NAMESPACE : dev-nginx
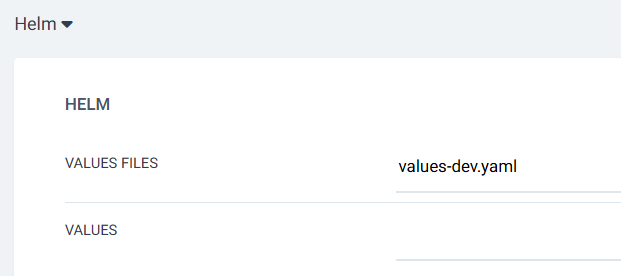
- HELM
- Values files : values-dev.yaml
- PRUNE : GIt에서 자원 삭제 후 배포시 K8S에서는 삭제되지 않으나, 해당 옵션을 선택하면 삭제시킴
- FORCE : --force 옵션으로 리소스 삭제
- APPLY ONLY : ArgoCD의 Pre/Post Hook은 사용 안함 (리소스만 배포)
- DRY RUN : 테스트 배포 (배포에 에러가 있는지 한번 확인해 볼때 사용)
- GENERAL

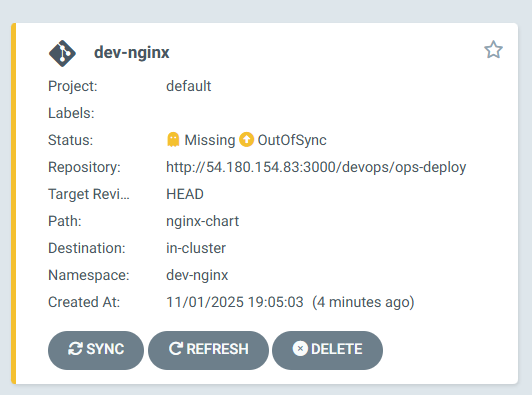
- dev-nginx App 클릭 후 상세 정보 확인 → DIFF 클릭 확인
#
kubectl get applications -n argocd
NAME        SYNC STATUS   HEALTH STATUS
dev-nginx   OutOfSync     Missing

kubectl describe applications -n argocd dev-nginx

# 상태 모니터링
kubectl get applications -n argocd -w

# 반복 접속 시도
while true; do curl -s --connect-timeout 1 http://127.0.0.1:30000 ; date ; echo "------------" ; sleep 1 ; done- SYNC 클릭 으로 K8S(Live) 반영 확인 : 생성될 리소스 확인
# 아래 처럼 yaml 로 APP 생성 가능
kubectl get applications -n argocd
kubectl get applications -n argocd -o yaml | kubectl neat

# 배포 확인
kubectl get all -n dev-nginx -o wide
5. GitOps 방식(?)을 무시하고 K8S(Live)를 수정 시도해보기!
- 동작 확인을 위해서 반복 접속
while true; do curl -s --connect-timeout 1 http://127.0.0.1:30000 ; date ; echo "------------" ; sleep 1 ; done- configmap (dev-nginx) 클릭
- LIVE MANIFEST 에 EDIT 클릭 후 index.html 내용 추가 → SAVE

- K8S(Live) 상태 확인
#
kubectl get cm -n dev-nginx dev-nginx -o yaml
apiVersion: v1
data:
  index.html: |
    <!DOCTYPE html>
    <html>
    <head>
      <title>Welcome to Nginx!</title>
    </head>
    <body>
      <h1>Hello, Kubernetes!</h1>
      <p>DEV testtest : Nginx version 1.26.1</p>
    </body>
    </html>
...
  labels:
    argocd.argoproj.io/instance: dev-nginx
    myname: tester
...

# kubectl 로 직접 k8s 추가 시 >> 이후 ArgoCD LIVE 에서 확인!
kubectl get cm -n dev-nginx dev-nginx --show-labels
kubectl label cm dev-nginx -n dev-nginx study=aews
kubectl get cm -n dev-nginx dev-nginx --show-labels

# 변경된 CM 적용을 위해서 롤아웃
kubectl rollout restart deployment -n dev-nginx dev-nginx

#
while true; do curl -s --connect-timeout 1 http://127.0.0.1:30000 ; date ; echo "------------" ; sleep 1 ; done- ArgoCD 에서 Git(원본) 과 LIVE간 차이점 DIFF 발견
- Git에 없던 정보는 DIFF가 발견되지 않는다!
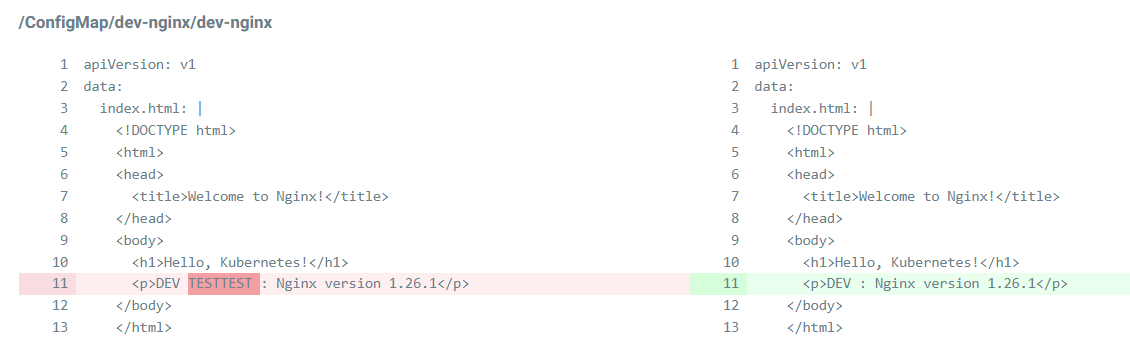
- ArgoCD 에서 SYNC 클릭 후 확인
# 변경된 CM 적용을 위해서 롤아웃
kubectl rollout restart deployment -n dev-nginx dev-nginx- 코드 수정 후 반영 확인
#
VERSION=1.26.2

cat > nginx-chart/VERSION <<EOF
$VERSION
EOF

cat > nginx-chart/values-dev.yaml <<EOF
indexHtml: |
  <!DOCTYPE html>
  <html>
  <head>
    <title>Welcome to Nginx!</title>
  </head>
  <body>
    <h1>Hello, Kubernetes!</h1>
    <p>DEV : Nginx version $VERSION</p>
  </body>
  </html>

image:
  repository: nginx
  tag: $VERSION

replicaCount: 2
EOF

cat > nginx-chart/values-prd.yaml <<EOF
indexHtml: |
  <!DOCTYPE html>
  <html>
  <head>
    <title>Welcome to Nginx!</title>
  </head>
  <body>
    <h1>Hello, Kubernetes!</h1>
    <p>PRD : Nginx version $VERSION</p>
  </body>
  </html>

image:
  repository: nginx
  tag: $VERSION

replicaCount: 2
EOF

cat > nginx-chart/Chart.yaml <<EOF
apiVersion: v2
name: nginx-chart
description: A Helm chart for deploying Nginx with custom index.html
type: application
version: 1.0.0
appVersion: "$VERSION"
EOF

#
git status && git add . && git commit -m "Update nginx version $(cat nginx-chart/VERSION)" && git push -u origin main- Argo CD 웹 확인 → REFRESH 클릭

kubectl get cm -n argocd argocd-cm -o yaml | grep timeout
  timeout.hard.reconciliation: 0s
timeout.reconciliation: 180s- SYNC 클릭 → SYNCHRONIZE 클릭
# 배포 확인
kubectl get all -n dev-nginx -o wide- Argo CD 웹에서 App 삭제

6. Repo(ops-deploy) 에 nginx helm chart 를 Argo CD를 통한 배포_1
- dev-nginx App 생성 및 Auto SYNC
#
MyIP=192.168.254.110
echo $MyIP

cat <<EOF | kubectl apply -f -
apiVersion: argoproj.io/v1alpha1
kind: Application
metadata:
  name: dev-nginx
  namespace: argocd
  finalizers:
  - resources-finalizer.argocd.argoproj.io
spec:
  project: default
  source:
    helm:
      valueFiles:
      - values-dev.yaml
    path: nginx-chart
    repoURL: http://$MyIP:3000/devops/ops-deploy
    targetRevision: HEAD
  syncPolicy:
    automated:
      prune: true
    syncOptions:
    - CreateNamespace=true
  destination:
    namespace: dev-nginx
    server: https://kubernetes.default.svc
EOF

#
kubectl get applications -n argocd dev-nginx
kubectl get applications -n argocd dev-nginx -o yaml
kubectl describe applications -n argocd dev-nginx
...
  Finalizers:
    resources-finalizer.argocd.argoproj.io
...
kubectl get pod,svc,ep,cm -n dev-nginx

#
curl http://127.0.0.1:30000
open http://127.0.0.1:30000

# Argo CD App 삭제
kubectl delete applications -n argocd dev-nginx- prd-nginx App 생성 및 Auto SYNC
#
cat <<EOF | kubectl apply -f -
apiVersion: argoproj.io/v1alpha1
kind: Application
metadata:
  name: prd-nginx
  namespace: argocd
  finalizers:
  - resources-finalizer.argocd.argoproj.io
spec:
  destination:
    namespace: prd-nginx
    server: https://kubernetes.default.svc
  project: default
  source:
    helm:
      valueFiles:
      - values-prd.yaml
    path: nginx-chart
    repoURL: http://$MyIP:3000/devops/ops-deploy
    targetRevision: HEAD
  syncPolicy:
    automated:
      prune: true
    syncOptions:
    - CreateNamespace=true
EOF

#
kubectl get applications -n argocd prd-nginx
kubectl describe applications -n argocd prd-nginx
kubectl get pod,svc,ep,cm -n prd-nginx

#
curl http://127.0.0.1:30000
open http://127.0.0.1:30000

# Argo CD App 삭제
kubectl delete applications -n argocd prd-nginx
7. Repo(ops-deploy) 에 Webhook 를 통해 Argo CD 에 즉시 반영 trigger하여 k8s 배포 할 수 있게 설정
- Repo(ops-deploy) 에 webhooks 설정 : Gogs 선택
- Payload URL : http://192.168.254.110:30002/api/webhook ← IP부분은 각자 자신의 IP로 변경
- 나머지 항목 ‘기본값’ ⇒ Add webhook
- 이후 생성된 webhook 클릭 후 Test Delivery 클릭 후 정상 응답 확인
- dev-nginx App 생성 및 Auto SYNC
#
echo $MyIP

cat <<EOF | kubectl apply -f -
apiVersion: argoproj.io/v1alpha1
kind: Application
metadata:
  name: dev-nginx
  namespace: argocd
  finalizers:
  - resources-finalizer.argocd.argoproj.io
spec:
  project: default
  source:
    helm:
      valueFiles:
      - values-dev.yaml
    path: nginx-chart
    repoURL: http://$MyIP:3000/devops/ops-deploy
    targetRevision: HEAD
  syncPolicy:
    automated:
      prune: true
    syncOptions:
    - CreateNamespace=true
  destination:
    namespace: dev-nginx
    server: https://kubernetes.default.svc
EOF


#
kubectl get applications -n argocd dev-nginx
kubectl get applications -n argocd dev-nginx -o yaml | kubectl neat
kubectl describe applications -n argocd dev-nginx
kubectl get pod,svc,ep,cm -n dev-nginx

#
curl http://127.0.0.1:30000
open http://127.0.0.1:30000- Git(Gogs) 수정 후 ArgoCD 즉시 반영 확인
#
cd cicd-labs/ops-deploy/nginx-chart

#
sed -i "s|replicaCount: 2|replicaCount: 3|g" values-dev.yaml
git add values-dev.yaml && git commit -m "Modify nginx-chart : values-dev.yaml" && git push -u origin main
watch -d kubectl get all -n dev-nginx -o wide

#
sed -i "s|replicaCount: 3|replicaCount: 4|g" values-dev.yaml
git add values-dev.yaml && git commit -m "Modify nginx-chart : values-dev.yaml" && git push -u origin main
watch -d kubectl get all -n dev-nginx -o wide

#
sed -i "s|replicaCount: 4|replicaCount: 2|g" values-dev.yaml
git add values-dev.yaml && git commit -m "Modify nginx-chart : values-dev.yaml" && git push -u origin main
watch -d kubectl get all -n dev-nginx -o wide- Argo CD Application 삭제
kubectl delete applications -n argocd dev-nginx
Jenkins CI + Argo CD + K8S(Kind)
1. Repo(ops-deploy) 기본 코드 작성
#
cd ops-deploy

#
mkdir dev-app

# 도커 계정 정보
DHUSER=<도커 허브 계정>
DHUSER=gasida

# 버전 정보
VERSION=0.0.1

#
cat > dev-app/VERSION <<EOF
$VERSION
EOF

cat > dev-app/timeserver.yaml <<EOF
apiVersion: apps/v1
kind: Deployment
metadata:
  name: timeserver
spec:
  replicas: 2
  selector:
    matchLabels:
      pod: timeserver-pod
  template:
    metadata:
      labels:
        pod: timeserver-pod
    spec:
      containers:
      - name: timeserver-container
        image: docker.io/$DHUSER/dev-app:$VERSION
        livenessProbe:
          initialDelaySeconds: 30
          periodSeconds: 30
          httpGet:
            path: /healthz
            port: 80
            scheme: HTTP
          timeoutSeconds: 5
          failureThreshold: 3
          successThreshold: 1
      imagePullSecrets:
      - name: dockerhub-secret
EOF

cat > dev-app/service.yaml <<EOF
apiVersion: v1
kind: Service
metadata:
  name: timeserver
spec:
  selector:
    pod: timeserver-pod
  ports:
  - port: 80
    targetPort: 80
    protocol: TCP
    nodePort: 30000
  type: NodePort
EOF

#
git add . && git commit -m "Add dev-app deployment yaml" && git push -u origin main
2. Repo(ops-deploy) 를 바라보는 ArgoCD App 생성
#
echo $MyIP

cat <<EOF | kubectl apply -f -
apiVersion: argoproj.io/v1alpha1
kind: Application
metadata:
  name: timeserver
  namespace: argocd
  finalizers:
  - resources-finalizer.argocd.argoproj.io
spec:
  project: default
  source:
    path: dev-app
    repoURL: http://$MyIP:3000/devops/ops-deploy
    targetRevision: HEAD
  syncPolicy:
    automated:
      prune: true
    syncOptions:
    - CreateNamespace=true
  destination:
    namespace: default
    server: https://kubernetes.default.svc
EOF

#
kubectl get applications -n argocd timeserver
kubectl get applications -n argocd timeserver -o yaml | kubectl neat
kubectl describe applications -n argocd timeserver
kubectl get deploy,rs,pod
kubectl get svc,ep timeserver

#
curl http://127.0.0.1:30000
curl http://127.0.0.1:30000/healthz
open http://127.0.0.1:30000
3. Repo(dev-app) 코드 작업
- dev-app Repo에 VERSION 업데이트 시 → ops-deploy Repo 에 dev-app 에 파일에 버전 정보 업데이트 작업 추가
- 기존 버전 정보는 VERSION 파일 내에 정보를 가져와서 변수 지정 : OLDVER=$(cat dev-app/VERSION)
- 신규 버전 정보는 environment 도커 태그 정보를 가져와서 변수 지정 : NEWVER=$(echo ${DOCKER_TAG})
- 이후 sed 로 ops-deploy Repo 에 dev-app/VERSION, timeserver.yaml 2개 파일에 ‘기존 버전’ → ‘신규 버전’으로 값 변경
- 이후 ops-deploy Repo 에 git push ⇒ Argo CD App Trigger 후 AutoSync 로 신규 버전 업데이트 진행
- 아래는 dev-app 에 위치한 Jenkinsfile 로 젠킨스에 SCM-Pipeline(SCM:git) 으로 사용되고 있는 파일을 수정해서 실습에 사용
pipeline {
    agent any
    environment {
        DOCKER_IMAGE = '<자신의 도커 허브 계정>/dev-app' // Docker 이미지 이름
        GOGSCRD = credentials('gogs-crd')
    }
    stages {
        stage('dev-app Checkout') {
            steps {
                 git branch: 'main',
                 url: 'http://<자신의 IP>:3000/devops/dev-app.git',  // Git에서 코드 체크아웃
                 credentialsId: 'gogs-crd'  // Credentials ID
            }
        }
        stage('Read VERSION') {
            steps {
                script {
                    // VERSION 파일 읽기
                    def version = readFile('VERSION').trim()
                    echo "Version found: ${version}"
                    // 환경 변수 설정
                    env.DOCKER_TAG = version
                }
            }
        }
        stage('Docker Build and Push') {
            steps {
                script {
                    docker.withRegistry('https://index.docker.io/v1/', 'dockerhub-crd') {
                        // DOCKER_TAG 사용
                        def appImage = docker.build("${DOCKER_IMAGE}:${DOCKER_TAG}")
                        appImage.push()
                        appImage.push("latest")
                    }
                }
            }
        }
        stage('ops-deploy Checkout') {
            steps {
                 git branch: 'main',
                 url: 'http://<자신의 IP>:3000/devops/ops-deploy.git',  // Git에서 코드 체크아웃
                 credentialsId: 'gogs-crd'  // Credentials ID
            }
        }
        stage('ops-deploy version update push') {
            steps {
                sh '''
                OLDVER=$(cat dev-app/VERSION)
                NEWVER=$(echo ${DOCKER_TAG})
                sed -i '' "s/$OLDVER/$NEWVER/" dev-app/timeserver.yaml
                sed -i '' "s/$OLDVER/$NEWVER/" dev-app/VERSION
                git add ./dev-app
                git config user.name "devops"
                git config user.email "a@a.com"
                git commit -m "version update ${DOCKER_TAG}"
                git push http://${GOGSCRD_USR}:${GOGSCRD_PSW}@<자신의 IP>:3000/devops/ops-deploy.git
                '''
            }
        }
    }
    post {
        success {
            echo "Docker image ${DOCKER_IMAGE}:${DOCKER_TAG} has been built and pushed successfully!"
        }
        failure {
            echo "Pipeline failed. Please check the logs."
        }
    }
}
pipeline {
agent any
environment {
DOCKER_IMAGE = 'gasida/dev-app' // Docker 이미지 이름
GOGSCRD = credentials('gogs-crd')
}
stages {
stage('dev-app Checkout') {
steps {
git branch: 'main',
url: 'http://192.168.254.110:3000/devops/dev-app.git', // Git에서 코드 체크아웃
credentialsId: 'gogs-crd' // Credentials ID
}
}
stage('Read VERSION') {
steps {
script {
// VERSION 파일 읽기
def version = readFile('VERSION').trim()
echo "Version found: ${version}"
// 환경 변수 설정
env.DOCKER_TAG = version
}
}
}
stage('Docker Build and Push') {
steps {
script {
docker.withRegistry('https://index.docker.io/v1/', 'dockerhub-crd') {
// DOCKER_TAG 사용
def appImage = docker.build("${DOCKER_IMAGE}:${DOCKER_TAG}")
appImage.push()
appImage.push("latest")
}
}
}
}
stage('ops-deploy Checkout') {
steps {
git branch: 'main',
url: 'http://192.168.254.110:3000/devops/ops-deploy.git', // Git에서 코드 체크아웃
credentialsId: 'gogs-crd' // Credentials ID
}
}
stage('ops-deploy version update push') {
steps {
sh '''
OLDVER=$(cat dev-app/VERSION)
NEWVER=$(echo ${DOCKER_TAG})
sed -i -e "s/$OLDVER/$NEWVER/" dev-app/timeserver.yaml
sed -i -e "s/$OLDVER/$NEWVER/" dev-app/VERSION
git add ./dev-app
git config user.name "devops"
git config user.email "a@a.com"
git commit -m "version update ${DOCKER_TAG}"
git push http://${GOGSCRD_USR}:${GOGSCRD_PSW}@192.168.254.110:3000/devops/ops-deploy.git
'''
}
}
}
post {
success {
echo "Docker image ${DOCKER_IMAGE}:${DOCKER_TAG} has been built and pushed successfully!"
}
failure {
echo "Pipeline failed. Please check the logs."
}
}
}- 아래는 dev-app (Repo) 에서 git push 수행
# [터미널] 동작 확인 모니터링
while true; do curl -s --connect-timeout 1 http://127.0.0.1:30000 ; echo ; kubectl get deploy timeserver -owide; echo "------------" ; sleep 1 ; done

#
cd cicd-labs/dev-app

# VERSION 파일 수정 : 0.0.3
# server.py 파일 수정 : 0.0.3

# git push : VERSION, server.py, Jenkinsfile
git add . && git commit -m "VERSION $(cat VERSION) Changed" && git push -u origin main
4. Argo CD app Trigger 후 AutoSync 로 신규 버전 업데이트 진행 확인
- dev-app Repo 에서 한번 더 버전 업데이트 수행
# [터미널] 동작 확인 모니터링
while true; do curl -s --connect-timeout 1 http://127.0.0.1:30000 ; echo ; kubectl get deploy timeserver -owide; echo "------------" ; sleep 1 ; done

# VERSION 파일 수정 : 0.0.4
# server.py 파일 수정 : 0.0.4

# git push : VERSION, server.py, Jenkinsfile
git add . && git commit -m "VERSION $(cat VERSION) Changed" && git push -u origin main
# VERSION 파일 수정 : 0.0.5
# server.py 파일 수정 : 0.0.5
# git push : VERSION, server.py, Jenkinsfile
git add . && git commit -m "VERSION $(cat VERSION) Changed" && git push -u origin main'Kubernetes' 카테고리의 다른 글
| Kubernetes CI/CD Study 1기 | 5주차 ArgoCD 2/3 (0) | 2025.11.10 |
|---|---|
| Kubernetes CI/CD Study 1기 | 4주차 ArgoCD 1/3 (0) | 2025.11.08 |
| Kubernetes CI/CD Study 1기 | 3주차 #1 Jenkins + ArgoCD (0) | 2025.10.31 |
| Kubernetes CI/CD Study 1기 | 2주차 #1 : Helm (0) | 2025.10.22 |
| Kubernetes CI/CD Study 1기 | 1주차 #3 : Kustomize (0) | 2025.10.16 |