cloudNet@ 팀의 가시다 님이 진행하는 쿠버네티스 CI/CD 스터디 5주차 내용입니다.
실습 환경 배포
1. kind k8s 배포
# kind k8s 배포
kind create cluster --name myk8s --image kindest/node:v1.32.8 --config - <<EOF
kind: Cluster
apiVersion: kind.x-k8s.io/v1alpha4
nodes:
- role: control-plane
  labels:
    ingress-ready: true
  extraPortMappings:
  - containerPort: 80
    hostPort: 80
    protocol: TCP
  - containerPort: 443
    hostPort: 443
    protocol: TCP
  - containerPort: 30000
    hostPort: 30000
  - containerPort: 30001
    hostPort: 30001
  - containerPort: 30002
    hostPort: 30002
  - containerPort: 30003
    hostPort: 30003
EOF

# kube-ops-view
helm repo add geek-cookbook https://geek-cookbook.github.io/charts/
helm install kube-ops-view geek-cookbook/kube-ops-view --version 1.2.2 --set service.main.type=NodePort,service.main.ports.http.nodePort=30001 --set env.TZ="Asia/Seoul" --namespace kube-system

# kube-ops-view 접속 URL 확인 (1.5 , 2 배율)
open "http://127.0.0.1:30001/#scale=1.5"
open "http://127.0.0.1:30001/#scale=2"
2. ingress-nginx 배포
# 노드 라벨 확인
kubectl get nodes myk8s-control-plane -o jsonpath={.metadata.labels} | jq
...
  "ingress-ready": "true",
...

# NGINX ingress 배포
## The manifests contains kind specific patches to forward the hostPorts to the ingress controller,
## set taint tolerations and schedule it to the custom labelled node.
kubectl apply -f https://raw.githubusercontent.com/kubernetes/ingress-nginx/main/deploy/static/provider/kind/deploy.yaml
-------------------------
## 호스트 포트 80,443 사용
ports:
- containerPort: 80
  hostPort: 80
  name: http
  protocol: TCP
- containerPort: 443
  hostPort: 443
  name: https
  protocol: TCP
...

## nodeSelector 로 배포 노드 지정
nodeSelector:
  ingress-ready: "true"
  kubernetes.io/os: linux

## taint 예외 tolerations 설정
tolerations:
- effect: NoSchedule
  key: node-role.kubernetes.io/master
	operator: Equal
- effect: NoSchedule
  key: node-role.kubernetes.io/control-plane
  operator: Equal
-------------------------

# ingress 배포 확인
kubectl get deploy,svc,ep ingress-nginx-controller -n ingress-nginx
kubectl describe -n ingress-nginx deployments/ingress-nginx-controller
...
  --publish-status-address=localhost
...

# control-plane 노드(실제로는 컨테이너)에 IPTABLES에 80,443은 ingress-nginx 파드로 전달 규칙 확인 # 10.244.0.7은 ingress-nginx 파드의 IP
docker exec -it myk8s-control-plane bash
root@myk8s-control-plane:/# iptables -t nat -L -n -v | grep '10.244.0.7'
    0     0 DNAT       6    --  *      *       0.0.0.0/0            0.0.0.0/0            tcp dpt:80 to:10.244.0.7:80
    0     0 DNAT       6    --  *      *       0.0.0.0/0            0.0.0.0/0            tcp dpt:443 to:10.244.0.7:443
...
exit
3. SSL Passthrough flag 활성화 설정 - Docs
- 해당 설정이 안될 경우 보통 ‘argocd.example.com에서 리디렉션한 횟수가 너무 많습니다.’ 발생.
# args 에 아래 내용 추가 : SSL Passthrough 기본 비활성화 상태
kubectl exec -it -n ingress-nginx deployments/ingress-nginx-controller -- /nginx-ingress-controller --help | grep ssl
      --default-ssl-certificate string          Secret containing a SSL certificate to be used by the default HTTPS server (catch-all).
      --enable-ssl-chain-completion             Autocomplete SSL certificate chains with missing intermediate CA certificates.
      --enable-ssl-passthrough                  Enable SSL Passthrough.
      --ssl-passthrough-proxy-port int          Port to use internally for SSL Passthrough. (default 442)

KUBE_EDITOR="nano" kubectl edit -n ingress-nginx deployments/ingress-nginx-controller
...
  - --enable-ssl-passthrough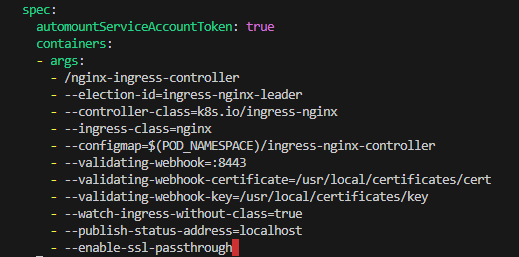
4. Argo CD 설치 + Ingress by Helm - Ingress , Docs , Argocd-Issue
[Argo CD TLS 동작 요약]
- cert-manager 없이 OpenSSL로 self-signed 인증서 생성 및 Secrets 생성
- Argo CD 서버는 TLS 인증서를 argocd-server-tls Secret 에서 직접 로드
- server.ingress.tls=true + nginx.ingress.kubernetes.io/ssl-passthrough=true
- 설정으로 Ingress는 TLS를 종료하지 않고 그대로 Pod에게 전달
- 따라서 브라우저 → Ingress → Argo CD Server 까지 end-to-end HTTPS가 유지됨
sequenceDiagram
    participant C as Client (Browser)
    participant I as Ingress (Nginx)
    participant S as Argo CD Server
    participant T as Secret(argocd-server-tls)

    C->>I: HTTPS Request (argocd.example.com)
    Note over I: ssl-passthrough=true<br/>TLS 그대로 전달
    I->>S: Forward HTTPS (Passthrough)
    S->>T: Load TLS certificate + key
    S->>C: HTTPS Response (Self-Signed Cert)
# TLS 키·인증서 생성 : 공통 이름이 argocd.example.com 이어야 합니다
openssl req -x509 -nodes -days 365 -newkey rsa:2048 \
  -keyout argocd.example.com.key \
  -out argocd.example.com.crt \
  -subj "/CN=argocd.example.com/O=argocd"

ls -l argocd.example.com.*
-rw-r--r--@ 1 gasida  staff  1184 Nov  8 23:10 argocd.example.com.crt
-rw-------@ 1 gasida  staff  1704 Nov  8 23:10 argocd.example.com.key

openssl x509 -noout -text -in argocd.example.com.crt
...
        Issuer: CN=argocd.example.com, O=argocd
        Validity
            Not Before: Nov  8 14:10:14 2025 GMT
            Not After : Nov  8 14:10:14 2026 GMT
        Subject: CN=argocd.example.com, O=argocd
        ...
            X509v3 Basic Constraints: critical
                CA:TRUE

# Argo CD가 자신의 TLS를 쓰도록 argocd 네임스페이스에 tls 타입 시크릿 생성
kubectl create ns argocd

# tls 시크릿 생성 : key/crt 파일이 로컬에 있어야 함
kubectl -n argocd create secret tls argocd-server-tls \
  --cert=argocd.example.com.crt \
  --key=argocd.example.com.key

kubectl get secret -n argocd
NAME                TYPE                DATA   AGE
argocd-server-tls   kubernetes.io/tls   2      7s

# SSL-Passthrough : The 'tls: true' option will expect that the 'argocd-server-tls' secret exists as Argo CD server loads TLS certificates from this place.
## certificate.enabled=true 는 cert-manager가 있을 때만 동작하는 것 같네요
## 이번 실습환경 구성에서는 argocd-server-tls 를 사전에 만들어서 알아서 참조하는 구조네요. (다른 시크릿 사용시 certificateSecret 사용)
cat <<EOF > argocd-values.yaml
global:
  domain: argocd.example.com

# TLS certificate configuration via cert-manager # 해당 부분은 빼도 되겠네요
certificate:
  enabled: true

server:
  ingress:
    enabled: true
    ingressClassName: nginx
    annotations:
      nginx.ingress.kubernetes.io/force-ssl-redirect: "true"
      nginx.ingress.kubernetes.io/ssl-passthrough: "true"
    tls: true
EOF

# 설치 : Argo CD v3.1.9 , (참고) 책 버전 Argo CD v2.1 ~ v2.2
# https://github.com/argoproj/argo-helm/blob/main/charts/argo-cd/values.yaml
helm repo add argo https://argoproj.github.io/argo-helm
helm install argocd argo/argo-cd --version 9.0.5 -f argocd-values.yaml --namespace argocd

# 각 구성요소 확인
kubectl get-all -n argocd
kubectl get pod,ingress,svc,ep,secret,cm -n argocd

kubectl describe ingress -n argocd argocd-server
kubectl get ingress -n argocd argocd-server # 아래 address 에 localhost 는 배포 후 sync 까지 다소 시간 소요
NAME            CLASS   HOSTS                ADDRESS     PORTS     AGE
argocd-server   nginx   argocd.example.com   localhost   80, 443   6m42s

kubectl get ingress -n argocd argocd-server -o yaml | kubectl neat |yq
...
    nginx.ingress.kubernetes.io/force-ssl-redirect: "true"
    nginx.ingress.kubernetes.io/ssl-passthrough: "true"
  ...
  name: argocd-server
  namespace: argocd
spec:
  ingressClassName: nginx
  rules:
    - host: argocd.example.com
      http:
        paths:
          - backend:
              service:
                name: argocd-server
                port:
                  number: 443
            path: /
            pathType: Prefix
  tls:
    - hosts:
        - argocd.example.com
      secretName: argocd-server-tls
# tls.secretName은 Ingress 자체에 인증서를 붙이는 것처럼 보이지만, passthrough 모드에서도 일부 chart/환경은 이 값(시크릿 존재)을
# 요구할 수 있으니(특히 Argo Helm chart) 시크릿을 동일 네임스페이스에 만들어 두는 것이 안전합니다.


# 도메인 설정
## macOS의 /etc/hosts 파일 수정
echo "127.0.0.1 argocd.example.com" | sudo tee -a /etc/hosts
cat /etc/hosts

## C:\Windows\System32\drivers\etc\hosts 관리자모드에서 메모장에 내용 추가
127.0.0.1 argocd.example.com


# 접속 확인
curl -vk https://argocd.example.com/
kubectl -n ingress-nginx logs deploy/ingress-nginx-controller
kubectl -n argocd logs deploy/argocd-server

# 최초 접속 암호 확인
kubectl -n argocd get secret argocd-initial-admin-secret -o jsonpath="{.data.password}" | base64 -d ;echo
38L2ZmXne7jIaRSZ

# Argo CD 웹 접속 주소 확인 : 초기 암호 입력 (admin 계정)
open "http://argocd.example.com"
open "https://argocd.example.com"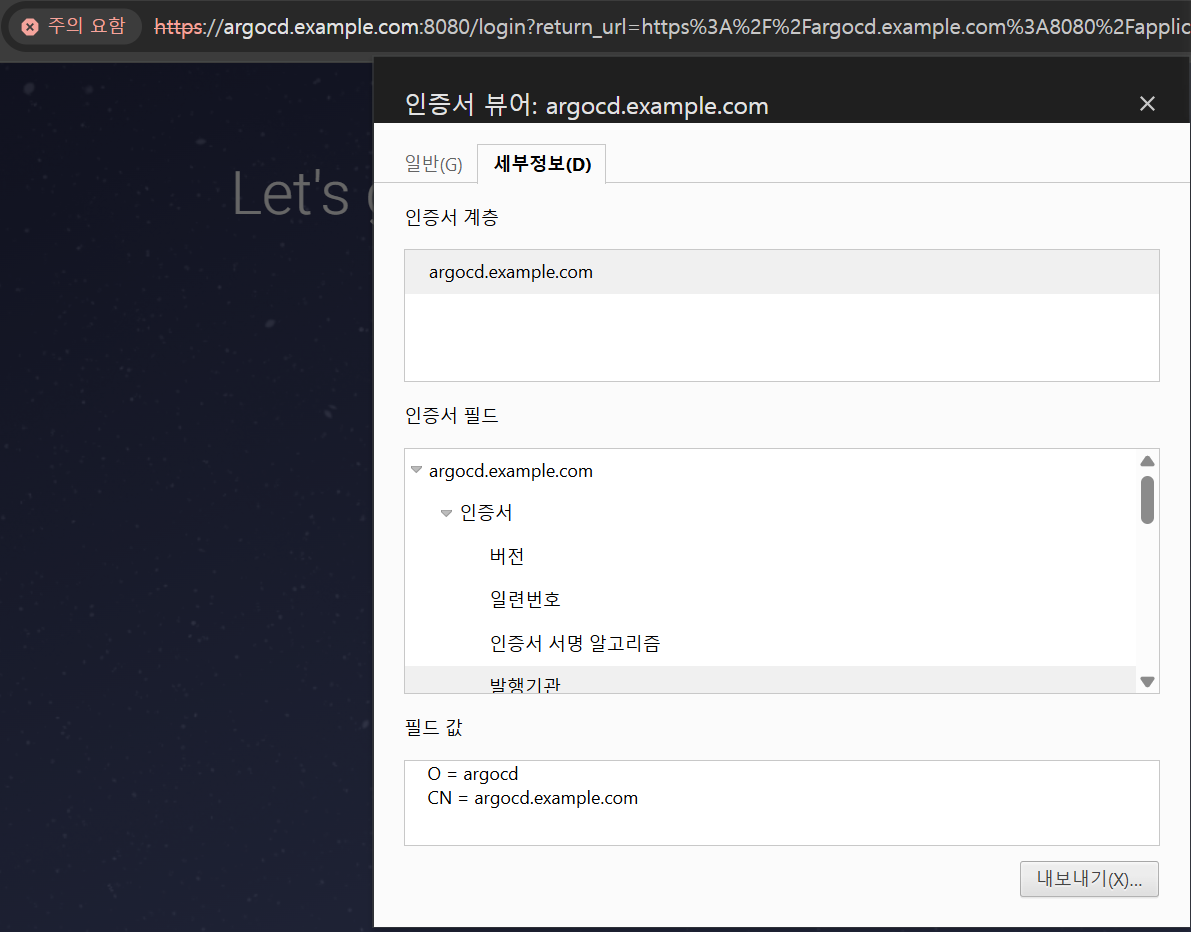
웹 브라우저에서 argocd web ui 접속 후 인증서 정보 확인 : 발급 기관에 O, CN 정보
# argocd 서버 cli 로그인
argocd login argocd.example.com --insecure
Username: admin
Password: 38L2ZmXne7jIaRSZ

# 확인
argocd account list
argocd proj list
argocd repo list
argocd cluster list
argocd app list
접근 제어 | 선언적 사용자 - Docs
1. 관리자 admin 계정
-
- Argo CD를 설치하면 admin시스템에 대한 전체 액세스 권한을 가진 기본 사용자 한 명이 생성됩니다.
- admin 비밀번호는 시크릿에 저장됨. 아래 마지막 % 기호는 프롬프트가 새 줄에서 시작하도록 CR/LF를 삽입한 것으로 제거하고 사용하면 됨.
kubectl get secret -n argocd argocd-initial-admin-secret --context kind-myk8s -o jsonpath='{.data.password}' | base64 -d
fNdOLSMFO83X1s8p%- 패드워드 변경 : UI (User-Info 탭 메뉴), CLI(argocd account update-password) - Docs
#
argocd account update-password
*** Enter password of currently logged in user (admin): fNdOLSMFO83X1s8p%
*** Enter new password for user admin: qwe12345
*** Confirm new password for user admin: qwe12345
Password updated
Context 'argocd.example.com' updated

# (참고) Update the password for user foobar
argocd account update-password --account foobar- 초기 구성 시에만 사용하고, 이후에는 로컬 사용자 계정으로 전환하거나 SSO 통합을 구성하는 것이 좋습니다. → 즉, 관리자 비활성화를 권장.
apiVersion: v1
kind: ConfigMap
metadata:
  name: argocd-cm
  namespace: argocd
  labels:
    app.kubernetes.io/name: argocd-cm
    app.kubernetes.io/part-of: argocd
data:
  admin.enabled: "false"
2. 작업을 수행할 최소 권한의 로컬 사용자 생성 - alice 사용자를 생성 - UI, CLI 모두 허용 - Docs
- argocd-cm 컨피드맵 구성
# alice 사용자 추가 : ui, cli
kubectl get cm -n argocd argocd-cm -o yaml
KUBE_EDITOR="nano"  kubectl edit cm -n argocd argocd-cm
  # add an additional local user with apiKey and login capabilities
  #   apiKey - allows generating API keys
  #   login - allows to login using UI
  accounts.alice: apiKey, login
  # disables user. User is enabled by default
  # accounts.alice.enabled: "false"
...
- 사용자 확인 및 암호 설정
# 사용자 확인
argocd account list
NAME   ENABLED  CAPABILITIES
admin  true     login
alice  true     apiKey, login

# if you are managing users as the admin user, <current-user-password> should be the current admin password.
argocd account update-password \
  --account alice \
  --current-password qwe12345 \
  --new-password alice12345
Password updated
# 혹은 argocd account update-password --account alice : 대화형 셸 사용 , 비밀번호가 셸 히스토리에 저장되지 않음.

# 변경된 내용 확인 : argocd-secret 에 새로운 사용자에 대한 값 추가 확인
kubectl get secret -n argocd argocd-secret -o jsonpath='{.data}' | jq
{
  "accounts.alice.password": "JDJhJDEwJE5QNkVISVdzR2dJUHBkbmNUVHA1WHV6Z0ZYL3JaZzY5UFE2ajlXaE9lLmtrRG9mV0VzUVRt",
  "accounts.alice.passwordMtime": "MjAyNS0xMS0wOVQwNToyMToxNlo=",
  "accounts.alice.tokens": "bnVsbA==",
  "admin.password": "JDJhJDEwJFBGbjFmM1dKZE51ZnpDcHYvTXRyZnVTejI3M2NGWklZLjBqQVdqZTZYMU96QXBJa1JiVE02",
  "admin.passwordMtime": "MjAyNS0xMS0wOVQwNToxMjo1OVo=",
  "server.secretkey": "SWhWbjd6bDVPUUUybzFHOUZ5NmpqNmhyaWNMemh2ZEt2Y1BRUkZxMW5WUT0="
}

# alice.token 은 아직 값이 없어서 null
kubectl get secret -n argocd argocd-secret -o jsonpath='{.data.accounts\.alice\.tokens}' | base64 -d ; echo
null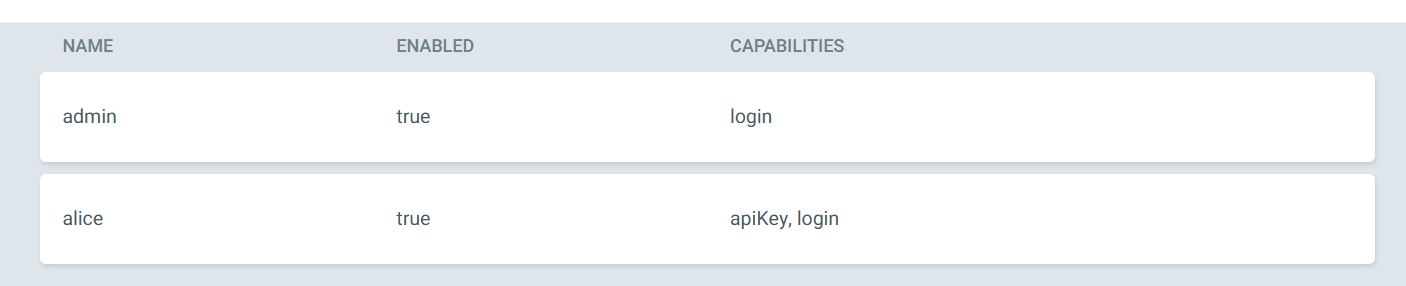
- 샘플 애플리케이션 배포 - Guestbook
# guestbook helm 차트 애플리케이션 생성
cat <<EOF | kubectl apply -f -
apiVersion: argoproj.io/v1alpha1
kind: Application
metadata:
  name: guestbook
  namespace: argocd
  finalizers:
  - resources-finalizer.argocd.argoproj.io
spec:
  project: default
  source:
    helm:
      valueFiles:
      - values.yaml
    path: helm-guestbook
    repoURL: https://github.com/argoproj/argocd-example-apps
    targetRevision: HEAD
  syncPolicy:
    automated:
      enabled: true
      prune: true
      selfHeal: true
    syncOptions:
    - CreateNamespace=true
  destination:
    namespace: guestbook
    server: https://kubernetes.default.svc
EOF

#
kubectl get applications -n argocd guestbook
kubectl get applications -n argocd guestbook -o yaml | kubectl neat | yq
kubectl get pod,svc,ep -n guestbook
- argo ui admin logout 후 → alice 로그인 후 확인 : 권한이 없으므로, application 이나 cluster 정보 안보임!

3. 권한 부여 RBAC : 1) 사용자에게 특정 권한을 부여, 2) 부여할 기본 정책을 설정
목표 : 기본 정책을 읽기 전용으로 설정하고 액세스 토큰을 사용할 때 특정 권한을 부여받는 방법을 알아보자 → RBAC 설정 - Docs
- RBAC
- RBAC 기능은 Argo CD 리소스에 대한 액세스를 제한할 수 있도록 합니다.
- Argo CD에는 자체 사용자 관리 시스템이 없으며 기본 사용자(admin) 하나만 있습니다.
- admin사용자는 슈퍼유저이며 시스템에 대한 무제한 액세스 권한을 갖습니다.
- RBAC를 사용하려면 SSO 구성 또는 하나 이상의 로컬 사용자 설정이 필요합니다 .
- SSO 또는 로컬 사용자를 구성한 후에는 추가 RBAC 역할을 정의하고 SSO 그룹 또는 로컬 사용자를 역할에 매핑할 수 있습니다.
- RBAC 구성을 정의할 수 있는 두 가지 주요 구성 요소
- 글로벌 RBAC 구성 맵( argo-rbac-cm.yaml 참조 )
- AppProject 의 역할
- 기본 내장 역할 : Argo CD에는 두 가지 사전 정의된 역할이 있지만 RBAC 구성을 사용하면 역할과 그룹을 정의할 수 있습니다(아래 참조).
- role:readonly : 모든 리소스에 대한 읽기 전용 액세스
- role:admin : 모든 리소스에 대한 무제한 액세스
- 사용자가 Argo CD에서 인증되면 policy.default 에 지정된 역할이 부여됩니다
- rbac 설정
#
kubectl get cm -n argocd argocd-rbac-cm -o jsonpath='{.data}' | jq
{
  "policy.csv": "",
  "policy.default": "",
  "policy.matchMode": "glob",
  "scopes": "[groups]"
}

#
KUBE_EDITOR="nano" kubectl edit cm -n argocd argocd-rbac-cm
policy.default: role:readonly- alice 로그인 상태에서 새로고침하여 app, cluster 정보 확인
#
argocd login argocd.example.com --insecure --username alice
Password: alice12345
'alice:login' logged in successfully
Context 'argocd.example.com' updated

#
argocd cluster list
argocd app list
NAME              CLUSTER                         NAMESPACE  PROJECT  STATUS  HEALTH   SYNCPOLICY  CONDITIONS  REPO                                             PATH            TARGET
argocd/guestbook  https://kubernetes.default.svc  guestbook  default  Synced  Healthy  Auto-Prune  <none>      https://github.com/argoproj/argocd-example-apps  helm-guestbook  HEAD

- admin 계정 비활성화
#
KUBE_EDITOR="nano"  kubectl edit cm -n argocd argocd-cm
  admin.enabled: "false"

#
argocd account list
NAME       ENABLED  CAPABILITIES
admin      false    login
alice      true     apiKey, login
접근제어 | 서비스 어카운트
4. 서비스 어카운트 - Docs
- 서비스 어카운트는 CI/CD 파이프라인과 같은 자동화를 시스템에 인증하는 데 사용하는 계정이다.
- 사용자를 비활성화하거나 권한을 제어하면 파이프라인이 실패할 수 있기 때문에 사용자와 연결돼서는 안 된다.
- 서비스 어카운트는 엄격하게 권한을 제한해야 하고 파이프라인에서 수행하는 것 이상의 권한이 있으면 안 된다.
- 반면 실제 사용자는 더 다양한 리소스에 접근할 수 있어야 한다.
- Argo CD에서 서비스 어카운트를 생성하는 방법은 두 가지가 있다.
- 첫 번째는 login 기능은 제거하고 api 키만을 사용하는 로컬 사용자이고, 둘째는 프로젝트 역할을 사용하고 그 역할에 토큰을 할당하는 것이다.
5. 로컬 서비스 어카운트 RBAC
- apikey 만 활성화된 별도의 로컬 계정을 만들자.
- 이 경우 사용자는 ui나 cli 에 대한 암호가 없고 api 키를 생성한 후에만 접근이 가능하다.
- 특정 애플리케이션에 대한 동기화를 시작할 수 있는 권한과 같은 특정 권한을 부여할 것이다.
- apikey 만 활성화된 별도의 로컬 계정 생성
- 새 계정을 만들 후에는 액세스 토큰을 생성해야 된다. 현재 admin 계정은 비활성화 되었고, alice 는 토큰 생성 권한이 없다.
#
KUBE_EDITOR="nano"  kubectl edit cm -n argocd argocd-cm
  accounts.gitops-ci: apiKey

#
argocd account list
NAME       ENABLED  CAPABILITIES
admin      false    login
alice      true     apiKey, login
gitops-ci  true     apiKey

# 계정 토큰 생성 시도
argocd account generate-token -a gitops-ci- alice 사용자에게 계정 업데이트 권한을 할당 : user-update 새 역할을 생성하고 사용자에게 이 역할을 할당 - Docs
# p 경우 정책을 정의, g 경우 사용자 또는 그룹에 역할을 연결 할 때 사용
KUBE_EDITOR="nano"  kubectl edit cm -n argocd argocd-rbac-cm
  policy.csv: |
    p, role:user-update, accounts, update, *, allow
    p, role:user-update, accounts, get, *, allow
    g, alice, role:user-update

# 계정 토큰 생성 시도
argocd account generate-token -a gitops-ci
eyJhbGciOiJIUzI1NiIsInR5cCI6IkpXVCJ9.eyJpc3MiOiJhcmdvY2QiLCJzdWIiOiJnaXRvcHMtY2k6YXBpS2V5IiwibmJmIjoxNzYyNjY4MTE1LCJpYXQiOjE3NjI2NjgxMTUsImp0aSI6IjM0MTEyZTdmLWExZTItNDM3Zi1hMDdlLWRkNWVjNmZjY2JhMCJ9.Wj-mG8HRE4FYMPZ1TCRKwVME6UBb9l4el9hUPSkoEiU

# 토큰 작동 확인
argocd account get-user-info --auth-token eyJhbGciOiJIUzI1NiIsInR5cCI6IkpXVCJ9.eyJpc3MiOiJhcmdvY2QiLCJzdWIiOiJnaXRvcHMtY2k6YXBpS2V5IiwibmJmIjoxNzYyNjY4MTE1LCJpYXQiOjE3NjI2NjgxMTUsImp0aSI6IjM0MTEyZTdmLWExZTItNDM3Zi1hMDdlLWRkNWVjNmZjY2JhMCJ9.Wj-mG8HRE4FYMPZ1TCRKwVME6UBb9l4el9hUPSkoEiU
Logged In: true
Username: gitops-ci
Issuer: argocd
Groups:- 새로 생성된 서비스 어카운트의 경우 권한을 지정하지 않았으므로 기본 권한인 읽기 전용 액세스만 가능한다.
- 물론 읽기 권한만 있는 토큰을 생성하는 것은 그다지 의미가 없다.
- 일반적으로 새 클러스터 등록 또는 등록 취소, 사용자 생성 또는 제거, 애플리케이션 생성 혹은 동기화 등과 같은 작업을 수행해야 한다.
- 로컬 계정을 RBAC 그룹에 포함시킬 수는 없고, 역할을 로컬 사용자에게 할당할 수만 있다.
6. 프로젝트 역할과 토큰 TOKEN
- 프로젝트 역할은 서비스 어카운트에서 사용할 수 있는 두 번째 옵션이다.
- 애플리케이션 프로젝트는 역할을 통해 애플리케이션 정의에 일부 제약 조건을 적용하는 방식이다.
- 상태를 가져오는 리포지터리, 대상 클러스터나 배포할 수 있는 네임스페이스를 지정할 수 있고, 설치할 수 있는 리소스 유형을 필터링할 수도 있다.
- 예를 들어 이 프로젝트를 사용하는 애플리케이션은 시크릿을 배포할 수 없도록 할 수 있다.
- 이 외에도 프로젝트 역할을 생성하고, 할 수 있는 작업의 종류를 제한하고 역할에 토큰을 할당할 수 도 있다.
- Argo CD가 설치되면 default 라는 기본 프로젝트가 제공되는데, 기본 프로젝트는 애플리케이션에 대한 제한 사항이 설정돼 있지 않다.
# ‘*’ 표시로 모든 것에 대해서 허용돼 있다.
kubectl get appprojects.argoproj.io -n argocd default -o yaml | k neat | yq
apiVersion: argoproj.io/v1alpha1
kind: AppProject
metadata:
  name: default
  namespace: argocd
spec:
  clusterResourceWhitelist:
    - group: '*'
      kind: '*'
  destinations:
    - namespace: '*'
      server: '*'
  sourceRepos:
- '*'- 프로젝트를 토큰과 함께 사용하는 방법을 확인하기 위해 새 프로젝트를 만들고 기존 argocd 애플리케이션에 사용해볼 것이다.
- 일단 새 프로젝트를 만들면 프로젝트에 사용할 역할을 생성하고 역할에 권한을 할당하고 토큰을 생성해야 한다.
- AppProject 신규 생성
#
cat <<EOF | kubectl apply -f -
apiVersion: argoproj.io/v1alpha1
kind: AppProject
metadata:
  name: sample-apps
  namespace: argocd
spec:
  roles:
    - name: read-sync
      description: read and sync privileges
      policies:
        - p, proj:sample-apps:read-sync, applications, get, sample-apps/*, allow
        - p, proj:sample-apps:read-sync, applications, sync, sample-apps/*, allow
  clusterResourceWhitelist:
    - group: '*'
      kind: '*'
  description: Project to configure argocd self-manage application
  destinations:
    - namespace: test
      server: https://kubernetes.default.svc
  sourceRepos:
    - https://github.com/argoproj/argocd-example-apps.git
EOF


#
kubectl get appproject -n argocd
NAME          AGE
default       92m
sample-apps 4m6s- 대상 네임스페이스와 클러스터를 제한하고, 정해진 리포지터리로부터 상태 파일을 가져옴.

- read and sync 라는 역할을 생성하고 AppProject 내의 모든 애플리케이션에 대한 가져오기, 동기화 작업만 허용.

- 해당 프로젝트에 app 배포
# 애플리케이션 생성
cat <<EOF | kubectl apply -f -
apiVersion: argoproj.io/v1alpha1
kind: Application
metadata:
name: pre-post-sync
namespace: argocd
finalizers:
- resources-finalizer.argocd.argoproj.io
spec:
project: sample-apps
source:
path: pre-post-sync
repoURL: https://github.com/argoproj/argocd-example-apps
targetRevision: master
destination:
namespace: test
server: https://kubernetes.default.svc
syncPolicy:
automated:
enabled: false
syncOptions:
- CreateNamespace=true
EOF
#
argocd app list
NAME CLUSTER NAMESPACE PROJECT STATUS HEALTH SYNCPOLICY CONDITIONS REPO PATH TARGET
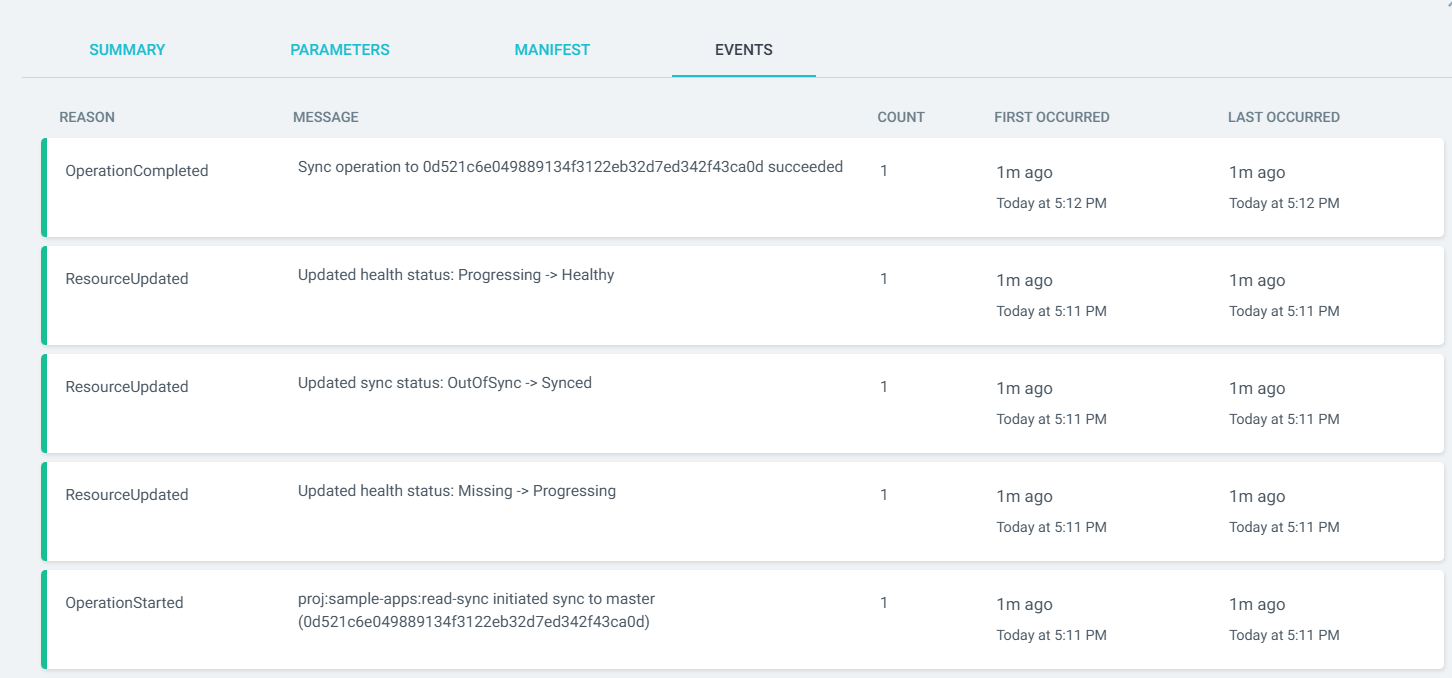
argocd/pre-post-sync https://kubernetes.default.svc sync-test sample-apps OutOfSync Missing Manual <none> https://github.com/argoproj/argocd-example-apps pre-post-sync master
# 동기화 실행 시 실패!
argocd app sync argocd/pre-post-sync
{"level":"fatal","msg":"rpc error: code = PermissionDenied desc = permission denied: applications, sync, sample-apps/pre-post-sync, sub: alice, iat: 2025-11-09T05:41:55Z","time":"2025-11-09T16:12:09+09:00"}- 읽기 및 동기화 역할에 대한 토큰을 통해 수행해보자
# RBAC 수정해 필요한 권한 추가
KUBE_EDITOR="nano" kubectl edit cm -n argocd argocd-rbac-cm
data:
policy.csv: |
p, role:user-update, accounts, update, *, allow
p, role:user-update, accounts, get, *, allow
p, role:user-update, projects, update, sample-apps, allow
g, alice, role:user-update
# 역할에 대한 토큰 생성
argocd proj role create-token sample-apps read-sync
Create token succeeded for proj:sample-apps:read-sync.
ID: 7e135311-8658-449a-9b08-33ac05afdd19
Issued At: 2025-11-09T16:37:24+09:00
Expires At: Never
Token: eyJhbGciOiJIUzI1NiIsInR5cCI6IkpXVCJ9.eyJpc3MiOiJhcmdvY2QiLCJzdWIiOiJwcm9qOnNhbXBsZS1hcHBzOnJlYWQtc3luYyIsIm5iZiI6MTc2MjY3Mzg0NCwiaWF0IjoxNzYyNjczODQ0LCJqdGkiOiI3ZTEzNTMxMS04NjU4LTQ0OWEtOWIwOC0zM2FjMDVhZmRkMTkifQ.Gv4QI1wDzkIown6_NPVaQ2-Lz5fyDtltXRKiDL4KbWg
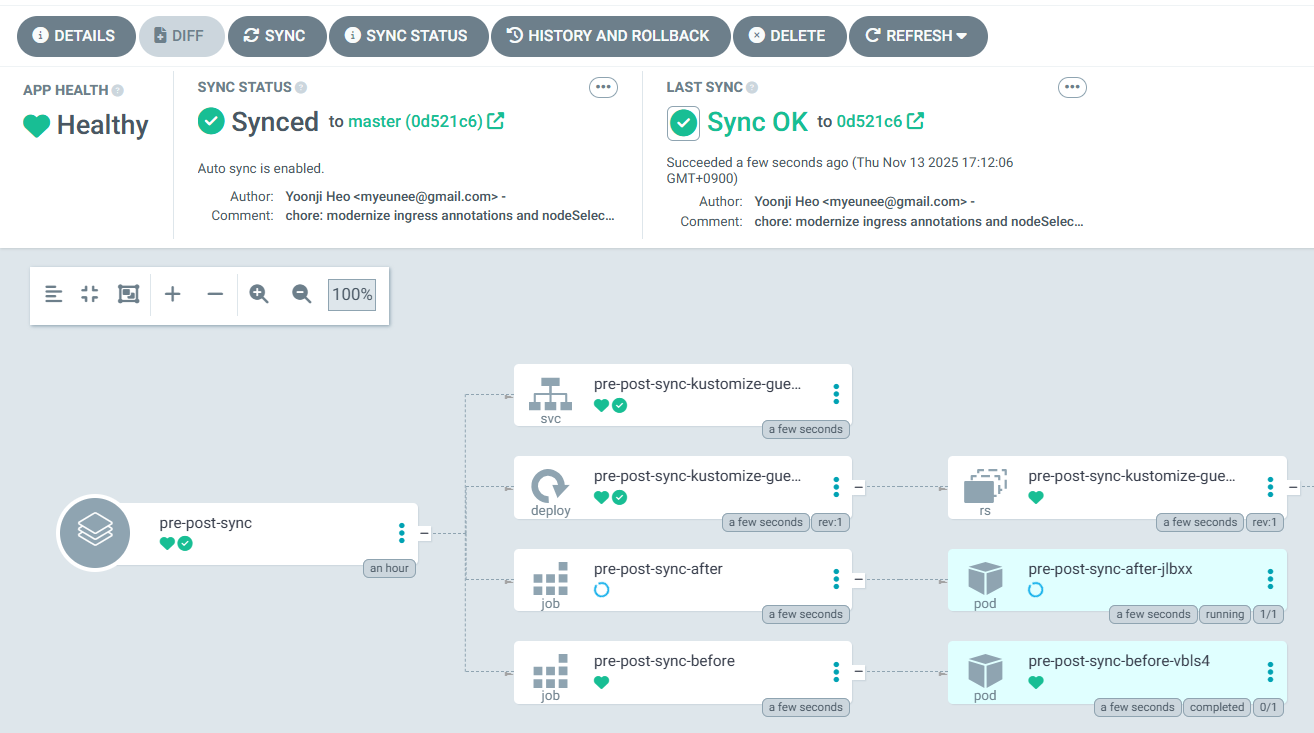
# 해당 토큰으로 애플리케이션을 수동으로 동기화할 수 있다.
argocd app sync argocd/pre-post-sync
TOKEN=eyJhbGciOiJIUzI1NiIsInR5cCI6IkpXVCJ9.eyJpc3MiOiJhcmdvY2QiLCJzdWIiOiJwcm9qOnNhbXBsZS1hcHBzOnJlYWQtc3luYyIsIm5iZiI6MTc2MjY3Mzg0NCwiaWF0IjoxNzYyNjczODQ0LCJqdGkiOiI3ZTEzNTMxMS04NjU4LTQ0OWEtOWIwOC0zM2FjMDVhZmRkMTkifQ.Gv4QI1wDzkIown6_NPVaQ2-Lz5fyDtltXRKiDL4KbWg
argocd app sync argocd/pre-post-sync --auth-token $TOKEN- 생성되는 모든 토큰은 프로젝트 역할에 저장된다. 이 토큰을 사용한 시간과 교체할 시기가 됐는지 확인할수 있다.
- 제한된 시간 동안 토큰을 사용하고자 한다면 토큰의 만료 일자를 설정할 수도 있다.
- 반면에 교체 시기를 짧게 지정하면 Argo CD를 관리하는 엔지니어는 일정 관리를 철저하게 해야 한다.
- 프로젝트 역할은 애플리케이션 리소스에 대한 작업을 수행하는 데에만 사용할 수 있고,
- 그 애플리케이션은 역할이 생성된 프로젝트 내에 존재해야 하므로 범위가 상당히 제한적이다.
- 그러나 이런 제한 사항이 오히려 보안적으로는 파이프라인에 공격 가능한 범위가 줄어드는 등 장점이 되기도 한다.
접근제어 | SSO
- SSO를 사용하면 마스터 로그인을 할 수 있으며, 이를 기반으로 다른 독립적인 애플리케이션에 대한 권한을 부여받을 수 있다.
- 예를 들어 argocd.mycompany.com 에 접근하려는 경우, argocd.mycompany.com은 외부 공급자를 신뢰해 서용자의 신원을 확인한다.
- 또한 argocd.mycompany.com에 대한 접근 유형은 외부 마스터 시스템에서 사용자의 소속 그룹 또는 계정 설정에 따라 제어할 수 있다.
- Argo CD는 두 가지 방법으로 SSO 기능을 제공한다.
- 하나는 기본적으로 설치되는 Dex OIDC 공급자를 사용하는 것이고, 다른 하나는 dex 설치 없이 다른 OIDC 공급자를 통해 Argo CD를 직접 사용하는 것이다.
- Argo CD는 UI 및 CLI에서 SSO 로그인을 제공한다.
- SSO를 활성화한 상태에서 로그인 할수 있는 로컬 계정이 없고 관리자가 비활성화된 경우, 사용자/비밀번호 입력 양식이 UI에서 자동으로 제거되고 SSO를 통한 로그인 버튼만 남게 된다.

- admin 계정 다시 활성화
#
KUBE_EDITOR="nano" kubectl edit cm -n argocd argocd-cm
  admin.enabled: "true"

#
argocd login argocd.example.com --username admin --password qwe12345 --insecure
argocd app list
1. Keycloak 소개 : 애플리케이션에 초점을 맞춘 오픈 소스 ID 및 접근(권한) 관리 도구 - Home
- Keycloak 은 강력한 인증을 포함해 완전히 사용자의 입맛에 맞게 설정할 수 있는 로그인 페이지를 제공하며 암호 복구, 주기적인 암호 업데이트 설정, 이용 약관 동의 등과 같은 다양한 기능을 제공한다.
- 해당 기능들을 애플리케이션에 포함시키지 위해 추가적인 설정이나 코딩을 할 필요가 전혀 없다.
- Keycloak 을 통해 인증을 수행하면 애플리케이션의 서로 다른 인증 매커니즘이나 암호 저장의 안전성에 대해 걱정할 필요가 없다.
- 또한 이런 방법은 애플리케이션이 사용자 자격증명에 직접 접근하지 않고 필요한 항목에만 접근할 수 있는 보안 토큰을 제공해 더 높은 수준의 보안을 제공한다.
- Keycloak 은 세션 관리 기능뿐만 아니라 SSO Single Sign-On 기능을 제공해 사용자가 한 번만 인증하면 여러 애플리케이션에 접근할 수 있다.
- 사용자와 관리자 모두 사용자가 인증된 위치를 정확하게 파악할 수 있으며 필요한 경우 원격으로 세션을 종료할 수 있다.
- Keycloak 은 OAuth 2.0, OpenID Connect, SAML 2.0을 지원하는 업계 표준 프로토콜을 기반으로 한다.

- Keycloak 은 자체 사용자 데이터베이스를 갖고 있기 때문에 별다른 설정 없이도 사용할 수 있다. 또한 기존 인증 인프라스트럭처와 손쉽게 통합할 수 있다.
- ID 브로커링 identity brokering 기능을 통해 소셜 네트워크 또는 다른 엔터프라이즈 ID 공급자의 기존 사용자 데이터를 연동할 수 있다.

- 또한 Active Directory 및 LDAP 서버와 같은 기존 사용자 디렉터리와 통합할 수도 있다.

- Keycloak 은 가볍고 설치가 쉬운 솔루션이다. 클러스터링 기능을 통해 고가용성을 제공한다.
- 좀 더 고도화된 이중화를 구현하는 경우 여러 데이터 센터에 대한 클러스터링도 지원한다.
- Keycloak 은 높은 사용자 정의 및 확장성을 가진다.
- Keycloak 사용자 정의 코드 custom code 를 구현 및 배포해 기존 동작을 수정하거나 완전히 새로운 기능을 추가할 수 있는 확장 가능한 부분이 많다.
- Keycloak 에 적용할 수 있는 확장에는 custom 인증 메커니즘, custom 사용자 정의소 user stores 그리고 custom 토큰 연동 등이 그 예다.
- 또한 사용자 고유의 로그인 프로토콜을 사용할 수 있다.
2. admin 콘솔 : realm, user, group, role 생성
- 관리 콘솔 접속 (관리자 계정 이름/암호 사용) http://localhost:8080/admin
- 로그인 시 Keycloak 의 master realm 설정이 표시됨.
- Realm 생성 및 설정 참고) 발음 (렐름, 렘~ ) - Realm
- 가장 먼저 해야 할 일은 애플리케이션과 사용자를 위한 realm (영역)을 만드는 것입니다. realm (영역)을 테넌트 tenant 라고 생각하면 됩니다.
- realm은 다른 realm과 서로 완전히 독립적이며 각 realm은 자체 설정과 애플리케이션 및 사용자를 갖습니다.
- 신규 realm을 생성하려면 좌측 상단 모서리(로고 왼쪽)에 있는 메뉴 아이콘을 클릭하여 메뉴를 확장하세요.
- Realm name : myrealm (이름이 URL에 사용되니, URL에 이스케이프가 필요한 특수 문자 사용하지 않기를 권장) → 하단 Create
- ⇒ 이후 왼쪽 메뉴 Realm settings 클릭 → General 에서 Display name 설정
- Endpoint (기본값) : OpenID Endpoint, SAML 2.0
- user 생성
- 왼쪽 메뉴 Users 클릭 후 → Add user 클릭 ⇒ 아래 항목 입력 후 → Create
- Username : keycloak
- Email : keycloak@keycloak.org
- First name : Ola
- Last name : Nordmann
- 이후 User 클릭 후 → Credentials 진입 후 → Set password 클릭
- Password : <각자 편하게 입력>
- Temporary : Off (참고 : ON 설정 시, 사용자 첫 로그인 시 비밀번호 변경 작업 필요)
- 왼쪽 메뉴 Users 클릭 후 → Add user 클릭 ⇒ 아래 항목 입력 후 → Create
- group 생성
- 왼쪽 메뉴 Groups 클릭 후 → Create group 클릭 후 mygroup 입력 후 Create 클릭하여 생성
- 그룹에 속성 추가 가능 → 그룹에 포함된 사용자는 모두 속성을 상속 받음
- 그룹에 역할 부여 가능 → 그룹에 포함된 사용자는 모두 역할을 상속 받음
- 왼쪽 메뉴 Users 클릭 후 → 해당 User 에서 Groups 진입 후 → Join Group 클릭 후 위에서 만든 그룹에 Join 하자.
- 왼쪽 메뉴 Groups 클릭 후 → Create group 클릭 후 mygroup 입력 후 Create 클릭하여 생성
- global role 생성
- Keycloak Role 구분
- Realm Role 영역 역할
- **전체 Realm(영역)**에서 공통으로 사용되는 역할입니다. 모든 클라이언트(Client)에서 공통적으로 적용할 수 있음. Keycloak에서 'Global Role(글로벌 역할)'이라는 용어는 공식 용어로 따로 명시되어 있진 않지만, 일반적으로 'Realm 단위로 전체 사용자에게 적용할 수 있는 역할’
- 예: admin, user, operator 등.
- Realm Role은 Access Token의 realm_access 클레임에 포함됩니다.
- **전체 Realm(영역)**에서 공통으로 사용되는 역할입니다. 모든 클라이언트(Client)에서 공통적으로 적용할 수 있음. Keycloak에서 'Global Role(글로벌 역할)'이라는 용어는 공식 용어로 따로 명시되어 있진 않지만, 일반적으로 'Realm 단위로 전체 사용자에게 적용할 수 있는 역할’
- Realm Role 영역 역할
"realm_access": {
  "roles": ["user", "admin"]
}- Client Role 클라이언트 역할
- 특정 Client(애플리케이션)에만 적용되는 역할입니다.
- 예: my-app 클라이언트에 viewer, editor 역할 정의.
- Client Role은 Access Token의 resource_access 클레임에 포함됩니다.
- 특정 Client(애플리케이션)에만 적용되는 역할입니다.
"resource_access": {
  "my-app": {
    "roles": ["viewer", "editor"]
  }
}- Composite Role 복합(통합) 역할
- 여러 개의 Role 을 하나로 묶은 역할입니다.
- 예: admin Composite Role - 포함 역할 user (Realm role), manager-users/view-reports (Client role)
- 이 경우 admin Composite Role 을 사용자에게 부여하면, 자동으로 위 3개의 하위 역할도 함께 부여됨.
- 여러 개의 Role 을 하나로 묶은 역할입니다.
# 토큰에는 아래 처럼 표시
"realm_access": {
  "roles": ["admin", "user"]
},
"resource_access": {
  "my-app": {
    "roles": ["manage-users", "view-reports"]
  }
}- Composite Role 은 다른 Composite Role도 포함할 수 있다. 이 기능은 매우 강력할 수 있지만 그와 동시에 주의해서 사용해야 한다.
- Composite Role 은 관리가 어렵고, 특히 Composite Role의 계층이 많을 경우 성능 저하가 발생할 수 도 있다.
- 왼쪽 메뉴 Relam roles 클릭 후 Create role 클릭 → Role name (myrole) 후 하단 Save 클릭
- 왼쪽 메뉴 Users 클릭 후 생성 된 User 클릭 후 Role mapping 클릭 후 Assign role 클릭 → myrole 선택 후 하단 Assign 클릭
- 첫 번째 애플리케이션의 보안과 관련된 초기 설정이 모두 마쳤다.
- 이제 사용자가 자신의 계정을 관리할 수 있는 Keycloak account console 을 알아본다.
Keycloak account 콘솔
- Keycloak account 콘솔은 사용자가 자신의 계정을 관리할 수 있는 인터페이스를 제공한다.
- 사용자 프로필 업데이트
- 사용자 패스워드 업데이트
- 2단계 인증 활성화
- 애플리케이션 보기 인증된 애플리케이션 포함
- 현재 세션 보기 다른 세션에서 원격 로그아웃 포함
- account 콘솔 접근 : http://localhost:8080/realms/myrealm/account → ‘keycloak / 암호’ 로그인 해보기
- 참고로 admin 콘솔에서 Clients 클릭 시, 각 클라이언트 ID 옆에 Home URL 로 account console URL 확인 가능
- [직접 연동] 흐름 : User — Application(ArgoCD, client 역할) — Keycloak(인증 서버 역할)
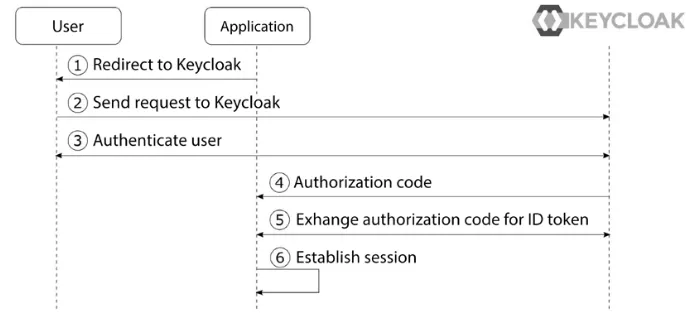
- OpenID Connect의 권한 부여 코드 흐름
OpenID Connect authorization code flow simplied
- OpenID Connect의 권한 부여 코드 흐름
- **애플리케이션(ArgoCD)**은 인증 요청을 준비하고 사용자 브라우저를 Keycloak으로 리디렉션하도록 요청합니다.
- 사용자 브라우저는 사용자를 권한 부여 엔드포인트라는 엔드포인트에서 Keycloak으로 리디렉션합니다.
- 사용자가 아직 Keycloak에 인증되지 않은 경우, Keycloak은 사용자를 인증합니다.
- **애플리케이션(ArgoCD)**은 Keycloak으로부터 인증 응답의 형태로 권한 부여 코드를 수신합니다.
- 애플리케이션은 Keycloak의 토큰 엔드포인트로 토큰 요청을 통해 권한 부여 코드를 ID 토큰과 액세스 토큰으로 교환합니다.
- 이제 애플리케이션은 사용자의 신원을 확인하는 데 사용할 수 있는 ID 토큰을 확보하고, 사용자에 대한 인증된 세션을 설정할 수 있습니다.
- [직접 연동] keycloak 배포 및 기본 설정
# 도커에서 컨테이너로 Keycloak 실행
# 기본 관리자 계정이 제공되지 않아, 환경 변수로 초기 관리자 계정 생성
docker run -d -e KEYCLOAK_ADMIN=admin -e KEYCLOAK_ADMIN_PASSWORD=admin --net host --name dev-keycloak quay.io/keycloak/keycloak:22.0.0 start-dev

# 확인
docker ps
CONTAINER ID   IMAGE                              COMMAND                  CREATED         STATUS         PORTS                                                   NAMES
db56c9925eff   quay.io/keycloak/keycloak:22.0.0   "/opt/keycloak/bin/k…"   7 seconds ago   Up 6 seconds   0.0.0.0:8080->8080/tcp, [::]:8080->8080/tcp, 8443/tcp   dev-keycloak

docker logs dev-keycloak
...
2025-10-13 13:52:35,966 INFO  [org.keycloak.services] (main) KC-SERVICES0050: Initializing master realm
2025-10-13 13:52:36,845 INFO  [io.quarkus] (main) Keycloak 22.0.0 on JVM (powered by Quarkus 3.2.0.Final) started in 4.856s. Listening on: http://0.0.0.0:8080
2025-10-13 13:52:36,845 INFO  [io.quarkus] (main) Profile dev activated.
2025-10-13 13:52:36,845 INFO  [io.quarkus] (main) Installed features: [agroal, cdi, hibernate-orm, jdbc-h2, jdbc-mariadb, jdbc-mssql, jdbc-mysql, jdbc-oracle, jdbc-postgresql, keycloak, logging-gelf, micrometer, narayana-jta, reactive-routes, resteasy, resteasy-jackson, smallrye-context-propagation, smallrye-health, vertx]
2025-10-13 13:52:36,941 INFO  [org.keycloak.services] (main) KC-SERVICES0009: Added user 'admin' to realm 'master'
2025-10-13 13:52:36,943 WARN  [org.keycloak.quarkus.runtime.KeycloakMain] (main) Running the server in development mode. DO NOT use this configuration in production.

docker exec -it dev-keycloak java --version
openjdk 17.0.8 2023-07-18 LTS

docker images
docker history quay.io/keycloak/keycloak:22.0.0 --no-trunc --format json | jq
{
  "Comment": "buildkit.dockerfile.v0",
  "CreatedAt": "2023-08-10T00:27:54+09:00",
  "CreatedBy": "ENTRYPOINT [\"/opt/keycloak/bin/kc.sh\"]",
  "CreatedSince": "2 years ago",
  "ID": "sha256:456b66461f4b63c7a42de1981b8f72052087c84df460b57db013c7d6fc7aed3e",
  "Size": "0B"
...

docker exec -it dev-keycloak ls -l /opt/keycloak/bin
docker exec -it dev-keycloak cat /opt/keycloak/bin/kc.sh

docker exec -it dev-keycloak id
uid=1000(keycloak) gid=0(root) groups=0(root)

# admin 웹 콘솔 접속 : admin / admin
open http://localhost:8080/admin

# 로그 모니터링 걸어두기
docker logs dev-keycloak -f- 관리자 웹 로그인 : admin / admin
- bob 유저 생성 : 암호 bob123
- [직접 연동] keycloak 에 argo cd 를 위한 client 생성
- client id : argocd
- name : argocd client
- client auth : ON
- Root URL : https://argocd.example.com/
- Home URL : /applications
- Valid redirect URIs : https://argocd.example.com/auth/callback
- Valid post logout redirect URIs : https://argocd.example.com/applications
- Web origins : +
- [직접 연동] Configuring ArgoCD OIDC
- 클라이언트 시크릿 설정
#
kubectl -n argocd patch secret argocd-secret --patch='{"stringData": { "oidc.keycloak.clientSecret": "<REPLACE_WITH_CLIENT_SECRET>" }}'
kubectl -n argocd patch secret argocd-secret --patch='{"stringData": { "oidc.keycloak.clientSecret": "mV3IZO3nmHoZr3BBC37UpdrMSMkF9Umt" }}'

# 확인
kubectl get secret -n argocd argocd-secret -o jsonpath='{.data}' | jq
...
"oidc.keycloak.clientSecret": "bVYzSVpPM25tSG9acjNCQkMzN1VwZHJNU01rRjlVbXQ=",- Now we can configure the config map and add the oidc configuration to enable our keycloak authentication.
# 아래 '192.168.254.110'는 자신의 로컬 IP로 keycloak 컨테이너와 myk8s-control-plane 컨테이너 및 argocd-server 파드 모두가 통신 가능해야 함!
# 예시) 모임장의 경우 아래 처럼 192.168.254.110이 mac 에 local IP로 컨테이너들과 파드 모두 통신 가능함.
ifconfig | grep 192.
        inet 192.168.254.110 netmask 0xffffff00 broadcast 192.168.254.255

KUBE_EDITOR="nano"  kubectl edit cm -n argocd argocd-cm
...
data:
  url: https://argocd.example.com # 맨 아래 있음
  oidc.config: |
    name: Keycloak
    issuer: http://192.168.254.110:8080/realms/master
    clientID: argocd
    clientSecret: mV3IZO3nmHoZr3BBC37UpdrMSMkF9Umt
requestedScopes: ["openid", "profile", "email"]- argocd 서버 재시작
kubectl rollout restart deploy argocd-server -n argocd- Now that we have an authentication that provides groups we want to apply a policy to these groups.
# 그룹에 정책 맵핑 시
KUBE_EDITOR="nano"  kubectl edit cm -n argocd argocd-rbac-cm
data:
  policy.default: role:readonly
  policy.csv: |
    g, keycloak-admin, role:admin
    g, keycloak-dev, role:developer

#
KUBE_EDITOR="nano"  kubectl edit cm -n argocd argocd-cm
...
data:
  url: https://argocd.example.com # 맨 아래 있음
  oidc.config: |
    name: Keycloak
    issuer: http://192.168.254.110:8080/realms/master
    clientID: argocd
    clientSecret: mV3IZO3nmHoZr3BBC37UpdrMSMkF9Umt
    requestedScopes: ["openid", "profile", "email" , "groups"]

# keycloak 에 group 관련 설정 : ..- [직접 연동] keycloak 인증을 통한 로그인
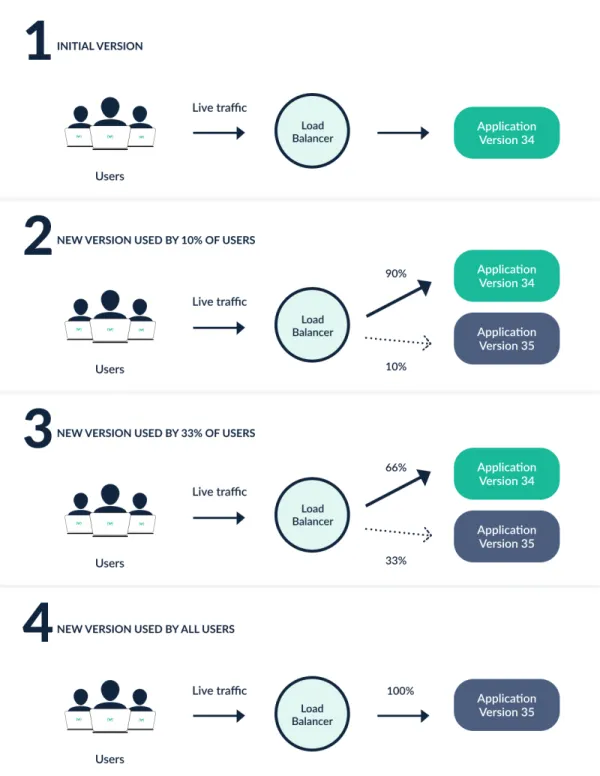
Argo Rollout
- Kubernetes Progressive Delivery Controller - Docs
- Argo Rollouts는 Kubernetes 컨트롤러 이자 CRD 세트로, Kubernetes에 블루-그린, 카나리아, 카나리아 분석, 실험, 점진적 전달 기능 등의 고급 배포 기능을 제공합니다.
- Argo Rollouts는 (선택 사항) 인그레스 컨트롤러 및 서비스 메시와 통합되어 트래픽 셰이핑 기능을 활용하여 업데이트 중에 트래픽을 점진적으로 새 버전으로 전환합니다.
- 또한, Rollouts는 다양한 제공업체의 지표를 쿼리하고 해석하여 주요 KPI를 확인하고 업데이트 중에 자동 프로모션 또는 롤백을 실행할 수 있습니다.
- 네이티브 쿠버네티스 deployment 객체는 RollingUpdate 업데이트 제약 사항
- 롤아웃 속도에 대한 제어가 거의 없음
- 새 버전으로의 트래픽 흐름을 제어할 수 없음
- 준비 프로브는 심층 검사, 스트레스 검사 또는 일회성 검사에는 적합하지 않습니다.
- 업데이트를 확인하기 위해 외부 메트릭을 쿼리할 수 있는 기능이 없습니다.
- 진행을 중지할 수 있지만 업데이트를 자동으로 중단하고 롤백할 수 없습니다.
- Controller Features
- Blue-Green update strategy

- Blue-Green update strategy
- Canary update strategy
- Fine-grained, weighted traffic shifting
- Automated rollbacks and promotions
- Manual judgement
- Customizable metric queries and analysis of business KPIs
- Ingress controller integration: NGINX, ALB, Apache APISIX
- Service Mesh integration: Istio, Linkerd, SMI
- Simultaneous usage of multiple providers: SMI + NGINX, Istio + ALB, etc.
- Metric provider integration: Prometheus, Wavefront, Kayenta, Web, Kubernetes Jobs, Datadog, New Relic, Graphite, InfluxDB
2. Argo Rollouts 동작
- 배포 객체 와 마찬가지로 Argo Rollouts 컨트롤러는 ReplicaSets 의 생성, 확장 및 삭제를 관리합니다 . 이러한 ReplicaSets는 spec.template배포 객체와 동일한 Pod 템플릿을 사용하는 Rollout 리소스 내부의 필드 에 의해 정의됩니다 .
- 이 변경되면 spec.templateArgo Rollouts 컨트롤러에 새 ReplicaSet이 도입됨을 알리는 신호가 전달됩니다. 컨트롤러는 필드 내에 설정된 전략을 사용하여 기존 ReplicaSet에서 새 ReplicaSet으로의 롤아웃 진행 방식을 결정합니다. 새 ReplicaSet이 확장되고 (선택적으로 Analysis를spec.strategy 통과하면 ) 컨트롤러는 해당 ReplicaSet을 "안정적"으로 표시합니다.
- 안정적인 ReplicaSet에서 새로운 ReplicaSet으로 전환하는 동안 다른 변경 사항이 발생하면 spec.template(즉, 롤아웃 도중 애플리케이션 버전을 변경하는 경우), 이전에 새로 생성된 ReplicaSet의 크기가 축소되고 컨트롤러는 업데이트된 필드를 반영하는 ReplicasSet을 진행하려고 시도합니다 spec.template. 각 전략의 동작에 대한 자세한 내용은 사양 섹션을 참조하십시오.
- 아키텍처 - Docs

- Argo Rollouts controller :
- Rollout resource :
- Replica sets for old and new version :
- Ingress/Service :
- AnalysisTemplate and AnalysisRun :
- Metric providers :
- CLI and UI :
3. Argo Rollouts 설치 및 Sample 테스트 - Docs
- Argo Rollouts 설치
# 네임스페이스 생성 및 파라미터 파일 작성
kubectl create ns argo-rollouts
cat <<EOT > argorollouts-values.yaml
dashboard:
  enabled: true
  service:
    type: NodePort
    nodePort: 30003
EOT

# 설치
helm install argo-rollouts argo/argo-rollouts --version 2.40.5 -f argorollouts-values.yaml --namespace argo-rollouts

# 확인
kubectl get all -n argo-rollouts
kubectl get crds

# Argo rollouts 대시보드 접속 주소 확인
echo "http://127.0.0.1:30003"
open "http://127.0.0.1:30003"- ArgoCD extension은 ArgoCD기본 기능을 확장 : https://github.com/argoproj-labs/rollout-extension - Blog
#
cat <<EOF > argocd-values.yaml
global:
  domain: argocd.example.com

certificate:
  enabled: true

server:
  ingress:
    enabled: true
    ingressClassName: nginx
    annotations:
      nginx.ingress.kubernetes.io/force-ssl-redirect: "true"
      nginx.ingress.kubernetes.io/ssl-passthrough: "true"
    tls: true
  extensions:
    enabled: true
    extensionList:
      - name: rollout-extension
        env:
          - name: EXTENSION_URL
            value: https://github.com/argoproj-labs/rollout-extension/releases/download/v0.3.7/extension.tar
EOF
helm upgrade -i argocd argo/argo-cd --version 9.0.5 -f argocd-values.yaml --namespace argocd

# initContainer 환경변수 EXTENSION_URL에 설치할 extension을 명시하면 됩니다.
# mainContainer는 initContainer가 설치한 extension을 가져오기 위해 volumeMount로 가져옵니다.
k describe deploy -n argocd argocd-server
...
  Init Containers:
   rollout-extension:
    Image:           quay.io/argoprojlabs/argocd-extension-installer:v0.0.8
    Port:            <none>
    Host Port:       <none>
    SeccompProfile:  RuntimeDefault
    Environment:
      EXTENSION_URL:  https://github.com/argoproj-labs/rollout-extension/releases/download/v0.3.7/extension.tar
    Mounts:
      /tmp from tmp (rw)
      /tmp/extensions/ from extensions (rw)
...
  Volumes:
   extensions:
    Type:       EmptyDir (a temporary directory that shares a pod's lifetime)
    Medium:
SizeLimit: <unset>- Deploying a Rollout
spec:
  replicas: 5
  strategy:
    canary:
      steps:
      - setWeight: 20
      - pause: {}
      - setWeight: 40
      - pause: {duration: 10}
      - setWeight: 60
      - pause: {duration: 10}
      - setWeight: 80
- pause: {duration: 10}- App name : rollout-test
- project name : default
- sync policy : manual
- set deletion finalizer : check
- auto-create namespae : check
- Repo URL : https://github.com/gasida/my-sample-app
- path : argo-rollouts
- Destination : https://kubernetes.default.svc
- Namespace : test
- SYNC
# Run the following command to deploy the initial Rollout and Service:
mkdir argo-rollouts && cd argo-rollouts
wget https://raw.githubusercontent.com/argoproj/argo-rollouts/master/docs/getting-started/basic/rollout.yaml
wget https://raw.githubusercontent.com/argoproj/argo-rollouts/master/docs/getting-started/basic/service.yaml
git add . && git commit -m "Add sample yaml" && git push -u origin main

# 확인
kubectl get rollout -n test
kubectl describe rollout -n test

kubectl get pod -l app=rollouts-demo -n test
kubectl get svc,ep rollouts-demo -n test
kubectl get rollouts rollouts-demo -n test -o json | grep rollouts-demo
...
   "image": "argoproj/rollouts-demo:blue"
...
default 네임스페이스 선택 → rollout-demo 클릭
- Updating a Rollout
# Run the following command to update the rollouts-demo Rollout with the "yellow" version of the container:
kubectl argo rollouts set image rollouts-demo rollouts-demo=argoproj/rollouts-demo:yellow
kubectl edit rollouts rollouts-demo -n test
..
     - image: argoproj/rollouts-demo:yellow
...

# 파드 label 정보 확인
watch -d kubectl get pod -l app=rollouts-demo -n test -owide --show-labels- Promoting a Rollout
# 아래 입력 혹은 UI에서 Promote Yes 클릭
kubectl argo rollouts promote rollouts-demo

# 정보 확인
kubectl argo rollouts get rollout rollouts-demo --watch
kubectl get rollouts rollouts-demo -o json | grep rollouts-demo
watch -d kubectl get pod -l app=rollouts-demo -owide --show-labels- 전체 삭제
kind delete cluster --name myk8s ; docker rm -f dev-keycloak'Kubernetes' 카테고리의 다른 글
| Kubernetes CI/CD Study 1기 | 7주차 #1 HashiCorp Vault (0) | 2025.11.27 |
|---|---|
| Kubernetes CI/CD Study 1기 | 6주차 ArgoCD 3/3 (0) | 2025.11.21 |
| Kubernetes CI/CD Study 1기 | 4주차 ArgoCD 1/3 (0) | 2025.11.08 |
| Kubernetes CI/CD Study 1기 | 3주차 #2 Jenkins + ArgoCD (0) | 2025.11.01 |
| Kubernetes CI/CD Study 1기 | 3주차 #1 Jenkins + ArgoCD (0) | 2025.10.31 |