cloudNet@ 팀의 가시다 님이 진행하는 쿠버네티스 CI/CD 스터디 4주차 내용입니다.
깃옵스와 쿠버네티스
1. 깃옵스란?
- 깃옵스라는 용어는 플럭스 Flux 라는 깃옵스 도구를 만든 웨이브웍스 Weaveworks 직원들이 2017년에 처음 사용했다.
- 깃옵스의 정의는 정말 다양하다. 풀 리퀘스트 PR, Pull Request 를 통한 운영으로 정의하기도 하고, 개발 관행(버전 제어, 협업, 규정 준수, CI/CD)을 인프라 자동화에 적용하는 것으로 정의하기도 한다. - Link
- 가장 중요한 정의는 CNCF의 Application Delivery TAG에 속한 그룹인 깃옵스 워킹 그룹 GitOps Working Group 에서 정의한 것이다. - Home
- 이 그룹은 깃옵스에 대해 특정 벤더에 종속되지 않고 원칙에 입각한 정의를 구축할 목적으로 다양한 회사 사람들로 구성돼 있다.
- GitOps Principles

- Declarative 선언적 구성
- 엔지니어가 원하는 의도와 완료된 상태를 명시하지만, 이를 위해 실행하기 위한 구체적인 행동을 명시하지 않는다.
- 예를 들어 “컨테이너 3개를 만들어라”와 같이 명령적인 방식이 아니라, 이 애플리케이션에 3개의 컨테이너를 사용하겠다고 선언하면 에이전트가 3이라는 숫자를 맞춰준다.
- 만약 지금 컨테이너가 5개 동작 중이라면 에이전트가 2개의 컨테이너를 종료시킨다.
- Versioned and Immutable 버전이 제어되는 불변의 저장소
- 깃은 버전이 제어되는 불편의 저장소로, 현재 가장 많이 사용되는 소스 제어 시스템이다.
- 유일한 것은 아니기 떄문에 다른 소스 제어 시스템도 깃옵스를 구현할 수 있다.
- Declarative 선언적 구성
-
- Pulled Automatically 자동화된 배포
- 변경 사항이 버전 제어 시스템 VCS Version Control System 에 반영되면 어떠한 수동 작업도 수행하지 말아야 한다는 것이다.
- Continuously Reconciled 폐쇄 루프
- 설정이 업데이트된 이후에는 새롭게 설정한 값이 잘 반영됐는지 확인한다.
- 원하는 상태를 표현하면 이를 맞추기 위해 필요한 조치가 무엇인지 계산해야 한다.
- 현재 시스템 상태와 버전 제어에서 원하는 상태의 차이를 비교해 알 수 있으며 이를 통해 폐쇄 루프를 설명할 수 있다.
- 일종의 관리를 위한 컨트롤 루프로 애플리케이션의 라이프 사이클 동안 발생하는 ‘배포 - 모니터링 - 수정’ 등의 전체 수명 주기를 자동화하는 것을 말한다.

- Pulled Automatically 자동화된 배포
2. 쿠버네티스와 깃옵스
- CNCF
- 쿠버네티스가 커뮤니티에서 빠르게 주목받은 이유는 CNCF가 있었기 때문이다.
- 쿠버네티스를 오픈 소스 프로젝트로 만든 이후, 구글은 리눅스 재단 Linux Foundation과 오픈 소스 클라우드 네이티브 기술의 적용을 주도하는 비영리 재단을 만들고자 했다.
- 이것이 쿠버네티스가 초기 시드 프로젝트일 때 CNCF가 등장하게 된 배경이자, KubeCon 이 주요 개발자 컨퍼런스가 된 이유다.
- CNCF 내의 모든 프로젝트나 단체는 유지 관리 구조가 매우 잘 돼 있고, 그들이 어떻게 결정하고 선정하는지에 대해서 잘 설명하고 있다.
- 그리고 어떠한 회사도 결정에 과반수를 차지할 수 없다.
- CNCF는 커뮤니티의 참여 없이는 어떠한 결정도 내리지 않으며, 전체 커뮤니티가 프로젝트의 전반에 중요한 역할을 한다.
- 아키텍처
- 쿠버네티스는 매우 유연하게 확장 가능하기 때문에 ‘플랫폼 구축을 위한 플랫폼’이란 말처럼 추상적인 개념으로 접근하지 않고서는 정의하기가 어렵다.
- 왜냐하면 수많은 기능 중에 자신이 필요한 방식대로 골라 조합해 사용하기 때문이다. (깃옵스 역시 그런 기능 들 중 하나다)
- 쿠버네티스 컴포넌트는 크게 두 가지로 나뉜다.
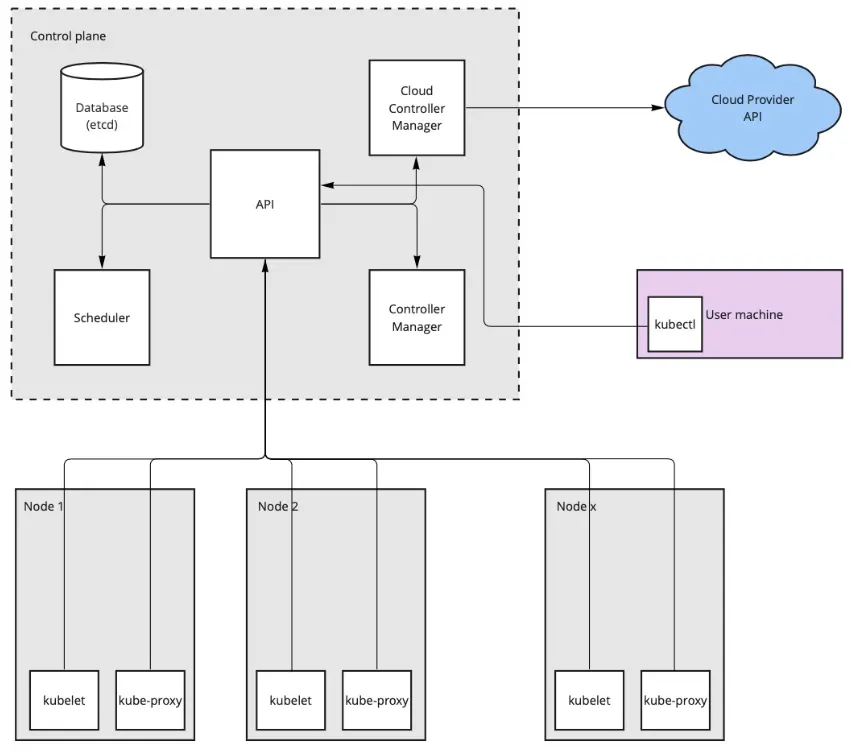
- 첫번째는 컨트롤 플레인이다. 클러스터를 관리하는 역할.
- 컨트롤 플레인은 REST API 서버와 데이터베이스 etcd, 다중 컨트롤 루프 multiple control loops 를 사용하는 컨트롤러 매니저, 노드에 파드를 할당하는 스케줄러로 구성된다.
- 둘째는 데이터 플레인이다. 노드에서 사용자 워크로드를 실행하는 역할.
- 노드는 쿠버네티스 클러스터의 일부분으로 컨테이너 런타임 containerd 등, 노드의 컨테이너 런타임과 REST API와 소통을 담당하는 kubelet 그리고 노드 수준의 네트워크 추상화를 담당하는 kube-proxy 로 구성된다.
- 첫번째는 컨트롤 플레인이다. 클러스터를 관리하는 역할.
- HTTP REST API 서버 : 설정은 Skip
- 컨트롤러 매니저 - Docs
- 쿠버네티스는 많은 컨트롤러가 있다. 레플리카셋 컨트롤러는 파드의 수를 일정하게 유지하는 역할을 한다.
- 컨트롤러의 역할은 실제 상태 live state 와 원하는 상태 desired state 가 일치하는지 관찰하고, 최종 상태에 도달하기 위해 지속적으로 조정하는 것이다.
- 이렇게 각각의 컨트롤러는 클러스터에서 각자 맡은 부분을 관리하는 데 특화돼 있다. 직접 컨트롤러를 만들 수도 있다.
- Argo CD 또한 컨트롤 루프를 통해 깃 리포지터리에서 선언된 상태와 클러스터의 상태를 일치시키면서 컨트롤러로 동작한다.
- 다만 Argo CD는 컨트롤러보다 오퍼레이터에 가깝다.
- 이 둘의 차이점은 컨트롤러는 쿠버네티스 내부 오브젝트에서 작동하는 반면, 오퍼레이터는 쿠버네티스와 그 외의 것들까지 다룰 수 있다.
- Argo CD의 경우, 깃 리포지터리는 오퍼레이터가 처리하는 외부 구성 요소이고, 이는 커스텀 리소스를 사용해 수행한다.
3. 명령형 API와 선언현 API
1. 명령형 방식 : 절차적 방식으로 진행돼 일련의 명령어를 순서대로 적용해야 한다.
- 직접 명령
kubectl create namespace test-imperative- 구성 파일 사용
# namespace.yaml
apiVersion: v1
kind: Namespace
metadata:
  name: imperative-config-test

kubectl create -f namespace.yaml- 리소스를 새로 생성하는 경우 kubectl create 를 사용하고, 이미 리소스가 존재하는 경우 kubectl replace 를 사용해 명확한 의도를 전달할 수 있다.
- 다만 kubectl replace 명령은 리소스를 모두 수정하기 때문에 만약 중간에 누군가 (다른 방식으로) 네임스페이스에 어노테이션을 추가하는 등 변경한 것이 있다면 손실될 수 있다.
2. 선언형 방식
- 구성 파일 사용 : 파일을 사용하여 생성하고, 파일 수정 후 업데이트/동기화 명령을 실행한다. 신규/수정 파일 모두 kubectl apply 명령 사용.
# namespace.yaml
apiVersion: v1
kind: Namespace
metadata:
  name: declarative-files
  labels:
    namespace: declarative-files

kubectl apply -f namespace.yaml- 구성 폴더와 함께 : kubectl apply 명령으로 폴더에 존재하는 모든 파일에서 찾은 리소스를 각각 계산해 변경 사항을 API 서버로 호출한다.
- 따라서 파일을 수정하고 폴더를 apply 하게 되면 모든 변경 사항이 적용된다.
- 깃옵스 오퍼레이터를 활용하면 로컬 폴더처럼 깃 리포지터리의 리소스를 자동으로 kubectl apply 할 수 있다.
4. 실습 환경
# kind k8s 배포
kind create cluster --name myk8s --image kindest/node:v1.32.8 --config - <<EOF
kind: Cluster
apiVersion: kind.x-k8s.io/v1alpha4
nodes:
- role: control-plane
  extraPortMappings:
  - containerPort: 30000
    hostPort: 30000
  - containerPort: 30001
    hostPort: 30001
  - containerPort: 30002
    hostPort: 30002
  - containerPort: 30003
    hostPort: 30003
EOF

# kube-ops-view
helm repo add geek-cookbook https://geek-cookbook.github.io/charts/
helm install kube-ops-view geek-cookbook/kube-ops-view --version 1.2.2 --set service.main.type=NodePort,service.main.ports.http.nodePort=30001 --set env.TZ="Asia/Seoul" --namespace kube-system

# kube-ops-view 접속 URL 확인 (1.5 , 2 배율)
open "http://127.0.0.1:30001/#scale=1.5"
open "http://127.0.0.1:30001/#scale=2"
5. 간단한 깃옵스 오퍼레이터 구축
- 필요한 동작
- 깃 리포지터리를 복제한다. 만약 이미 복제했다면 가져오기를 수행해 깃 리포지터리 최신 내용을 동기화한다.
- 깃 리포지터리 내용을 적용한다.
- 앞의 1,2 과정을 반복해 깃 리포지터리 변경 사항을 지속적으로 적용한다.
# Go 설치
brew install go           # mac
apt install golang-go -y  # windows wsl2 ubuntu

# 깃 리포지터리 최신 내용 동기화
git clone https://github.com/PacktPublishing/ArgoCD-in-Practice

# ArgoCD-in-Practice/ch01
tree basic-gitops-operator
├── go.mod
├── go.sum
└── main.go

# 배포할 매니페스트 파일
tree basic-gitops-operator-config
├── deployment.yaml
└── namespace.yaml

# 실행 : tmp 폴더 생성하고 클러스터에 적용할 매니페스트를 관리.
go run main.go
start repo sync
Enumerating objects: 1261, done.
Counting objects: 100% (125/125), done.
Compressing objects: 100% (32/32), done.
Total 1261 (delta 99), reused 97 (delta 93), pack-reused 1136 (from 1)
start manifests apply
deployment.apps/nginx unchanged
namespace/nginx unchanged

 next sync in 5s
start repo sync
start manifests apply
deployment.apps/nginx unchanged
namespace/nginx unchanged


# 신규 터미널 : 생성 확인
kubectl get deploy,pod -n nginx
NAME                    READY   UP-TO-DATE   AVAILABLE   AGE
deployment.apps/nginx   1/1     1            1           63s

NAME                         READY   STATUS    RESTARTS   AGE
pod/nginx-5869d7778c-229mz   1/1     Running   0          63s

# 강제로 deploy 삭제 해보기
kubectl delete deploy -n nginx nginx
...- 소스 깃 repo 을 fork 후 배포하는 매니페스트를 변경해보고, 변경된 내용이 쿠버네티스에 반영이 되는지도 확인해보자.
- 실습 완료 후 삭제 kubectl delete ns nginx
- 간단한 깃옵스 오퍼레이터를 생성해 깃 리포지터리를 복제하고, 원격 리포지터리와 동기화 상태를 유지하며 콘텐츠를 가져와 적용하는 단계를 확인했다.
- Argo CD는 이런 오퍼레이터 동작과 비슷할 뿐 아니라 성능은 더 향상되고 많은 기능이 추가됐다.
Argo CD
1. Argo CD란
- 배경
- 수년간 애플리케이션은 개발, 테스트, 스테이징 staging, 프로덕션 production 환경으로 구분했다.
- 쿠버네티스에서 이렇게 환경을 분리하는 방법은 다양하고 팀의 크기나 예산같이 다양한 요소에 따라 달라진다.
- 환경별로 쿠버네티스 클러스터가 있거나, 아니면 하나의 클러스터 안에서 네임스페이스로 구분하는 식이다.
- 후자는 배포가 필요한 리소스를 위해 네임스페이스를 새로 만들고 애플리케이션을 구성하는 데 필요한 모든 환경 (configmap, secrets, ingress 등) 을 추가한다.
- 앞서 언급한 접근 방식의 단점은 시간이 지남에 따라 구성 드리프트 configuration drift 가 발생한다는 것이다.
- 시간이 지남에 따라 인프라 자원들이 서로 다른 상태가 되는 현상
- 예를 들어 개발 환경 클러스터 네임스페이스에만 최신 버전의 애플리케이션이 배포됐거나 네트워크 정책과 같은 리소스를 수정한 경우, 나머지 다른 환경을 개발 환경과 동일하게 맞추기 위해서는 다른 부분을 확인해 수동으로 변경해줘야 한다.
- 이 문제를 단순화하려면 헬름, Kustomize, jsonnet 과 같은 패키지 매니저를 사용해 애플리케이션 리소스를 재활용하고 하나의 단일 지점 single point of authority 처럼 관리하는 방법이 있다.
- 예를 들어 헬름을 사용하면 여러 버전을 만들고 각 환경에 맞게 원하는 버전을 배포할 수 있다.
- 하지만 이 방식은 이력을 추적하기 어렵고 관리의 복잡성이 증가한다는 단점이 있다.
- 깃옵스 접근 방식을 따른다면 어떨까?
- 깃 리포지터리에 풀 리쿼스트 및 모든 변경 이력인 원천 소스 source of truth 를 보관한다.
- 만약 1장 깃옵스와 쿠버네티스에서 설명한 것처럼 유사한 컨트롤러가 있다면 어떨까?
- 컨트롤러는 깃 리포지터리의 모든 구성을 자동으로 적용할 것이다.
- 쿠버네티스 리소스를 수동적으로 변화하고 깃 리포지터리에 있지만 아직 반영되지 않은 내용들을 컨틀로러는 깃 리포지터리의 원천 소스를 유지하기 위해 의도한 상태로 다시 만드렉 된다.
- Argo CD 친해지기
- Argo CD는 선언적인 declarative 쿠버네티스의 깃옵스 CD Continuous Delivery 도구다.
- Argo CD의 핵심 구성 요소 중 애플리케이션 컨트롤러가 있다.
- 애플리케이션 컨트롤러는 운영 중인 애플리케이션을 지속적으로 관찰하고 현재 애플리케이션 상태와 원천 소스인 깃 리포지터리에 작성된 의도한 상태를 비교한다.
- 사용 사례
- 배포 자동화 automated deployment
- 깃 커밋 또는 CI 파이프라인이 동작하고 수동 동기화를 트리거한 후에 Argo CD 컨트롤러는 자동으로 클러스터를 깃 리포지터리에 의도한 상태로 푸시할 것이다.
- 관찰 가능성 observability
- Argo CD는 애플리케이션 상태가 깃에서 의도한 상태와 동기화돼 있는지 식별할 수 있는 UI 및 CLI를 제공하고 Argo CD Notifications 엔진을 제공한다.
- 멀티 테넌시 multi-tenancy
- 인증을 위한 RBAC 정책을 사용해 여러 클러스터를 관리하고 배포하는 기능이다.
- 배포 자동화 automated deployment
- Argo Project 는 다음과 같이 다양한 도구를 갖고 있다.
- Argo CD https://argoproj.github.io/cd/
- Argo Rollouts https://argoproj.github.io/rollouts/
- Argo Events https://argoproj.github.io/events/
- Argo Workflows https://argoproj.github.io/workflows/
2. 핵심 개념과 용어 정리
- Argo CD Reconciliation 조정
- 깃 리포지터리에 담긴 의도한 상태를 현재 상태의 클러스터와 일치시켜야 하며, 필요한 환경에 올바르게 전달해야 한다.
- 이것을 조정 reconciling 라고 하는데, Argo CD는 깃 리포지터리에서 쿠버네티스로 향하는 조정 reconciling 루프 속에 있다.
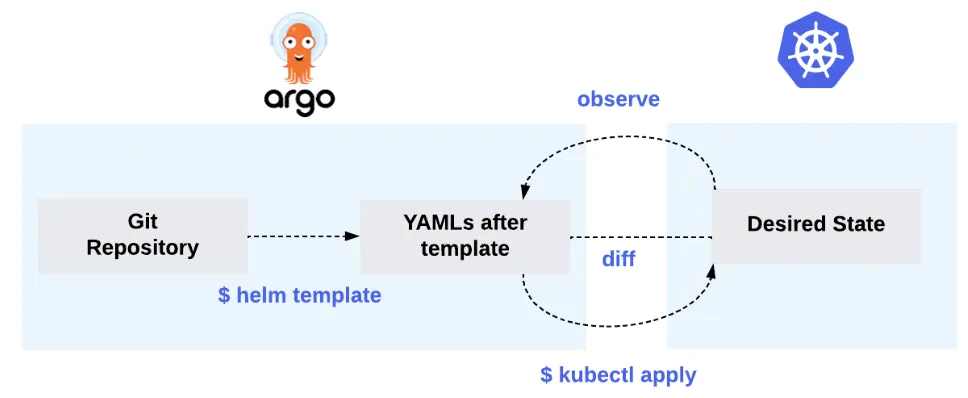
- 위 그림을 보면 Argo CD는 바라보는 깃 리포지터리에 있는 헬름 차트를 → 쿠버네티스 yaml로 렌더링한다.
- 그리고 클러스터를 의도한 상태와 비교한다. 이걸 동기화 상태 sync status 라고 부른다.
- 여기서 주목할 만한 점은 Argo CD가 helm install 을 사용하지 않고 kubectl apply 를 사용했다는 점이다.
- 왜냐하면 Argo CD는 여러 템플릿 도구를 지원하고 있는데, 이런 도구들을 래퍼로 사용하는 것이 아니라 깃옵스 원칙에 맞는 선언적 도구로 사용해 원하는 상태를 배포하는 데 목적이 있기 때문이다.
- 용어 - Docs
- 애플리케이션 application
- 쿠버네티스 리소스 그룹은 매니페스트에 의해 규정된다. Argo CD에서는 CRD 에서 규정한다.
- 애플리케이션 소스 타입 application source type
- 헬름, Kustomize, jsonnet 과 같이 애플리케이션을 구축하는 데 사용하는 도구다.
- 타깃 상태 target state
- 애플리케이션의 의도한 상태를 이야기하며 원천 소스인 깃 리포지터리를 의미한다.
- 현재 상태 live state
- 애플리케이션의 현재 상태로 쿠버네티스 클러스터에 배포된 상태를 의미한다.
- 동기화 상태
- 현재 상태와 타킷 상태가 일치하는지 확인한다.
- 즉, 쿠버네티스에 배포된 애플리케이션이 깃 리포지터리에서 설명된 의도한 상태와 일치하는지 여부를 확인한다.
- 동기화 sync
- 쿠버네티스 클러스터에 변화를 적용해 애플리케이션을 타깃 상태로 변경한다.
- 동기화 동작 상태 sync operation status
- 동기화 단계에서 작업이 실패인지 성공인지 여부를 보여준다.
- 새로고침 refresh
- 깃 리포지터리의 최신 코드와 현재 상태의 차이점을 비교한다.
- 서비스 상태 health status
- 애플리케이션이 요청을 받을 수 있고 운영 중인 상태인지를 말해준다.
- 애플리케이션 application
3. 아키텍처 설명
- 개요
- Argo CD의 핵심 구성 요소는 쿠버네티스 컨트롤러로 구성돼 있기 때문에 각 구성 요소를 개별적으로 살펴보기 전에 쿠버네티스 컨트롤러가 작동하는 방법을 이해해야 한다.
- 쿠버네티스 컨트롤러는 클러스터의 상태를 관찰한 다음 필요한 경우 변경 사항을 적용하거나 요청한다.
- 따라서 컨트롤러는 클러스터의 현재 상태를 의도한 상태와 비슷하게 유지하려고 한다.
- 컨트롤러는 쿠버네티스 리소스 오브젝트를 지속적으로 관찰하며, 이 리소스 오브젝트는 스펙 spec 필드를 통해 의도한 상태를 나타낸다.
- Argo CD의 핵심 구성 요소
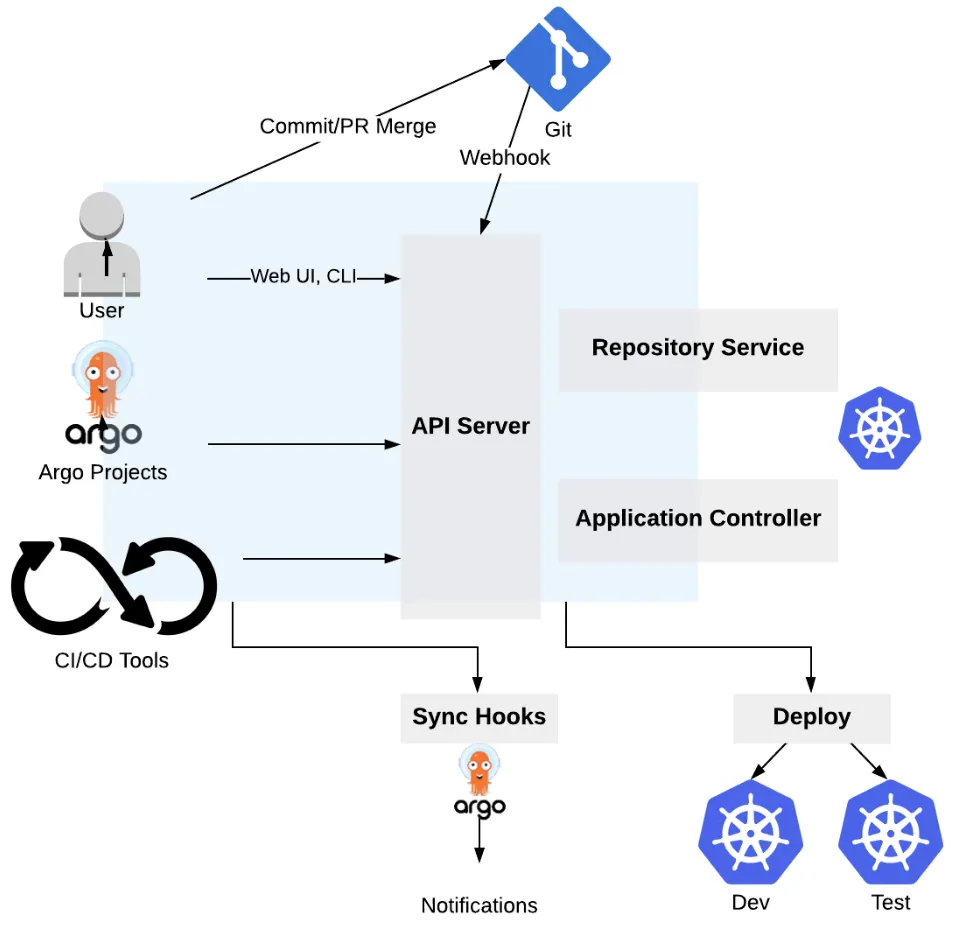
- API 서버
- Argo CD는 쿠버네티스와 비슷하게 API 서버가 있다.
- 이 API 서버는 웹 UI, CLI, Argo Event, CI/CD 시스템 같이 다른 시스템과도 API를 통해 상호 작용한다.
- API 서버의 역할
- 애플리케이션 관리 및 상태 보고
- 애플리케이션 트리거 작업
- 깃 리포지터리와 쿠버네티스 클러스터 관리
- 인증과 SSO 지원
- RBAC 정책 강화
- 리포지터리 서버
- 리포지터리 서버의 주요 역할은 애플리케이션 매니페스트를 보관하는 깃 리포지터리의 로컬 캐시를 유지하는 것이다.
- 다른 Argo CD 컴포넌트는 쿠버네티스 매니페스트를 가져오기 위해 리포지터리 서버에 요청한다.
- 요청할 때 필요한 매개 변수는 다음과 같다.
- 리포지터리 URL
- 깃 버전
- 애플리케이션 경로
- 템플릿 세부설정 : 매개변수, ksonnet 의 environmnet, 헬름의 values
- 애플리케이션 컨트롤러
- 애플리케이션 컨트롤러는 지속적으로 애플리케이션의 현재 상태를 확인하고, 깃 리포지터리의 의도한 상태와 비교한다.
- 만약 리소스를 수정했는데 상태가 동기화되지 않은 경우, 컨트롤러가 상태를 동기화하려고 하며, 현재 상태를 의도한 상태와 맞추려고 한다.
- 또 다른 역할은 사용자가 생성한 훅 hook 을 생명 주기 동안 실행시킨다.
- Argo CD는 리포지터리를 확인해 원하는 상태를 불러오고 기본적으로 3분마다 깃 리포지터리를 확인한다.
- 따라서 즉시 반영되지 않기 때문에 지연을 피하기 위해서는 동기화 단계를 즉시 트리거할 수 있는 몇 가지 다른 옵션이 있다.
- 첫째, Argo CD에는 동기화 단계를 수동으로 시작할 수 있는 UI가 포함돼 있다.
- 둘째, Argo CD에는 API서버와 상호 작용하기 위해 사용하는 CLI도 있다. 아래 처럼 CI/CD 또는 로컬에서 CLI로 동기화 할 수 있다.
- argocd app sync myapp
- 마지막 옵션은 동기화 단계를 즉시 시작하는 웹훅 web-hook 구성을 설정하는 것이다. Github, GitLab, Bitbucket, Gogs - Docs
- API 서버
4. Argo CD의 핵심 오브젝트와 리소스
- Argo CD 애플리케이션, 프로젝트, 리포지터리, 클러스터의 자격 증명과 설정 값들은 쿠버네티스 매니페스트를 이용해 선언적으로 정의할 수 있다.
- 이것을 CRD라고 한다.
- 애플리케이션 Application
- Argo CD는 실제 쿠버네티스 클러스터에 배포하려는 애플리케이션의 인스턴스를 Application 이라는 CRD로 구현한다.
apiVersion: argoproj.io/v1alpha1
kind: Application
metadata:
  name: nginx
  namespace: argocd
spec:
  project: default
  source:
    repoURL: https://charts.bitnami.com/bitnami
    chart: nginx
    targetRevision: 13.2.10
  destination:
    namespace: nginx
server: https://kubernetes.default.svc- 앱 프로젝트 AppProject
- 애플리케이션처럼 앱 프로젝트 CRD는 태그 지정과 같이 관련 있는 애플리케이션을 논리적으로 그룹화시켜줄 수 있다.
- 실무에서는 애플리케이션과 유틸리티 서비스가 분리된다.
# kubectl get appprojects.argoproj.io -n argocd default -o yaml | kubectl neat | yq
apiVersion: argoproj.io/v1alpha1
kind: AppProject
metadata:
  name: default
  namespace: argocd
spec:
  # 매니페스트가 모든 깃 리포지터리에서 배포되도록 허용
  sourceRepos:
    - '*'

  # 애플리케이션이 동일한 클러스터의 guestbook 네임스페이스에만 배포되도록 허용
  destinations:
    - namespace: guestbook                    #'*'
      server: https://kubernetes.default.svc  #'*'

  # 네임스페이스를 제외하고 모든 클러스터 범위에서 리소스 생성 거부
  clusterResourceWhitelist:
    - group: '*'
kind: Namespace #'*'- 리포지터리 자격 증명 repository credentials
- 실제 운영에서는 프라이빗 리포지터리를 사용하기 때문에 Argo CD가 해당 리포지터리에 접근하기 위해서는 접근 가능한 자격 증명이 필요하다.
- Argo CD가 해당 리포지터리에 접근하기 위해서는 접근 가능한 자격 증명이 필요하다.
- Argo CD는 이를 쿠버네티스 시크릿과 컨피그맵을 사용해 해결한다.
- 따라서 ‘argocd.argoproj.io/secret-type: **repository**’같은 특정 쿠버네티스 레이블을 포함해 쿠버네티스 시크릿 리소스를 생성한다.
# HTTPS 인증 방식 (예시)
apiVersion: v1
kind: Secret
metadata:
  name: repo-credentials-https
  namespace: argocd                             # 반드시 argocd 네임스페이스여야 함
  labels:
    argocd.argoproj.io/secret-type: repository  # Argo CD가 이 Secret을 “저장소 접근 자격”으로 인식하는 라벨
stringData:
  url: https://github.com/your-org/private-repo.git
  username: your-github-username
  password: ghp_xxxxxxxxxxxxxxxxxxxxxxx         # Personal Access Token (PAT) 또는 비밀번호


# SSH Key 인증 방식 (예시)
apiVersion: v1
kind: Secret
metadata:
  name: repo-credentials-ssh
  namespace: argocd
  labels:
    argocd.argoproj.io/secret-type: repository
stringData:
  url: git@github.com:your-org/private-repo.git  # SSH 형태의 주소
  sshPrivateKey: |
    -----BEGIN OPENSSH PRIVATE KEY-----
    MIIEvQIBADANBgkqhkiG9w0BAQEFAASC...
-----END OPENSSH PRIVATE KEY------ 클러스터 자격 증명 cluster credentials
- 리포지터리 자격 증명과 마찬가지로 Argo CD가 여러 클러스터를 관리하고 Argo CD가 이미 실행 중인 클러스터에 포함되지 않은 경우 다른 쿠버네티스 클러스터에 대한 액세스 권한을 얻어야 한다.
- 리포지터리 자격 증명과 클러스터 자격 증명의 차이점은 시크릿 유형이 다르기 때문에 쿠버네티스 레이블이 다르다는 것이다.
- argocd.argoproj.io/secret-type: **cluster**
apiVersion: v1
kind: Secret
metadata:
  name: cluster-credentials-dev
  namespace: argocd
  labels:
    argocd.argoproj.io/secret-type: cluster
stringData:
  name: dev-cluster                         # Argo CD 내에서 표시될 클러스터 이름
  server: https://123.45.67.89:6443         # 대상 클러스터의 API 서버 주소
  config: |                                 # JSON 형태의 kubeconfig 일부. Argo CD가 인증에 사용
    {
      "bearerToken": "eyJhbGciOiJSUzI1NiIsImtpZCI6...", # 대상 클러스터의 ServiceAccount로부터 추출한 토큰
      "tlsClientConfig": {
        "insecure": false,                              # true일 경우 TLS 검증 비활성화 (개발용)
        "caData": "LS0tLS1CRUdJTiBDRVJUSUZJQ0FURS0t..." # 클러스터 CA 인증서 (Base64 인코딩된 값)
      }
    }

# YAML이 아닌 CLI 명령어로도 동일한 작업 가능
argocd cluster add CONTEXT_NAME
5. Argo CD 설치 by Helm - README
#
kubectl create ns argocd
cat <<EOF > argocd-values.yaml
server:
  service:
    type: NodePort
    nodePortHttps: 30002
  extraArgs:
    - --insecure  # HTTPS 대신 HTTP 사용
EOF

# 설치 : Argo CD v3.1.9 , (참고) 책 버전 Argo CD v2.1 ~ v2.2
# https://github.com/argoproj/argo-helm/blob/main/charts/argo-cd/values.yaml
helm repo add argo https://argoproj.github.io/argo-helm
helm install argocd argo/argo-cd --version 9.0.5 -f argocd-values.yaml --namespace argocd

# 각 구성요소 확인
kubectl get all -n argocd
kubectl get pod,svc,ep,secret,cm -n argocd

# crd 확인
kubectl get crd | grep argo
applications.argoproj.io                     2024-04-14T08:12:16Z
applicationsets.argoproj.io                  2024-04-14T08:12:17Z
appprojects.argoproj.io                      2024-04-14T08:12:16Z

kubectl get appproject -n argocd -o yaml

# sa
kubectl get sa -n argocd
NAME                               SECRETS   AGE
argocd-application-controller      0         3m48s
argocd-applicationset-controller   0         3m48s
argocd-dex-server                  0         3m48s
argocd-notifications-controller    0         3m48s
argocd-redis-secret-init           0         3m52s
argocd-repo-server                 0         3m48s
argocd-server                      0         3m48s


# Krew가 없다면 설치
(
  set -euo pipefail
  cd "$(mktemp -d)"
  OS="$(uname | tr '[:upper:]' '[:lower:]')"
  ARCH="$(uname -m | sed -e 's/x86_64/amd64/' -e 's/aarch64/arm64/' -e 's/arm64/arm64/')"
  KREW="krew-${OS}_${ARCH}"
  curl -fsSLO "https://github.com/kubernetes-sigs/krew/releases/latest/download/${KREW}.tar.gz"
  tar zxvf "${KREW}.tar.gz"
  ./"${KREW}" install krew
)
echo 'export PATH="${KREW_ROOT:-$HOME/.krew}/bin:$PATH"' >> ~/.bashrc

# rolesum 플러그인 설치
kubectl krew install rolesum

# Summarize RBAC roles for subjects : ServiceAccount(default), User, Group
kubectl rolesum -h
kubectl rolesum aws-node -n kube-system    # sa
kubectl rolesum -k User system:kube-proxy  # user
kubectl rolesum -k Group system:masters    # group

kubectl rolesum -n argocd argocd-server
kubectl rolesum -n argocd argocd-application-controller
kubectl rolesum -n argocd argocd-applicationset-controller
kubectl rolesum -n argocd argocd-repo-server

kubectl rolesum -n argocd argocd-server
ServiceAccount: argocd/argocd-server
Secrets:

Policies:
• [RB] argocd/argocd-server ⟶ [R] argocd/argocd-server                 # [RB] = RoleBinding ⟶ [R] = Role
  Resource                     Name  Exclude  Verbs  G L W C U P D DC   # Get/List/Watch/Create/Update/Patch/Delete
  applications.argoproj.io     [*]     [-]     [-]   ✔ ✔ ✔ ✔ ✔ ✔ ✔ ✖
  applicationsets.argoproj.io  [*]     [-]     [-]   ✔ ✔ ✔ ✔ ✔ ✔ ✔ ✖
  appprojects.argoproj.io      [*]     [-]     [-]   ✔ ✔ ✔ ✔ ✔ ✔ ✔ ✖
  configmaps                   [*]     [-]     [-]   ✔ ✔ ✔ ✔ ✔ ✔ ✔ ✖
  events                       [*]     [-]     [-]   ✖ ✔ ✖ ✔ ✖ ✖ ✖ ✖
  secrets                      [*]     [-]     [-]   ✔ ✔ ✔ ✔ ✔ ✔ ✔ ✖


• [CRB] */argocd-server ⟶ [CR] */argocd-server                        # [CRB] = ClusterRoleBinding ⟶ [CR] = ClusterRole
  Resource                     Name  Exclude  Verbs  G L W C U P D DC
  *.*                          [*]     [-]     [-]   ✔ ✖ ✖ ✖ ✖ ✔ ✔ ✖
  applications.argoproj.io     [*]     [-]     [-]   ✔ ✔ ✔ ✖ ✔ ✖ ✖ ✖
  applicationsets.argoproj.io  [*]     [-]     [-]   ✔ ✔ ✔ ✖ ✔ ✖ ✖ ✖
  events                       [*]     [-]     [-]   ✖ ✔ ✖ ✔ ✖ ✖ ✖ ✖
  jobs.batch                   [*]     [-]     [-]   ✖ ✖ ✖ ✔ ✖ ✖ ✖ ✖
  pods                         [*]     [-]     [-]   ✔ ✖ ✖ ✖ ✖ ✖ ✖ ✖
  pods/log                     [*]     [-]     [-]   ✔ ✖ ✖ ✖ ✖ ✖ ✖ ✖
  workflows.argoproj.io        [*]     [-]     [-]   ✖ ✖ ✖ ✔ ✖ ✖ ✖ ✖


# 최초 접속 암호 확인
kubectl -n argocd get secret argocd-initial-admin-secret -o jsonpath="{.data.password}" | base64 -d ;echo
38L2ZmXne7jIaRSZ

# Argo CD 웹 접속 주소 확인 : 초기 암호 입력 (admin 계정)
open "http://127.0.0.1:30002" # macOS
## Windows OS경우 직접 웹 브라우저에서 http://<Ubuntu Eth0 IP>:30002 접속
5. 애플리케이션 실행하기
# finalizers.-resources... : # Argo CD가 Application을 삭제할 때, 관련된 Kubernetes 리소스를 먼저 정리 prune하도록 보장하는 설정
# targetRevision: HEAD       # 브랜치명 또는 commit , HEAD = 기본 브랜치 최신 커밋
# syncPolicy.automated.enabled: true          # 자동 동기화/배포 활성화
# syncPolicy.automated.prune: true            # Git에서 리소스가 제거되면 클러스터에서도 자동 삭제
# syncPolicy.automated.selfHeal: true         # 클러스터 리소스가 수동으로 변경되면 Git 상태로 자동 복구
# syncPolicy.syncOptions.CreateNamespace=true # 배포 대상 네임스페이스 guestbook 가 없으면 자동 생성

# guestbook helm 차트 애플리케이션 생성
cat <<EOF | kubectl apply -f -
apiVersion: argoproj.io/v1alpha1
kind: Application
metadata:
  name: guestbook
  namespace: argocd
  finalizers:
  - resources-finalizer.argocd.argoproj.io
spec:
  project: default
  source:
    helm:
      valueFiles:
      - values.yaml
    path: helm-guestbook
    repoURL: https://github.com/argoproj/argocd-example-apps
    targetRevision: HEAD
  syncPolicy:
    automated:
      enabled: true
      prune: true
      selfHeal: true
    syncOptions:
    - CreateNamespace=true
  destination:
    namespace: guestbook
    server: https://kubernetes.default.svc
EOF

#
kubectl get applications -n argocd guestbook
kubectl get applications -n argocd guestbook -o yaml | kubectl neat | yq
kubectl get pod,svc,ep -n guestbook

# nodeport 변경 시도
kubectl get svc -n guestbook
kubectl patch svc -n guestbook guestbook-helm-guestbook -p '{"spec":{"type":"NodePort","ports":[{"port":80,"targetPort":80,"nodePort":30003}]}}'

# nodeport 변경 시도 반복 : 왜 그럴까?
kubectl get svc -n guestbook
kubectl patch svc -n guestbook guestbook-helm-guestbook -p '{"spec":{"type":"NodePort","ports":[{"port":80,"targetPort":80,"nodePort":30003}]}}'
# 변경 되지 않고 있음- ArgoCD에서 Details → SYNC POLICY → Self Heal Disable
- Self Heal
- Git 저장소와 클러스터 상태가 다를 때 자동으로 동기화
- 누군가 kubectl로 직접 리소스를 수정해도 Git 상태로 자동 복원
- 실시간으로 Git 정의된 상태를 유지

6. Argo CLI 설치
- Argo CLI 설치
# mac
brew install argocd

# windows wsl2 ubuntu
VERSION=$(curl -L -s https://raw.githubusercontent.com/argoproj/argo-cd/stable/VERSION)
curl -sSL -o argocd-linux-amd64 https://github.com/argoproj/argo-cd/releases/download/v$VERSION/argocd-linux-amd64
sudo install -m 555 argocd-linux-amd64 /usr/local/bin/argocd
rm argocd-linux-amd64

# (공통) 버전 정보 확인
argocd version --client- Argo CLI로 정보 확인
# argocd 서버 (http) 로그인 : 이제 argo cd API 서버와 소통할 수 있다!
argocd login 127.0.0.1:30002 --plaintext
Username: admin
Password: qwe12345
'admin:login' logged in successfully
Context '127.0.0.1:30002' updated

#
argocd account list
argocd proj list
argocd repo list
argocd cluster list
argocd app list
Admin 사용자는 초기 설정에만 사용하고 그 외에는 로컬 사용자를 사용하거나 SSO를 통합해 사용하도록 한다. -
Docs
CI 시스템을 실행할 때는 특정 사용자가 CI에 접근할 수 있는 토큰을 사용해야 한다. 해당 토큰은
argocd account generate-token --account ci-bot 형태의 명령어를 통해서 생성할 수 있다.
7. Argo CLI로 애플리케이션 배포
깃옵스의 목적은 깃 리포지터리의 모든 것을 추적하고 원천 소스에서 의도한 상태로 맞추는 것이다. 만약 CLI를 사용해 Argo CD 애플리케이션을 생성한다면 이러한 중요한 단계를 건너뛰고 깃옵스 원칙을 위해하는 것이다.
# Argo CLI로 애플리케이션 배포
argocd app create guestbook --repo https://github.com/argoproj/argocd-example-apps.git --path helm-guestbook \
  --dest-server https://kubernetes.default.svc --dest-namespace guestbook --values values.yaml

#
argocd app list
NAME              CLUSTER                         NAMESPACE  PROJECT  STATUS     HEALTH   SYNCPOLICY  CONDITIONS  REPO                                                 PATH            TARGET
argocd/guestbook  https://kubernetes.default.svc  guestbook  default  OutOfSync  Missing  Manual      <none>      https://github.com/argoproj/argocd-example-apps.git  helm-guestbook

#
argocd app get argocd/guestbook
Name:               argocd/guestbook
Project:            default
Server:             https://kubernetes.default.svc
Namespace:          guestbook
URL:                https://argocd.example.com/applications/guestbook
Source:
- Repo:             https://github.com/argoproj/argocd-example-apps.git
  Target:
  Path:             helm-guestbook
  Helm Values:      values.yaml
SyncWindow:         Sync Allowed
Sync Policy:        Manual
Sync Status:        OutOfSync from  (0d521c6)
Health Status:      Missing

GROUP  KIND        NAMESPACE  NAME                      STATUS     HEALTH   HOOK  MESSAGE
       Service     guestbook  guestbook-helm-guestbook  OutOfSync  Missing
apps   Deployment  guestbook  guestbook-helm-guestbook  OutOfSync  Missing

# 직접 sync 실행
argocd app sync argocd/guestbook
argocd app get argocd/guestbook


# 삭제
argocd app delete argocd/guestbook
8. Argo CD 파드 Web-based Terminal 기능 설정 - Docs
# argocd server 에 기본 설정 configmap 확인 : 파드 접속 exec 기능 비활성화
kubectl get configmap argocd-cm -n argocd -o yaml | grep exec.enabled
  exec.enabled: "false"

# argocd server 에 기본 설정 configmap 확인 : 파드 접속 exec 기능 활성화 설정
kubectl patch configmap argocd-cm -n argocd --type merge -p '{"data":{"exec.enabled":"true"}}'
kubectl get configmap argocd-cm -n argocd -o yaml | grep exec.enabled
  exec.enabled: "true"

# argocd server 에 서비스어카운트에 맵핑된 롤/클러스터롤 확인
kubectl rolesum -n argocd argocd-server
ServiceAccount: argocd/argocd-server
...
• [CRB] */argocd-server ⟶ [CR] */argocd-server                        # [CRB] = ClusterRoleBinding ⟶ [CR] = ClusterRole
...

# 해당 클러스터롤에 파드 exec 는 없음
kubectl describe clusterroles.rbac.authorization.k8s.io argocd-server
...
PolicyRule:
  Resources                    Non-Resource URLs  Resource Names  Verbs
  ---------                    -----------------  --------------  -----
  workflows.argoproj.io        []                 []              [create]
  jobs.batch                   []                 []              [create]
  *.*                          []                 []              [delete get patch]
  applications.argoproj.io     []                 []              [get list update watch]
  applicationsets.argoproj.io  []                 []              [get list update watch]
  pods/log                     []                 []              [get]
  pods                         []                 []              [get]
  events                       []                 []              [list create]

# 해당 클러스터롤에 파드 exec 추가
kubectl patch clusterrole argocd-server --type='json' \
  -p='[{"op": "add", "path": "/rules/-", "value": {"apiGroups": [""], "resources": ["pods/exec"], "verbs": ["create"]}}]'

# 해당 클러스터롤에 파드 exec 추가 확인
kubectl describe clusterroles.rbac.authorization.k8s.io argocd-server
...
PolicyRule:
  Resources                    Non-Resource URLs  Resource Names  Verbs
  ---------                    -----------------  --------------  -----
  pods/exec                    []                 []              [create]
  workflows.argoproj.io        []                 []              [create]
  jobs.batch                   []                 []              [create]
  *.*                          []                 []              [delete get patch]
  applications.argoproj.io     []                 []              [get list update watch]
  applicationsets.argoproj.io  []                 []              [get list update watch]
  pods/log                     []                 []              [get]
  pods                         []                 []              [get]
  events                       []                 []              [list create]

# guestbook helm 차트 애플리케이션 생성
cat <<EOF | kubectl apply -f -
apiVersion: argoproj.io/v1alpha1
kind: Application
metadata:
  name: guestbook
  namespace: argocd
  finalizers:
  - resources-finalizer.argocd.argoproj.io
spec:
  project: default
  source:
    helm:
      valueFiles:
      - values.yaml
    path: helm-guestbook
    repoURL: https://github.com/argoproj/argocd-example-apps
    targetRevision: HEAD
  syncPolicy:
    automated:
      enabled: true
      prune: true
      selfHeal: true
    syncOptions:
    - CreateNamespace=true
  destination:
    namespace: guestbook
    server: https://kubernetes.default.svc
EOF- 파드 리소스 클릭 후 TERMINAL 클릭

- 리소스 삭제
helm uninstall -n argocd argocd && kubectl delete ns argocd9. Finalizer Error
- Finalizer란?
- Kubernetes 리소스 삭제 시 정리 작업을 보장하는 메커니즘
- Application 삭제 시 배포된 모든 리소스 자동 정리
- Pod, Service, Deployment 등 cascade 삭제
- 데이터 손실 방지
- Kubernetes 리소스 삭제 시 정리 작업을 보장하는 메커니즘
- 에러 발생 원인
- ArgoCD Controller가 종료되어 finalizer 처리 불가
- Application에 finalizer가 남아있어 삭제 대기
- 네임스페이스 삭제가 Application 삭제를 기다림
kubectl get namespace argocd
NAME     STATUS        AGE
argocd   Terminating   87m

# 네임스페이스가 Terminating 상태로 멈춤- 네임스페이스 상태 확인
kubectl get namespace argocd -o yaml | grep -A 5 finalizers
- 해결 방법
# Finalizer 제거
kubectl patch application guestbook -n argocd -p '{"metadata":{"finalizers":null}}' --type=merge
Argo-CD Autopilot
1. 배경 및 소개

Argocd application이 동작하기 위해 Argod application이 필요한 상황이 닭이 먼저냐 달걀이 먼저냐 상황과 비슷하다.
- Argo-CD Autopilot 제공 기능 : Argo CD 설치 자동화 + GitOps 환경 초기화, 애플리케이션/클러스터 등 선언적 관리 가능
- 깃옵스를 사용해 부트스트랩 Argo CD 애플리케이션을 생성하고 관리할 수 있다.
- 깃허브 리포지터리를 짜여진 구조로 셋팅해 새로운 서비스를 추가하고 Argo CD의 수명 주기에 적용한다.
- 각각 다른 환경에서 애플리케이션을 업데이트하고 승격 promote 할 수 있게 해준다.
- 재해 복구를 대비할 수 있고, 필요한 모든 유틸리티와 애플리케이션에 대한 장애 조치 failover 클러스터를 부트스트랩한다.
- 지원 예정 : Argo CD 애플리케이션에 시크릿에 대한 암호화, Other Templating Choices Besides Kustomize → Helm
- 첫 번째 기능부터 놀라운 것은 Argo CD는 자기 자신의 배포와 구성을 관리할 수 있다.
- 오토파일럿 부트스트랩은 깃 리포지터리의 특정 폴더 안에 Argo CD 애플리케이션 매니페스트를 직접 올리기도 한다.
- 그래서 Argo CD 설치를 관리하고 깃옵스 방식으로 관리할 수 있다.
2. Argo-CD Autopilot 아키텍처
- 부트스트랩 단계에서 Argo CD를 배포할 때 오토파일럿은 쿠버네티스 클러스터와 통신한다.
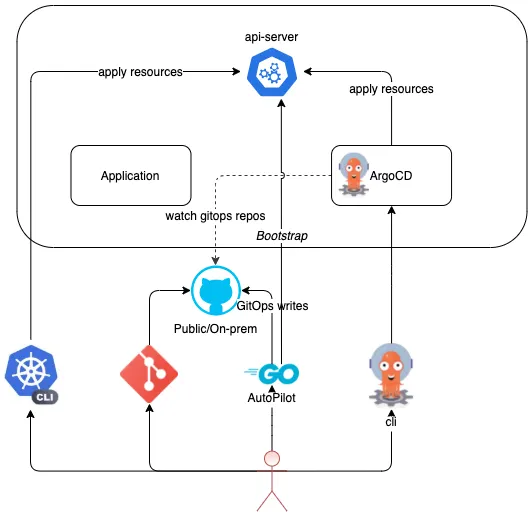
- autopilot bootstrap 명령은 Argo CD 매니페스트를 대상 K8s 클러스터에 배포하고, GitOps 저장소의 특정 디렉터리에 Argo CD 애플리케이션 매니페스트를 커밋합니다.
- 이 애플리케이션은 Argo CD 설치를 직접 관리합니다. 따라서 이 명령을 실행하면 GitOps를 통해 자체적으로 관리되는 Argo CD 배포가 생성됩니다.
- 그 시점부터 사용자는 자신에게 속한 프로젝트와 애플리케이션을 생성할 수 있습니다. Autopilot은 필요한 매니페스트를 저장소에 커밋합니다.
- 커밋이 완료되면 Argo CD가 자동으로 애플리케이션을 클러스터에 적용합니다.그 후에는 더 이상 쿠버네티스 클러스터에 접근할 일이 없다. 이제 접근이 필요한 건 깃옵스 리포지터리뿐이다.
3. argocd-autopilot CLI 설치
# install : mac
brew install argocd-autopilot
argocd-autopilot version


# install : Linux and WSL (using curl)
VERSION=$(curl --silent "https://api.github.com/repos/argoproj-labs/argocd-autopilot/releases/latest" | grep '"tag_name"' | sed -E 's/.*"([^"]+)".*/\1/')
curl -L --output - https://github.com/argoproj-labs/argocd-autopilot/releases/download/"$VERSION"/argocd-autopilot-linux-amd64.tar.gz | tar zx
mv ./argocd-autopilot-* /usr/local/bin/argocd-autopilot
argocd-autopilot version


# Docker : you have to provide the .kube and .gitconfig directories as mounts to the running container
docker run \
  -v ~/.kube:/home/autopilot/.kube \
  -v ~/.gitconfig:/home/autopilot/.gitconfig \
  -it quay.io/argoprojlabs/argocd-autopilot <cmd> <flags>
4. Git 레포지토리 (GitOps 환경으로 사용할 레포지토리) & Git Token 준비
- Git Providers : Github, Gitlab, Butbucket Server(on-prem only), Azure Devops, Gitea - Docs
- Git 레포지토리 생성 : Private
- Git Personal access tokens 생성 : scope(repo 체크)

4. Bootstrap Argo-CD
- "argocd-autopilot repo bootstrap" 명령은 매니페스트를 푸시하고 깃 리포지터리 안에 필요한 구조를 생성한다.
- 동시에 쿠버네티스 클러스터에 Argo CD를 설치한다.
# (참고) HA 모드 지원 You can bootstrap Argo CD in high-availability mode using the App Specifier:
argocd-autopilot repo bootstrap --app https://github.com/argoproj-labs/argocd-autopilot/manifests/ha
# 각자 자신의 Git 정보 사용하자
export GIT_TOKEN=<자신의 Git Token>
export GIT_REPO=<자신의 Repo>
export GIT_TOKEN=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
export GIT_REPO=https://github.com/gasida/autopilot.git
# Bootstrap Argo-CD
argocd-autopilot repo bootstrap
INFO cloning repo: https://github.com/gasida/autopilot.git
Enumerating objects: 2, done.
Counting objects: 100% (2/2), done.
Total 2 (delta 0), reused 1 (delta 0), pack-reused 0 (from 0)
INFO using revision: "", installation path: ""
INFO using context: "kind-myk8s", namespace: "argocd"
INFO applying bootstrap manifests to cluster...
namespace/argocd created
...
INFO pushing bootstrap manifests to repo
...
INFO argocd initialized. password: lIudnGkjmKphpgmt
INFO run:
kubectl port-forward -n argocd svc/argocd-server 8080:80
# 신규 터미널
kubectl port-forward -n argocd svc/argocd-server 8080:80
# 기존터미널 : 설치 확인
kubectl get pod -n argocd
NAME READY STATUS RESTARTS AGE
argocd-application-controller-0 1/1 Running 0 8m45s
argocd-applicationset-controller-79887fd6-4p9pf 1/1 Running 0 8m45s
argocd-dex-server-655b4448b5-kcxds 1/1 Running 0 8m45s
argocd-notifications-controller-77fd6f9885-r8c49 1/1 Running 0 8m45s
argocd-redis-7fdcfb697b-htddp 1/1 Running 0 8m45s
argocd-repo-server-7d969c8c68-xcpvk 1/1 Running 0 8m45s
argocd-server-58f6cdcccd-hwbrf 1/1 Running 0 8m45s
#
kubectl get appprojects.argoproj.io -n argocd
NAME AGE
default 17m
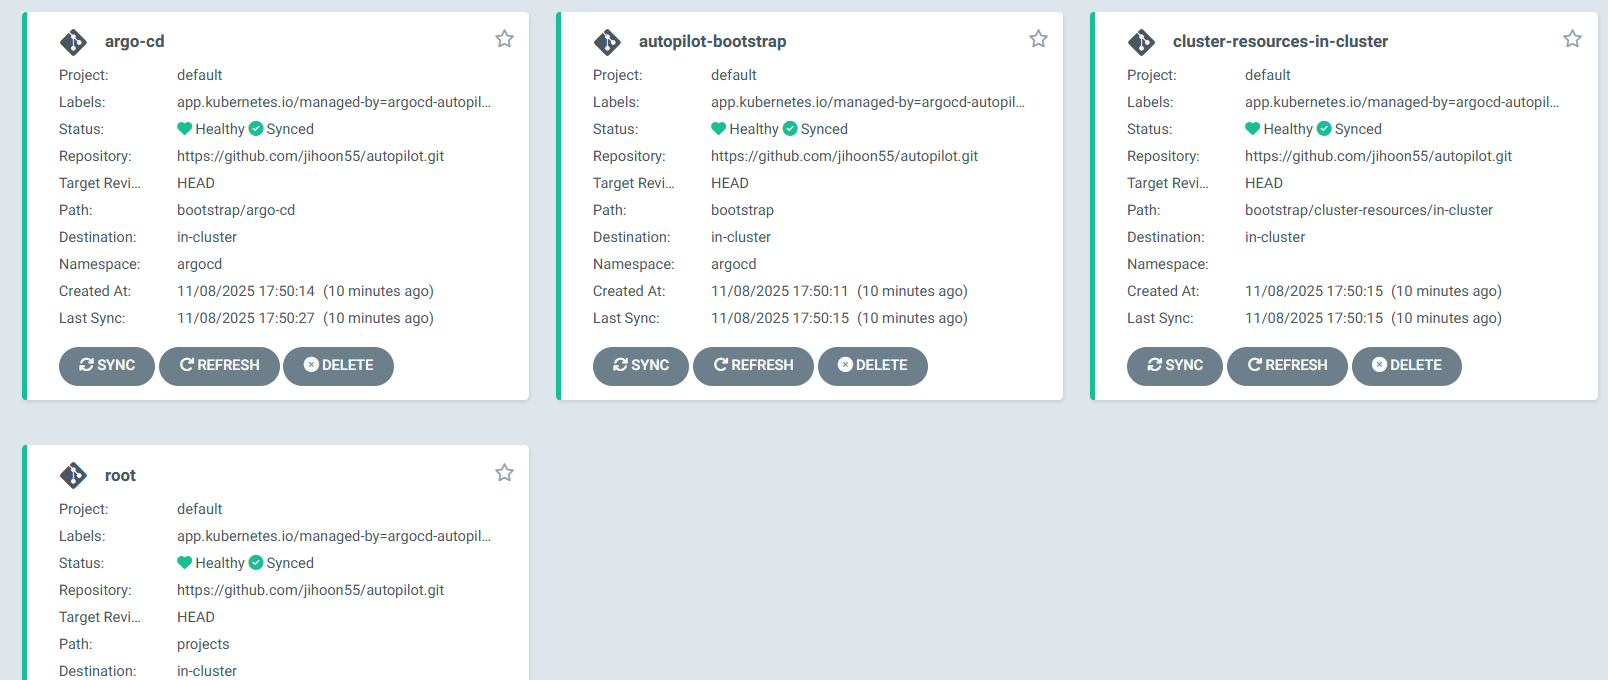
kubectl get applications.argoproj.io -n argocd -owide
NAME SYNC STATUS HEALTH STATUS REVISION PROJECT
argo-cd Synced Healthy 9f60bd38bd867fabb10dacc73e4156e8545c9de2 default
autopilot-bootstrap Synced Healthy 9f60bd38bd867fabb10dacc73e4156e8545c9de2 default
cluster-resources-in-cluster Synced Healthy 9f60bd38bd867fabb10dacc73e4156e8545c9de2 default
root Synced Healthy 9f60bd38bd867fabb10dacc73e4156e8545c9de2 default
kubectl get applications.argoproj.io -n argocd autopilot-bootstrap -o yaml | kubectl neat | yq
source:
path: bootstrap
repoURL: https://github.com/gasida/autopilot.git
...
kubectl get applications.argoproj.io -n argocd argo-cd -o yaml | kubectl neat | yq
source:
path: bootstrap/argo-cd
repoURL: https://github.com/gasida/autopilot.git
...
kubectl get applications.argoproj.io -n argocd cluster-resources-in-cluster -o yaml | kubectl neat | yq
source:
path: bootstrap/cluster-resources/in-cluster
repoURL: https://github.com/gasida/autopilot.git
...
kubectl get applications.argoproj.io -n argocd root -o yaml | kubectl neat | yq
source:
path: projects
repoURL: https://github.com/gasida/autopilot.git
...
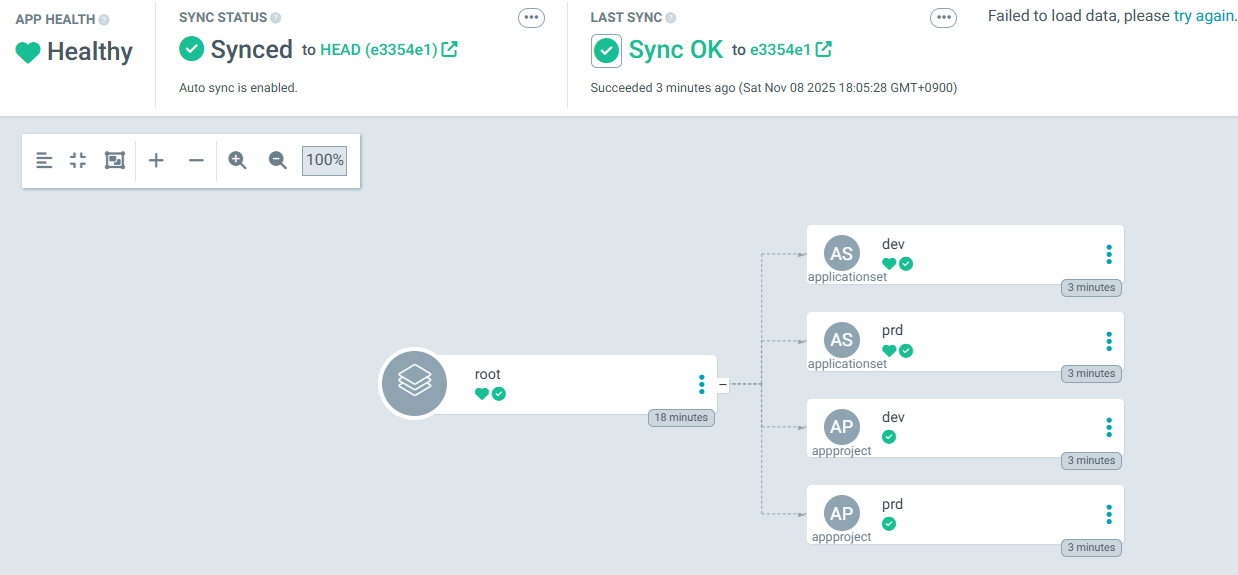
# applications 그룹핑을 app of apps 패턴이라고 부름 : 이 패턴은 다른 애플리케이션을 생성하는 메인 애플리케이션을 구축할 수 있다는 것.
# 애플리케이션 선언적 방식으로 애플리케이션 그룹을 관리할 수 있도록 해주고 구성과 배포를 함께 할 수 있음.
kubectl get applicationsets.argoproj.io -n argocd
NAME AGE
cluster-resources 15m
kubectl get applicationsets.argoproj.io -n argocd -o yaml | k neat | yq
apiVersion: v1
items:
- apiVersion: argoproj.io/v1alpha1
kind: ApplicationSet
metadata:
annotations:
argocd.argoproj.io/sync-wave: "0"
argocd.argoproj.io/tracking-id: autopilot-bootstrap:argoproj.io/ApplicationSet:argocd/cluster-resources
name: cluster-resources
namespace: argocd
spec:
generators:
- git:
files:
- path: bootstrap/cluster-resources/*.json
repoURL: https://github.com/gasida/autopilot.git
requeueAfterSeconds: 20
revision: ""
template:
spec:
project: ""
syncPolicy:
preserveResourcesOnDeletion: true
template:
metadata:
labels:
app.kubernetes.io/managed-by: argocd-autopilot
app.kubernetes.io/name: cluster-resources-{{name}}
name: cluster-resources-{{name}}
namespace: argocd
spec:
destination:
server: '{{server}}'
ignoreDifferences:
- group: argoproj.io
jsonPointers:
- /status
kind: Application
project: default
source:
path: bootstrap/cluster-resources/{{name}}
repoURL: https://github.com/gasida/autopilot.git
syncPolicy:
automated:
allowEmpty: true
selfHeal: true
# 위 초기 접속 암호 확인 후 웹 접속 후 확인
http://localhost:8080- 디렉터리 구조
- apps : 애플리케이션 디렉터리.
- bootstrap : ArgoCD 초기 설정 및 클러스터 리소스.
- projects : 환경별 프로젝트 정의.

- autopilot-bootstrap
- References the bootstrap directory in the GitOps repository, and manages the other 2 applications
- argo-cd
- References the bootstrap/argo-cd folder, and manages the Argo CD deployment itself (including Argo CD ApplicationSet)
- root
- References the projects directory in the repo. The folder contains only an empty DUMMY file after the bootstrap command, so no projects will be created

5. Project 생성, Application 추가
- Project 생성

# 각자 자신의 Git 정보 사용하자
export GIT_TOKEN=<자신의 Git Token>
export GIT_REPO=<자신의 Repo>

export GIT_TOKEN=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
export GIT_REPO=https://github.com/gasida/autopilot.git


# Projects provide a way to logically group applications and easily control things such as defaults and restrictions.
# Projects may also be used to deploy applications to different kubernetes clusters.
# To create your first project run the following command:
# 프로젝트 생성
argocd-autopilot project create dev
argocd-autopilot project create prd
INFO cloning git repository: https://github.com/gasida/autopilot.git
Enumerating objects: 18, done.
Counting objects: 100% (18/18), done.
Compressing objects: 100% (15/15), done.
Total 18 (delta 2), reused 17 (delta 1), pack-reused 0 (from 0)
INFO using revision: "", installation path: "/"
INFO pushing new project manifest to repo
INFO project created: 'prd'

#
kubectl get appprojects.argoproj.io -n argocd dev -o yaml | kubectl neat | yq
kubectl get appprojects.argoproj.io -n argocd prd -o yaml | kubectl neat | yq
kubectl get appprojects.argoproj.io -n argocd
NAME      AGE
default   29m
dev       104s
prd       101s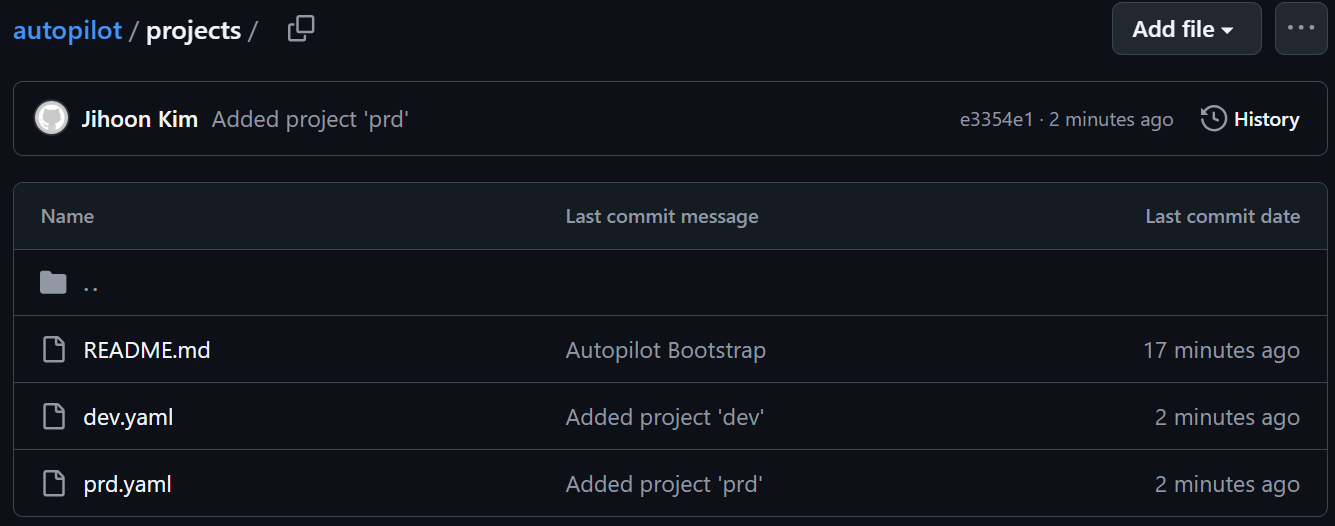
- Application 추가
# This will create the testing AppProject and ApplicationSet.
# You should see that it was pushed to your installation repository under /projects/testing.yaml
# 애플리케이션 생성
argocd-autopilot app create hello-world1 --app github.com/argoproj-labs/argocd-autopilot/examples/demo-app/ -p dev --type kustomize
argocd-autopilot app create hello-world2 --app github.com/argoproj-labs/argocd-autopilot/examples/demo-app/ -p prd --type kustomize
argocd-autopilot app delete hello-world2 -p prd

#
kubectl get applications.argoproj.io -n argocd -owide
NAME                           SYNC STATUS   HEALTH STATUS   REVISION                                   PROJECT
dev-hello-world1               Synced        Healthy         d4215a0bb38b31f988f0e101f4d9a201f77f1f1e   dev
...

kubectl get applications.argoproj.io -n argocd dev-hello-world1 -o yaml | kubectl neat | yq
  source:
    path: apps/hello-world1/overlays/dev
    repoURL: https://github.com/gasida/autopilot.git

#
kubectl get deploy,pod
NAME                                READY   UP-TO-DATE   AVAILABLE   AGE
deployment.apps/simple-deployment   1/1     1            1           9m17s

NAME                                     READY   STATUS    RESTARTS   AGE
pod/simple-deployment-7854dd65f8-8tp86   1/1     Running   0          9m17s

6. 동기화 원리
1. 리소스 훅
- 동기화란 쿠버네티스 클러스터에 변경 내용을 적용해 애플리케이션을 타깃 상태로 만드는 단계다.
- 그리고 이러한 작업이 Argo CD 에서 여러 단계를 거쳐 실행된다.
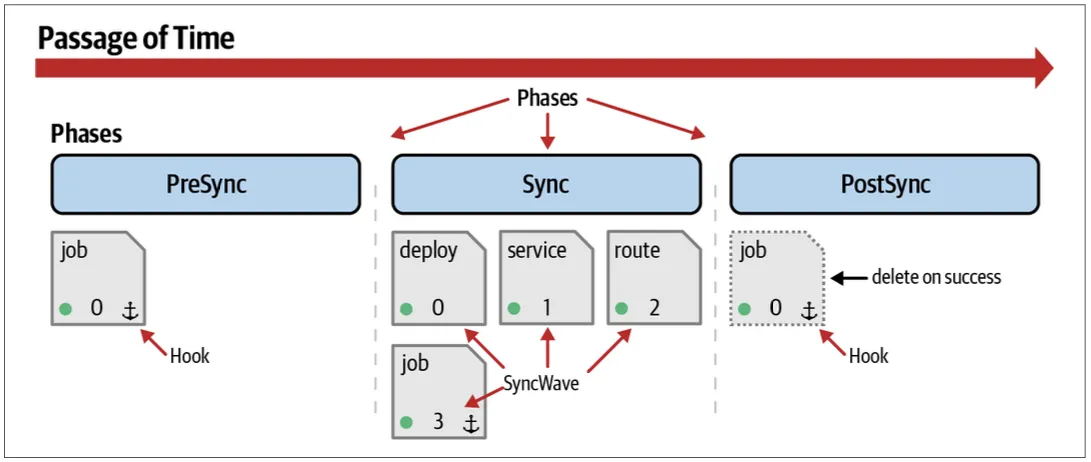
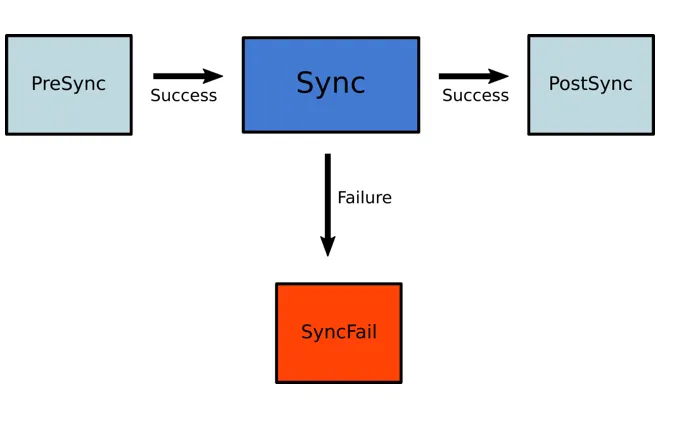
- 동기화 단계는 다음과 같다.
- 사전 동기화 pre-sync
- 동기화 sync
- 사후 동기화 post-sync
- 이를 리소스 훅이라고 하며 동기화 단계 전, 중, 후에 다른 작업을 실행할 수 있는 권한을 제공한다.
https://argo-cd.readthedocs.io/en/stable/user-guide/sync-waves/
- PreSync hook
- 동기화 단계 전에 완료돼야 하는 작업을 수행할 때 사용한다.
- 일반적으로 데이터베이스 마이그레이션을 예시로 드는데 마이그레이션을 먼저 진행하기 때문이다.
- Skip
- Argo CD에 애플리케이션 매니페스트가 적용되지 않도록 할 때 사용한다.
- Sync hook
- 블루-그린이나 카나리 배포와 같은 쿠버네티스 롤링 업데이트 전략 보다 더 정교하고 복잡한 배포를 오케스트레이션 하는 데 사용한다.
- PostSync hook
- 배포 후에 통합 및 상태 확인을 하거나, 새로운 릴리즈나 다른 시스템과 통합 같은 내용을 알리는 데 사용한다.
- SyncFail hook
- 동기화 작업이 실패했을 경우 로직을 정리 또는 종료시킬 때 사용한다.
- PostDelete → v2.10 이후 사용 가능
- Application resources 모두 삭제되었을 때 사용한다
- 리소스 훅은 쿠버네티스 매니페스트에 적용된다.
- 예를 들어 데이터베이스 스키마 마이그레이션을 쿠버네티스 Job 을 통해서 실행한다고 해보자.
- 리소스 훅은 쿠버네티스 어노테이션 annotation 으로 설정할 수 있다.
- 이 어노테이션이 동기화 작업 중에 리소스를 실행해야 할 때 Argo CD에게 알려준다.
apiVersion: batch/v1
kind: Job
metadata:
  name: db-migrate
  annotations:
argocd.argoproj.io/hook: PreSync- 리소스 훅은 논리적인 순서나 사용 사례에 맞게 매니페스트 동기화 순서를 배치하는 데 유리하다.
2. 동기화 웨이브
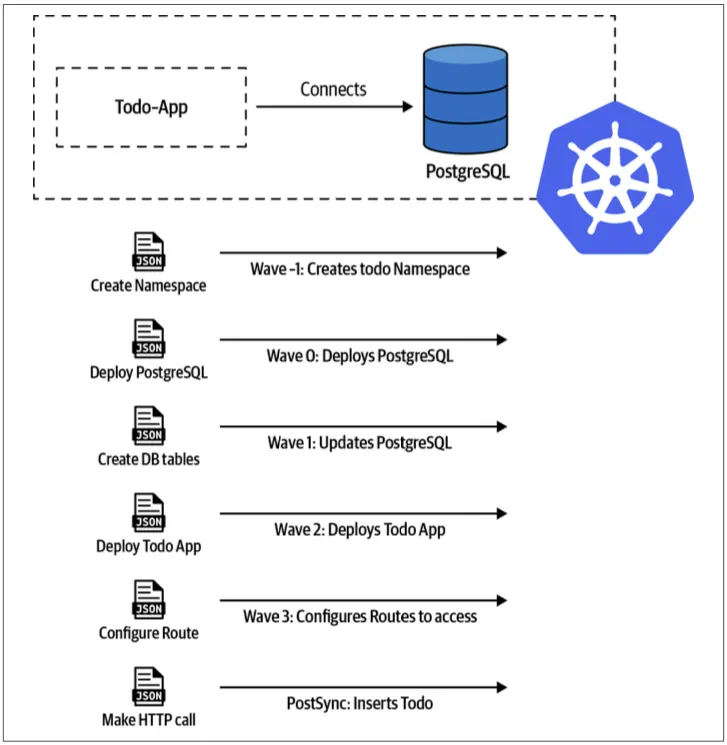
- 동기화 단계에서 사전 동기화, 동기화, 사후 동기화 이렇게 세 단계가 있다.
- 이렇게 세 단계 내에서 후속 리소스가 동기화되기 전에 특정 리소스가 정상인지 확인할 수 있는 하나 이상의 웨이브 weave 를 가질 수 있다.
- 웨이브는 양수와 음수 값을 모두 가질 수 있다. 웨이브 값이 특정되지 않으면 기본값으로 0을 할당한다.
- 웨이브는 매니페스트에 어노테이션을 추가하여 정의한다.
metadata:
  annotations:
argocd.argoproj.io/sync-wave: "5"- 이 두가지 방식으로 매니페스트 실행 순서를 재배치할 수 있다.
- 리소스 훅
- 동기화 웨이브

- 먼저 두 가지 방법을 동시에 진행하거나 결합할 수 있다.
- 동기화 작업을 시작할 때 Argo CD는 다음 순서에 따라 리소스를 변경한다.
- 어노테이션 확인
- 웨이브 어노테이션 (낮은 값부터)
- 쿠버네티스 리소스 종류 (네임스페이스 먼저)
- 이름 (오름차순)
- Argo CD는 다음에 어떤 웨이브를 적용할지 결정하고, 동기화되지 않았거나 out-of-sync 비정상 리소스를 확인한다.
- 그리고 다음 웨이브를 적용하는 방식으로 모든 단계와 웨이브가 동기화되고 정상이 될 때까지 반복한다.
- 첫 번째 웨이브 동안 애플리케이션에서 리소스가 비정상이라면 그 애플리케이션은 정상이 아니라는 것을 명싱하자.
3. 동기화 윈도
- 과제
- 시간대에 따라 애플리케이션 동기화를 차단하거나 허용하도록 Argo CD를 설정
- 풀이
- Argo CD는 애플리케이션 동기화(저장소에 푸시된 변경 사항 적용)를 차단하거나 허용할 시간대를 구성할 수 있도록 동기화 윈도 synchronization window 라는 개념을 지원한다.
- 동기화 윈도를 정의하려면 AppProject 매니페스트를 만들어 주면 된다.
cat <<EOF | kubectl apply -f -
apiVersion: argoproj.io/v1alpha1
kind: AppProject
metadata:
  name: default
  namespace: argocd
spec:
  description: Default project
  sourceRepos:
    - '*'
  destinations:
    - namespace: '*'
      server: https://kubernetes.default.svc
  clusterResourceWhitelist:
    - group: '*'
      kind: '*'
  namespaceResourceWhitelist:
    - group: '*'
      kind: '*'
  syncWindows:
    - kind: allow # 허용
      schedule: "10 1 * * *" # cron 형식 지원
      duration: 1h # 얼마동안
      applications: # application or namespace or cluster
        - "*-prod" # 이름이 -prod로 끝나는 모든 애플리케이션
      manualSync: true
    - kind: deny # 차단
      schedule: "0 22 * * *"
      timeZone: "Europe/Amsterdam"
      duration: 1h
      namespaces:
        - default
    - kind: allow
      schedule: "0 23 * * *"
      duration: 1h
      clusters:
        - in-cluster
        - cluster1
EOF

# 프로젝트 확인
kubectl -n argocd get appprojects
kubectl -n argocd get appproject default -o yaml

# Argo CD CLI에서 윈도우 조회 (프로젝트 이름을 정확히!)
argocd login <ARGOCD_SERVER>   # 필요 시
argocd proj windows list default- 설정 정보 확인 : Web UI → Settings → Projects → <default> → windows
# Windows can be listed using the CLI or viewed in the UI:
argocd proj windows list PROJECT
ID  STATUS    KIND   SCHEDULE    DURATION  APPLICATIONS  NAMESPACES  CLUSTERS  MANUALSYNC
0   Active    allow  * * * * *   1h        -             -           prod1     Disabled
1   Inactive  deny   * * * * 1   3h        -             default     -         Disabled
2   Inactive  allow  1 2 * * *   1h        prod-*        -           -         Enabled
3   Active    deny   * * * * *   1h        -             default     -         Disabled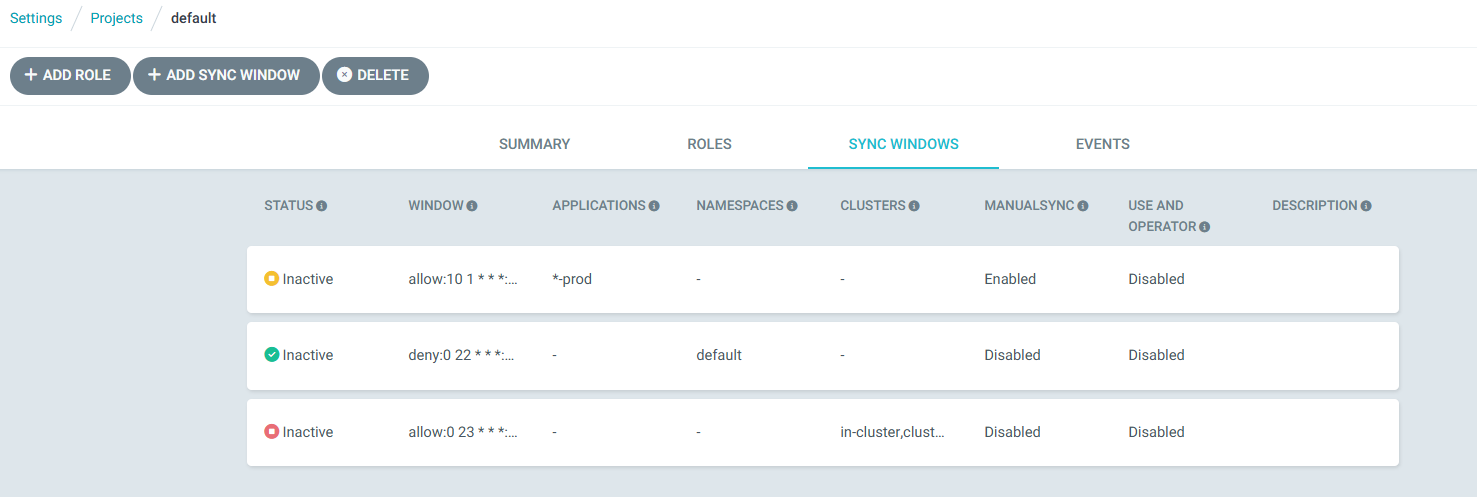
- 다음 실습을 위해 리소스 삭제
kind delete cluster --name myk8s
Argo CD 운영
- 고가용성 HA 매니페스트를 사용해 Argo CD를 설치해보고, 가장 최적의 구성 옵션이 무엇인지 알아본다.
- 재해 복구를 대비하고, 많은 메트릭 중 꼭 필요한 것은 무엇인지 살펴본다.
1. kind k8s 배포
# kind k8s 배포
kind create cluster --name myk8s --image kindest/node:v1.32.8 --config - <<EOF
kind: Cluster
apiVersion: kind.x-k8s.io/v1alpha4
nodes:
- role: control-plane
  extraPortMappings:
  - containerPort: 30000
    hostPort: 30000
  - containerPort: 30001
    hostPort: 30001
  - containerPort: 30002
    hostPort: 30002
  - containerPort: 30003
    hostPort: 30003
- role: worker
- role: worker
- role: worker
EOF

# kube-ops-view
helm repo add geek-cookbook https://geek-cookbook.github.io/charts/
helm install kube-ops-view geek-cookbook/kube-ops-view --version 1.2.2 --set service.main.type=NodePort,service.main.ports.http.nodePort=30001 --set env.TZ="Asia/Seoul" --namespace kube-system

# kube-ops-view 접속 URL 확인 (1.5 , 2 배율)
open "http://127.0.0.1:30001/#scale=1.5"
open "http://127.0.0.1:30001/#scale=2"
2. 선언적 구성 : HA mode 설치
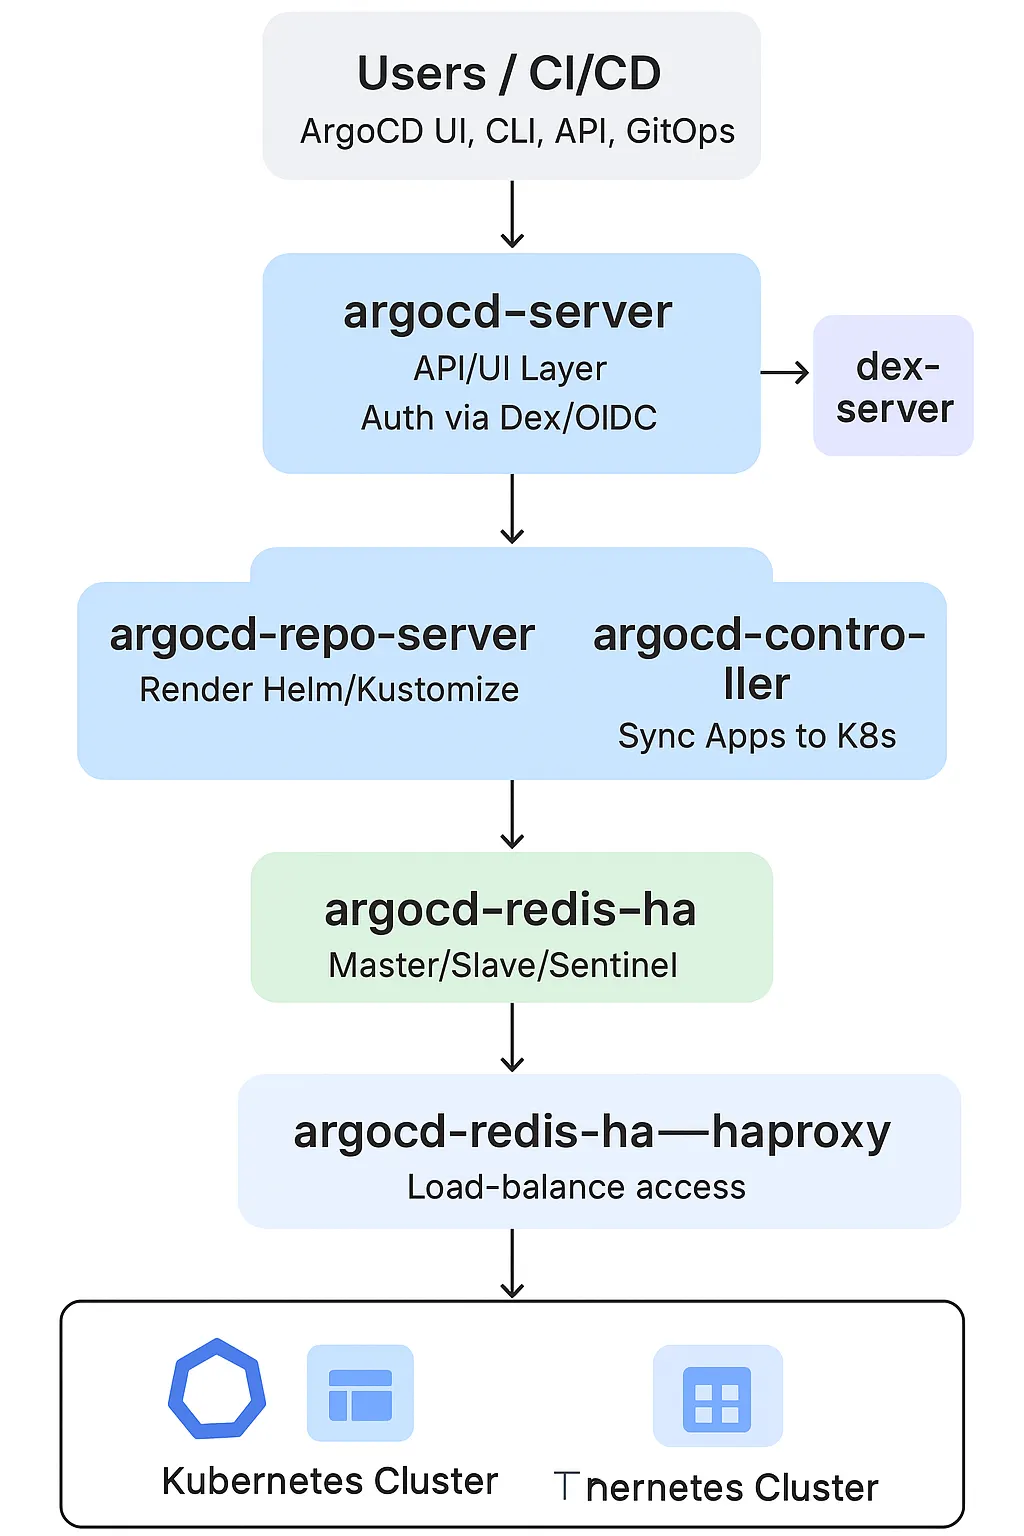
- Argo CD HA의 핵심은 Controller, Repo-server, Server 3대 구성요소를 다중화 + Redis HA 구성
- Redis HA는 Sentinel + HAProxy 로 장애 시 자동 failover
- Controller는 Leader Election으로 1개만 active, 나머지는 standby
- Repo-server / Server는 수평 확장으로 부하 분산
- 모든 구성요소는 Argo CD CRD(Application)를 watch하여 자동 GitOps 수행
| 구성요소 | 타입 | 기본 Replica | 주요 역할 |
| argocd-repo-server | Deployment | 2개 이상 | Git 저장소에서 매니페스트 가져오고 렌더링 (Helm/Kustomize 등) |
| argocd-application-controller | StatefulSet | 2개 이상 | 실제 동기화 수행 (Git↔Cluster 상태 비교 및 Apply) |
| argocd-dex-server | Deployment | 1개 이상 | OIDC 인증(SSO) 제공 (Keycloak, Google, GitHub 등 연동) |
| argocd-redis-ha | StatefulSet | 3개 (Sentinel 포함) | 캐시/세션 저장소 — App 상태 및 Auth Token 캐시 |
| argocd-redis-ha-haproxy | Deployment | 1개 이상 | Redis 클러스터를 프록시(로드밸런싱) |
| argocd-notifications-controller | Deployment | 1개 이상 | Slack, Webhook 등 알림 처리 |
| argocd-application-set-controller | Deployment | 1개 이상 | 다중 Application 자동 생성 (예: 환경별 앱 배포) |
| 요소 | HA 동작 방식 |
| Server / Controller / Repo-server | Deployment or StatefulSet 으로 replica 복제, K8s Service LB로 라우팅 |
| Redis HA | Sentinel 구조로 master 선출 |
| Dex | Stateless → 여러 replica 가능 |
| Notifications / ApplicationSet | Controller 간 leader election 수행 |
# 매니페스트 파일 작성 및 배포
cat << EOF > resources/namespace.yaml
apiVersion: v1
kind: Namespace
metadata:
  name: argocd
EOF
kubectl apply -f resources/namespace.yaml
wget https://raw.githubusercontent.com/argoproj/argo-cd/refs/heads/master/manifests/ha/install.yaml
mv install.yaml resources/
kubectl apply -f resources/install.yaml -n argocd

# 확인
watch -d kubectl get pod -n argocd
kubectl port-forward svc/argocd-server -n argocd 8080:80

#
kubectl get secret -n argocd argocd-initial-admin-secret -o jsonpath='{.data.password}' | base64 -d ; echo
UOn2CEkg0c4RCfQU
open https://127.0.0.1:8080 # 프로덕션의 경우 TLS인증서가 적용된 로드밸랜서 서비스로 오픈하자

# 원격 리포지터리에 커밋하고 푸시한다.
git add . && git commit -m "Deploy Argo CD " && git push -u origin main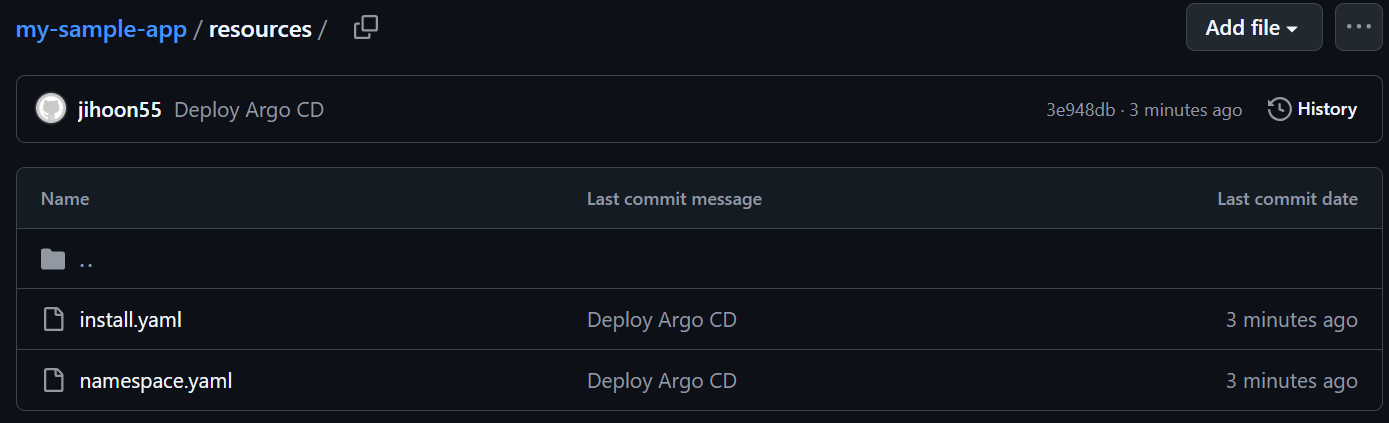
3. Argo CD 자체 관리: 오토파일럿 처럼, 자기 자신을 애플리케이션으로 관리
- Argo CD 애플리케이션을 만들고, 매니페스트에 특정 폴더를 지정할 것이다.
- Argo CD 는 리포지터리와 폴더 변화를 모니터링하며, 폴더에 어떤 커밋이 발생하면 자동으로 적용될 것이다.
- Argo CD UI → Settings → Repo 에 자신의 Repo 추가

- Argo CD 애플리케이션 생성
# Argo CD 애플리케이션 생성
cat <<EOF | kubectl apply -f -
apiVersion: argoproj.io/v1alpha1
kind: Application
metadata:
  name: argocd
  namespace: argocd
spec:
  project: default
  source:
    path: resources
    repoURL: https://github.com/jihoon55/my-sample-app
    targetRevision: main
  syncPolicy:
    automated: {}
  destination:
    namespace: argocd
    server: https://kubernetes.default.svc
EOF

#
kubectl get applications.argoproj.io -n argocd -owide
NAME     SYNC STATUS   HEALTH STATUS   REVISION                                   PROJECT
argocd   Synced        Healthy         3ebfcfdc11acafd9bc9c875c80f19bb566633e06   default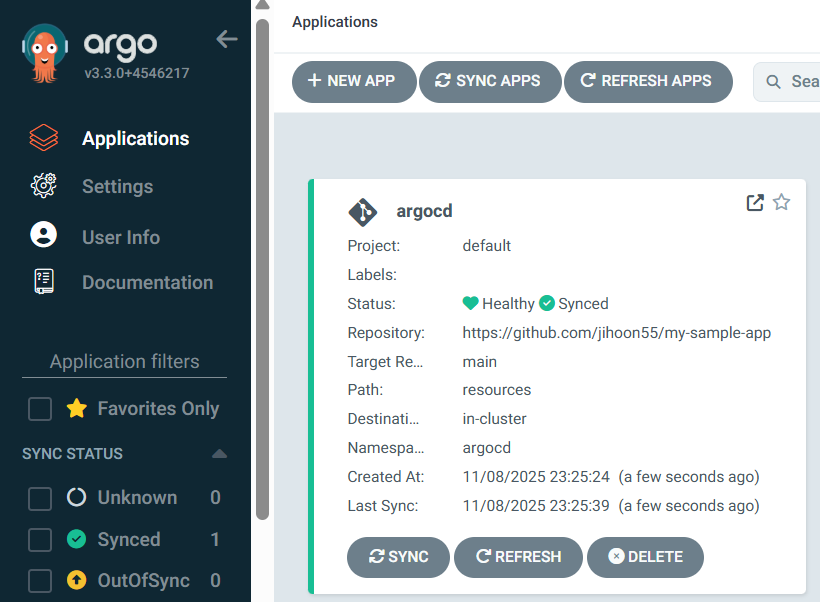

4. Argo CD 설정 변경
이제 커밋을 하거나 원격 저장소에 푸시하면 자동으로 Argo CD에 적용되는 간단한 설정 업데이트를 해보자.
- 목표 : networkpolicy 를 삭제해보자
# 배포된 networkpolicy
kubectl get networkpolicies.networking.k8s.io -n argocd
NAME                                              POD-SELECTOR                                              AGE
argocd-application-controller-network-policy      app.kubernetes.io/name=argocd-application-controller      40m
argocd-applicationset-controller-network-policy   app.kubernetes.io/name=argocd-applicationset-controller   40m
argocd-dex-server-network-policy                  app.kubernetes.io/name=argocd-dex-server                  40m
argocd-notifications-controller-network-policy    app.kubernetes.io/name=argocd-notifications-controller    40m
argocd-redis-ha-proxy-network-policy              app.kubernetes.io/name=argocd-redis-ha-haproxy            40m
argocd-redis-ha-server-network-policy             app.kubernetes.io/name=argocd-redis-ha                    40m
argocd-repo-server-network-policy                 app.kubernetes.io/name=argocd-repo-server                 40m
argocd-server-network-policy app.kubernetes.io/name=argocd-server 40m- 코드 수정 : networkpolicy 삭제 후 푸시
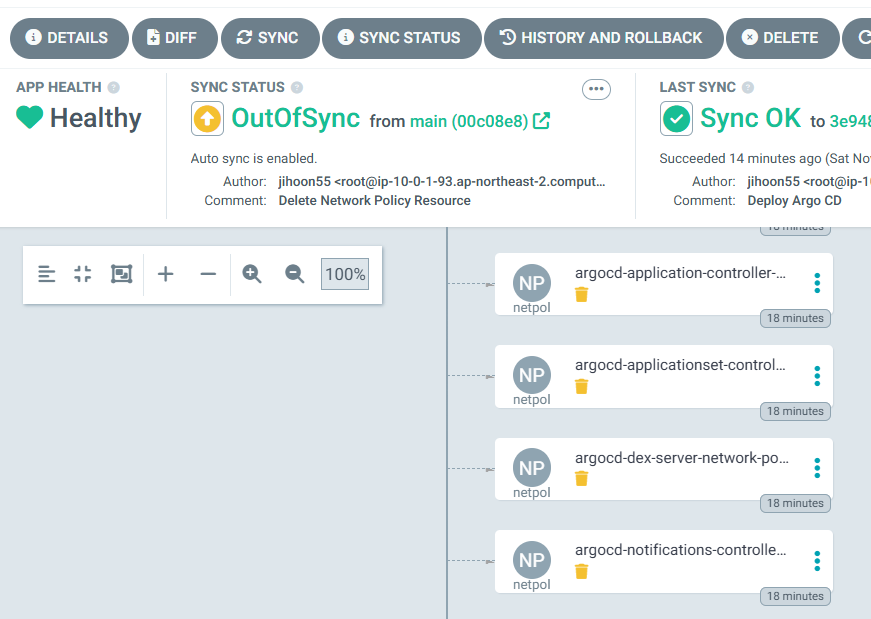
# 원격 리포지터리에 커밋하고 푸시한다.
git add . && git commit -m "Delete Network Policy Resource" && git push -u origin main

# 모니터링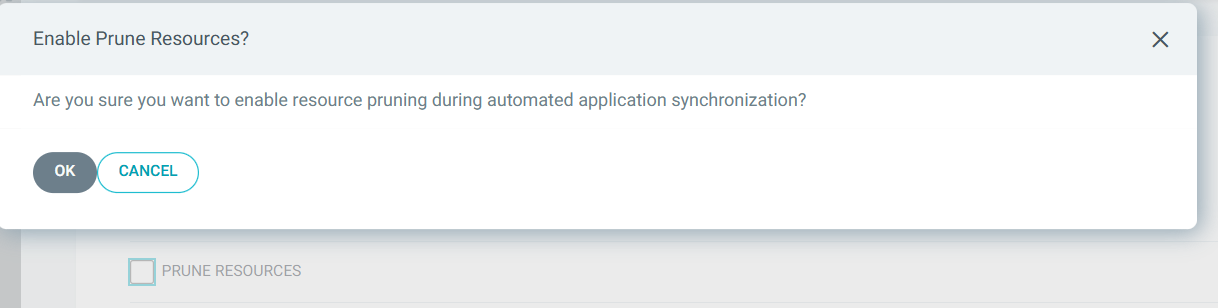
watch -d kubectl get networkpolicies.networking.k8s.io -n argocd- Argo CD UI : REFRESH 확인 → SYNC → SYNCHRONIZE (PRUNE 체크)
- 혹은 sync policy 에 prune resources 체크 → git 과 비교해서 삭제 수행
- Argo CD를 운영 중인 상태에서 간단한 설정 값 변경부터 버전 업그레이드까지 자체적으로 관리할 수 있다는 점은 매우 유용한다.
- Argo CD에 의해 모든 것이 자동으로 적용돼 Argo CD가 관리하는 애플리케이션이 된다.
- 일반적인 깃옵스의 작업 방식은 변경 사항에 대해서 풀 리퀘스트를 만들어 동료 리뷰를 하도록 한다.
5. 관찰 가능성 기본 정보
1. monitoring과 관측 가능성 observability의 정의와 차이점
측면 모니터링 관측 가능성
| 측면 | monitoring | observability |
| 정의 | 특정 메트릭 추적으로 문제 감지 | 외부 출력 데이터로 시스템 상태 이해 |
| 목표 | 문제 발생 시 감지 및 경고 | 문제 원인 진단 및 시스템 최적화 |
| 데이터 소스 | 미리 정의된 메트릭 (CPU, 메모리 등) | 로그, 메트릭, 트레이스, 이벤트 등 |
| 시스템 유형 | 단순한 시스템, 잘 알려진 파라미터 | 복잡한 분산 시스템, 다중 컴포넌트 |
| 상호작용 방식 | 정적 경고 (임계값 기반) | 동적 쿼리 및 분석 (질문 기반) |
- 모니터링의 정의와 특징 : 사전에 정의된 기준을 기반으로 시스템의 상태를 감시에 중점
- 모니터링은 IT 시스템의 운영 상태를 추적하고, 성능 지표를 수집하며, 예상치 못한 문제를 조기에 감지하는 과정입니다. What is IT monitoring? | Definition from TechTarget에 따르면, 모니터링은 하드웨어와 소프트웨어의 메트릭을 수집하여 모든 것이 정상적으로 작동하는지 확인하고, 문제를 탐지하며 해결하는 데 사용됩니다.
- 주요 활동: CPU 사용량, 메모리 사용량, 응답 시간, 오류율 등 특정 지표를 지속적으로 측정.
- 목적: 시스템 다운타임을 방지하고, 경고를 통해 팀이 빠르게 대응할 수 있도록 함.
- 빈도: 연속적이거나 일정 간격(일간, 주간, 월간)으로 수행됨.
- 예시: Google의 SRE 책(What’s IT Monitoring? IT Systems Monitoring Explained | Splunk)에서는 모니터링을 "시스템에 대한 실시간 정량 데이터 수집, 처리, 집계, 표시"로 정의하며, 쿼리 수, 오류 수, 처리 시간 등을 포함한다고 설명합니다.
- 모니터링은 주로 단순하고 잘 알려진 시스템에 적합하며, 미리 설정된 임계값을 초과하면 알림을 발송하는 방식으로 작동합니다. 예를 들어, 서버의 CPU 사용량이 90%를 초과하면 경고가 발생할 수 있습니다.
- 모니터링은 IT 시스템의 운영 상태를 추적하고, 성능 지표를 수집하며, 예상치 못한 문제를 조기에 감지하는 과정입니다. What is IT monitoring? | Definition from TechTarget에 따르면, 모니터링은 하드웨어와 소프트웨어의 메트릭을 수집하여 모든 것이 정상적으로 작동하는지 확인하고, 문제를 탐지하며 해결하는 데 사용됩니다.
- 관측 가능성의 정의와 특징 : 수집된 다양한 데이터를 활용하여 예측되지 않은 문제까지 분석
- 관측 가능성은 시스템의 내부 상태를 외부 출력 데이터(로그, 메트릭, 트레이스)를 통해 이해할 수 있는 능력을 의미합니다. Observability (software) - Wikipedia에 따르면, 관측 가능성은 소프트웨어 엔지니어링에서 프로그램 실행, 모듈 내부 상태, 컴포넌트 간 통신 데이터를 수집하고 분석하는 능력을 말합니다.
- 핵심 데이터: 로그(이벤트 기록), 메트릭(수치 데이터), 트레이스(요청 흐름 추적), 그리고 일부 경우 이벤트가 포함됩니다.
- 목적: 복잡한 분산 시스템에서 문제를 진단하고, 새로운 문제를 탐지하며, 시스템 동작을 최적화.
- What Is Observability? | IBM에서는 관측 가능성을 "복잡한 시스템의 내부 상태를 외부 출력 데이터로 이해하는 능력"으로 정의하며, 특히 클라우드 환경에서 중요하다고 강조합니다.
- 예시: 애플리케이션이 느려진 이유가 특정 마이크로서비스의 데이터베이스 연결 문제 때문이라는 것을 로그와 트레이스를 통해 파악.
- 관측 가능성은 특히 현대의 분산 아키텍처(예: 마이크로서비스, 컨테이너)에서 필수적이며, 미리 정의되지 않은 질문에 답할 수 있는 유연성을 제공합니다. 예를 들어, "왜 이 특정 요청이 실패했는가?"라는 질문을 로그와 트레이스를 통해 분석할 수 있습니다. → 콘텍스트 context(문맥) 정보를 제공
- APM 대신 추적 tracing 이라고 부르며, 계측 instrumentation 과 텔레메트리 telemetry 라는 용어를 범용적으로 사용함.
- 관측 가능성은 시스템의 내부 상태를 외부 출력 데이터(로그, 메트릭, 트레이스)를 통해 이해할 수 있는 능력을 의미합니다. Observability (software) - Wikipedia에 따르면, 관측 가능성은 소프트웨어 엔지니어링에서 프로그램 실행, 모듈 내부 상태, 컴포넌트 간 통신 데이터를 수집하고 분석하는 능력을 말합니다.
- 차이점
- 목적:
- 모니터링: 시스템의 건강 상태를 확인하고, 문제가 발생했는지 감지. 예: 서버 다운 감지.
- 관측 가능성: 문제의 원인을 진단하고, 시스템 동작을 이해. 예: 왜 서버가 다운되었는지 분석.
- 데이터 수집:
- 모니터링: 미리 정의된 메트릭(CPU 사용량, 메모리 사용량 등)에 초점. Monitoring - Oxford Reference에서는 모니터링을 "특정 프로세스의 성능 분석"으로 정의.
- 관측 가능성: 로그, 메트릭, 트레이스 등 다양한 데이터 소스를 통합적으로 사용. What is observability? Not just logs, metrics, and traces에서는 이를 "관측 가능성의 세 가지 기둥"으로 설명.
- 시스템 복잡성:
- 모니터링: 단순한 시스템에 적합, 예: 단일 서버 환경.
- 관측 가능성: 복잡한 분산 시스템에 필수, 예: 마이크로서비스 아키텍처. Observability vs. Monitoring: Understanding the Differences | InfluxData에서는 분산 시스템에서 관측 가능성의 중요성을 강조.
- 사용자 상호작용:
- 모니터링: 경고 기반, 예: 임계값 초과 시 알림.
- 관측 가능성: 동적 쿼리 및 분석 가능, 예: 특정 로그를 검색해 문제 원인 찾기.
- 목적:
2. observability 의 메트릭 metric, 로그 log, 추적 tracing 이란?
| 비교 항 | Metrics | Logs | Tracing |
| 정의 | 수치로 표현된 성능 데이터 | 시스템 이벤트 기록 | 요청이 시스템을 거치는 과정 추적 |
| 형태 | 숫자 (정량적 데이터) | 텍스트 (비정형 데이터) | 트랜잭션 흐름 데이터 |
| 예시 데이터 | CPU 사용률, 응답 시간, 요청 수 | 오류 메시지, 로그인 시도, API 호출 로그 | A 서비스 → B 서비스 → C 서비스 요청 흐름 |
| 주요 목적 | 시스템 성능 모니터링 및 알람 | 이벤트 분석 및 디버깅 | 서비스 간 호출 경로 및 병목 현상 분석 |
| 저장 방식 | 시계열 데이터베이스(TSDB) | 로그 파일 또는 로그 관리 시스템 | 분산 트레이싱 시스템 (Jaeger, Zipkin) |
| 활용 도구 | Prometheus, Grafana | ELK Stack, Loki | Jaeger, Zipkin |
- 메트릭(Metrics): 시스템의 성능을 정량적으로 모니터링
- 메트릭은 시스템의 성능과 건강 상태를 수치로 표현한 데이터입니다. 예를 들어, CPU 사용량, 메모리 사용량, 요청 지연 시간, 오류율 등이 있습니다. 이는 시스템의 전반적인 상태를 한눈에 볼 수 있게 도와주며, 이상 징후를 빠르게 감지할 수 있습니다. 놀라운 점은 메트릭이 시간에 따른 추세를 보여주며, 대시보드와 경고 시스템에 자주 사용된다는 것입니다.
- 로그(Logs): 이벤트 기반의 디버깅 및 문제 분석
- 로그는 시스템에서 발생한 이벤트를 기록한 텍스트나 구조화된 데이터입니다. 특정 행동이나 오류가 발생한 시점과 이유를 자세히 알 수 있어 디버깅에 유용합니다. 예를 들어, 애플리케이션이 오류를 낼 때 로그를 통해 그 원인을 찾을 수 있습니다.
- 추적(Tracing): 분산 시스템에서 요청 흐름을 파악하고 병목 현상 분석
- 추적, 특히 분산 추적은 요청이 분산 시스템의 여러 구성 요소를 통해 어떻게 이동하는지 추적하는 것입니다. 이는 요청의 흐름을 시각화하고, 성능 병목 현상을 찾거나 여러 서비스에 걸친 문제를 진단하는 데 도움을 줍니다. 예를 들어, 사용자가 웹사이트에서 버튼을 클릭하면 그 요청이 백엔드 서비스를 어떻게 거치는지 알 수 있습니다.
3. SLI, SLO, SLA
| 비교 항목 | SLI (서비스 수준 지표) | SLO (서비스 수준 목표) | SLA (서비스 수준 계약) |
| 정의 | 서비스 성능을 측정하는 실제 값 | 유지해야 하는 성능 목표 | 고객과 맺은 공식 계약 |
| 목적 | 현재 서비스 상태를 모니터링 | 내부적으로 목표 수준을 설정 | 고객과의 계약 보장 |
| 예제 | 99.95%의 가용성 | 99.9% 이상의 가용성 목표 | 99.9% 미만이면 환불 제공 |
| 법적 구속력 | ❌ 없음 | ❌ 없음 | ✅ 있음 |
| 위반 시 결과 | 단순 데이터 측정 | 내부 경고 및 개선 조치 | 보상금 지급, 계약 위반 가능 |
- SLI (Service Level Indicator, 서비스 수준 지표)
- SLI는 서비스 품질을 정량적으로 측정하는 주요 성능 지표입니다.
- 즉, 서비스의 신뢰성과 성능을 평가하는 데 사용되는 실제 측정된 값입니다.
- 예제
- 웹 서비스의 응답 시간: 100ms 이내의 응답률이 99.9%
- 가용성: 30일 동안 서비스 정상 작동 시간의 비율 (예: 99.99%)
- 오류율: 총 요청 중 오류 응답(5xx, 4xx)이 발생한 비율
- 트래픽 지연율: 네트워크 요청의 평균 응답 시간
- 📌 SLI는 측정값이므로, 실제 운영 데이터에서 계산됩니다.
- SLO (Service Level Objective, 서비스 수준 목표)
- SLO는 서비스가 유지해야 하는 목표 수준을 정의하는 값으로, SLI(실제 측정값)에 대한 **기준선(threshold)**을 설정합니다.
- 즉, "이 정도의 성능을 유지해야 한다"는 목표를 의미합니다.
- 예제
- 가용성 SLO: "서비스 가용성 99.9% 이상 유지"
- 응답 시간 SLO: "모든 요청의 95%는 200ms 이내에 응답해야 한다"
- 오류율 SLO: "오류율 0.1% 이하 유지"
- SLO는 내부 목표이며, SLA(계약)와 다릅니다.
- SLA (Service Level Agreement, 서비스 수준 계약)
- SLA는 서비스 제공자와 고객 간에 체결된 공식적인 계약으로, 서비스 품질을 보장하는 법적 문서입니다.
- SLA는 SLO와 달리 계약 위반 시 **페널티(배상)**가 존재할 수 있습니다.
- 예제
- 가용성 SLA: "서비스 가용성이 99.9% 미만이면, 고객에게 요금의 10% 환불"
- 응답 시간 SLA: "트랜잭션 응답 시간이 500ms를 초과하면, 서비스 제공자가 손해 배상"
- SLA는 법적 계약이므로, 위반 시 금전적 보상이 따를 수 있습니다.
6. 프로메테우스란?
Prometheus는 SoundCloud에서 개발한 오픈소스 시스템 모니터링 및 알림 툴킷이다.
- 제공 기능
- 메트릭 이름과 키/값 쌍으로 식별되는 시계열 데이터(TSDB, 시계열 데이터베이스)를 가진 다차원 데이터 모델
- 이러한 차원성을 활용하는 유연한 쿼리 언어인 PromQL
- 분산 스토리지에 의존하지 않음; 단일 서버 노드가 독립적으로 동작
- HTTP를 통한 풀(pull) 모델로 시계열 데이터 수집 ⇒ 질문 Push와 Pull 수집 방식 장단점?
- 중간 게이트웨이를 통한 시계열 데이터 푸시 지원
- 서비스 디스커버리 또는 정적 구성을 통한 타겟 발견
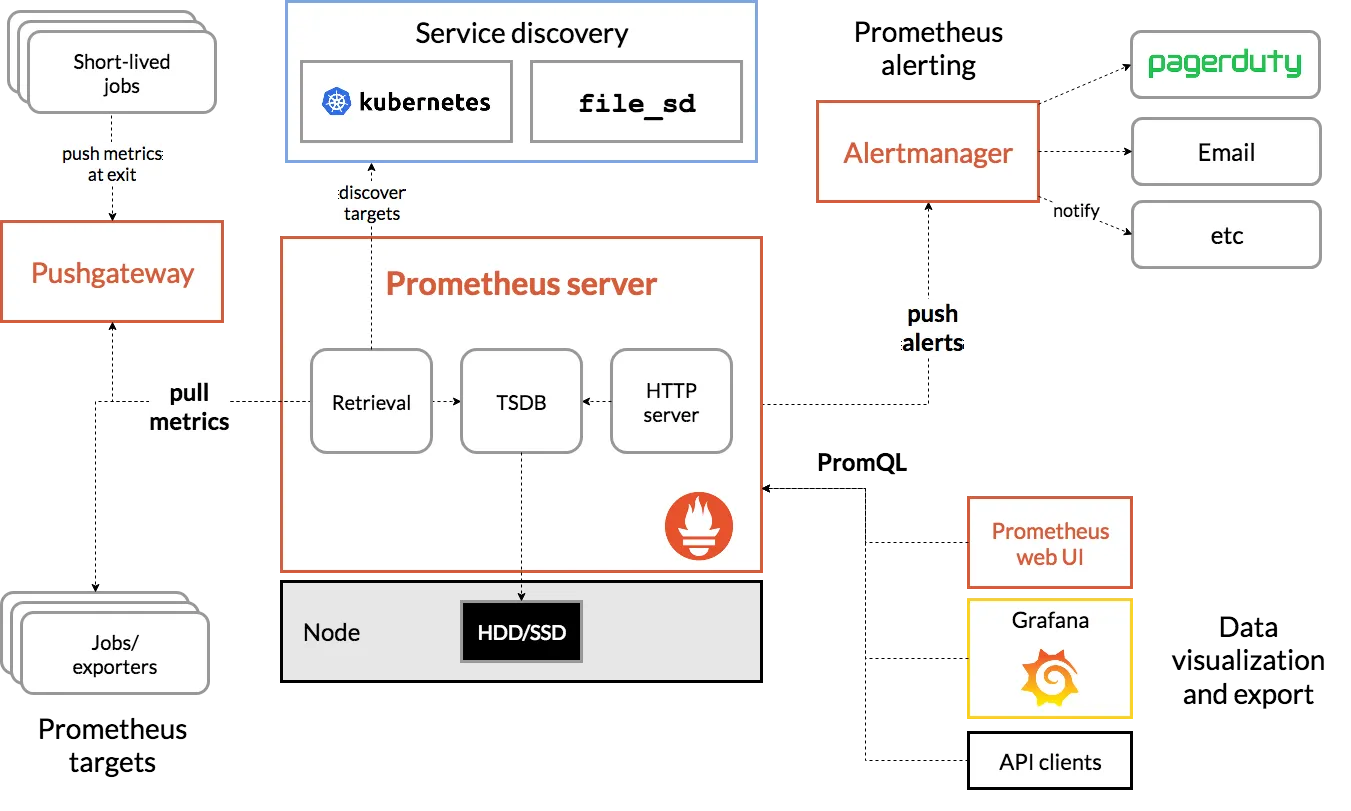
- 구성 요소
- 시계열 데이터를 수집하고 저장하는 메인 Prometheus 서버
- 애플리케이션 코드 계측을 위한 클라이언트 라이브러리
- 단기 실행 작업을 지원하는 푸시 게이트웨이
- HAProxy, StatsD, Graphite 등의 서비스를 위한 특수 목적 익스포터
- 알림을 처리하는 알림매니저
- 다양한 지원 도구
- 메트릭
- 메트릭은 일반인이 이해하기 쉬운 수치적 측정이다.
- 시계열이라는 용어는 시간에 따른 변화를 기록하는 것을 말한다.
- 사용자가 측정하고자 하는 것은 애플리케이션마다 다르다.
- 웹 서버의 경우 요청 시간이 될 수 있고, 데이터베이스의 경우 활성 연결 또는 활성 쿼리 수가 될 수 있다.

7. [AWs EC2] 프로메테우스 직접 설치
- prometheus 설치
# 최신 버전 다운로드
wget https://github.com/prometheus/prometheus/releases/download/v3.2.0/prometheus-3.2.0.linux-amd64.tar.gz

# 압축 해제
tar -xvf prometheus-3.2.0.linux-amd64.tar.gz
cd prometheus-3.2.0.linux-amd64
ls -l

#
mv prometheus /usr/local/bin/
mv promtool /usr/local/bin/
mkdir -p /etc/prometheus /var/lib/prometheus
mv prometheus.yml /etc/prometheus/
cat /etc/prometheus/prometheus.yml

#
useradd --no-create-home --shell /sbin/nologin prometheus
chown -R prometheus:prometheus /etc/prometheus /var/lib/prometheus
chown prometheus:prometheus /usr/local/bin/prometheus /usr/local/bin/promtool

#
tee /etc/systemd/system/prometheus.service > /dev/null <<EOF
[Unit]
Description=Prometheus
Wants=network-online.target
After=network-online.target

[Service]
User=prometheus
Group=prometheus
Type=simple
ExecStart=/usr/local/bin/prometheus \
  --config.file=/etc/prometheus/prometheus.yml \
  --storage.tsdb.path=/var/lib/prometheus \
  --web.listen-address=0.0.0.0:9090

[Install]
WantedBy=multi-user.target
EOF

#
systemctl daemon-reload
systemctl enable --now prometheus
systemctl status prometheus
ss -tnlp

#
curl localhost:9090/metrics
echo -e "http://$(curl -s ipinfo.io/ip):9090"- node_exporter 설치 - Github
# Node Exporter 최신 버전 다운로드
cd ~
wget https://github.com/prometheus/node_exporter/releases/download/v1.9.0/node_exporter-1.9.0.linux-amd64.tar.gz
tar xvfz node_exporter-1.9.0.linux-amd64.tar.gz
cd node_exporter-1.9.0.linux-amd64
cp node_exporter /usr/local/bin/

#
groupadd -f node_exporter
useradd -g node_exporter --no-create-home --shell /sbin/nologin node_exporter
chown node_exporter:node_exporter /usr/local/bin/node_exporter

#
tee /etc/systemd/system/node_exporter.service > /dev/null <<EOF
[Unit]
Description=Node Exporter
Documentation=https://prometheus.io/docs/guides/node-exporter/
Wants=network-online.target
After=network-online.target

[Service]
User=node_exporter
Group=node_exporter
Type=simple
Restart=on-failure
ExecStart=/usr/local/bin/node_exporter \
  --web.listen-address=:9200

[Install]
WantedBy=multi-user.target
EOF

# 데몬 실행
systemctl daemon-reload
systemctl enable --now node_exporter
systemctl status node_exporter
ss -tnlp

#
curl localhost:9200/metrics- prometheus 설정에 수집 대상 target (node_exporter) 추가
# prometheus.yml 수정
cat << EOF >> /etc/prometheus/prometheus.yml

  - job_name: 'node_exporter'
    static_configs:
      - targets: ["127.0.0.1:9200"]
        labels:
          alias: 'myec2'
EOF

# prometheus 데몬 재기동
systemctl restart prometheus.service
systemctl status prometheus- prometheus 웹에서 target 확인 및 node 로 시작되는 메트릭 쿼리 해보기
rate(node_cpu_seconds_total{mode="system"}[1m])
node_filesystem_avail_bytes
rate(node_network_receive_bytes_total[1m])
observability 테스트
1. kube-prometheus-stack 설치
# repo 추가
helm repo add prometheus-community https://prometheus-community.github.io/helm-charts

# 파라미터 파일 생성
cat <<EOT > monitor-values.yaml
prometheus:
  prometheusSpec:
    scrapeInterval: "15s"
    evaluationInterval: "15s"
  service:
    type: NodePort
    nodePort: 30002

grafana:
  defaultDashboardsTimezone: Asia/Seoul
  adminPassword: prom-operator
  service:
    type: NodePort
    nodePort: 30003

alertmanager:
  enabled: false
defaultRules:
  create: false
prometheus-windows-exporter:
  prometheus:
    monitor:
      enabled: false
EOT
cat monitor-values.yaml

# 배포
helm install kube-prometheus-stack prometheus-community/kube-prometheus-stack --version 75.15.1 \
-f monitor-values.yaml --create-namespace --namespace monitoring


# 각각 웹 접속 실행
## Windows(WSL2) 사용자는 아래 주소를 자신의 웹 브라우저에서 기입 후 직접 접속, 이후에도 동일.
open http://127.0.0.1:30002 # macOS
open http://127.0.0.1:30003 # macOS

# 확인
## grafana : 프로메테우스는 메트릭 정보를 저장하는 용도로 사용하며, 그라파나로 시각화 처리
## prometheus-0 : 모니터링 대상이 되는 파드는 ‘exporter’라는 별도의 사이드카 형식의 파드에서 모니터링 메트릭을 노출, pull 방식으로 가져와 내부의 시계열 데이터베이스에 저장
## node-exporter : 노드익스포터는 물리 노드에 대한 자원 사용량(네트워크, 스토리지 등 전체) 정보를 메트릭 형태로 변경하여 노출
## operator : 시스템 경고 메시지 정책(prometheus rule), 애플리케이션 모니터링 대상 추가 등의 작업을 편리하게 할수 있게 CRD 지원
## kube-state-metrics : 쿠버네티스의 클러스터의 상태(kube-state)를 메트릭으로 변환하는 파드
helm list -n monitoring
kubectl get pod,svc,ingress,pvc -n monitoring
kubectl get-all -n monitoring
kubectl get prometheus,servicemonitors -n monitoring
kubectl get crd | grep monitoring

# 프로메테우스 버전 확인
kubectl exec -it sts/prometheus-kube-prometheus-stack-prometheus -n monitoring -c prometheus -- prometheus --version

# 프로메테우스 리소스 정보 확인
kubectl get prometheuses.monitoring.coreos.com -n monitoring
kubectl get prometheuses.monitoring.coreos.com -n monitoring -o yaml | k neat | yq
...
      podMonitorSelector:
        matchLabels:
          release: kube-prometheus-stack
      probeSelector:
        matchLabels:
          release: kube-prometheus-stack
      scrapeConfigSelector:
        matchLabels:
          release: kube-prometheus-stack
      serviceMonitorSelector:
        matchLabels:
          release: kube-prometheus-stack
...

#
kubectl get servicemonitors.monitoring.coreos.com -n monitoring
kubectl get servicemonitors.monitoring.coreos.com -n monitoring kube-prometheus-stack-apiserver -o yaml | grep labels: -A10
  labels:
    app: kube-prometheus-stack-apiserver
    app.kubernetes.io/instance: kube-prometheus-stack
    app.kubernetes.io/managed-by: Helm
    app.kubernetes.io/part-of: kube-prometheus-stack
    app.kubernetes.io/version: 75.15.1
    chart: kube-prometheus-stack-75.15.1
    heritage: Helm
    release: kube-prometheus-stack
2. Argo CD 구성요소에 대한 ServiceMonitor 생성
# 테스트용 파드 기동
cat <<EOF | kubectl apply -f -
apiVersion: v1
kind: Pod
metadata:
  name: nginx
  labels:
    app: nginx
spec:
  containers:
  - name: nginx
    image: nginx:alpine
    ports:
    - containerPort: 80
EOF

# application-controller 메트릭 호출
kubectl exec -it -n default nginx -- curl argocd-metrics.argocd.svc:8082/metrics
...

kubectl get svc,ep -n argocd -l app.kubernetes.io/name=argocd-metrics
NAME                     TYPE        CLUSTER-IP      EXTERNAL-IP   PORT(S)    AGE
service/argocd-metrics   ClusterIP   10.96.203.215   <none>        8082/TCP   82m

NAME                       ENDPOINTS          AGE
endpoints/argocd-metrics   10.244.2.22:8082   82m

kubectl get svc -n argocd argocd-metrics -o yaml | k neat | yq
...
  ports:
    - name: metrics
      port: 8082
  selector:
    app.kubernetes.io/name: argocd-application-controller

kubectl get pod -n argocd -l app.kubernetes.io/name=argocd-application-controller
NAME                              READY   STATUS    RESTARTS   AGE
argocd-application-controller-0   1/1     Running   0          84m

# ServiceMonitor 생성
cat <<EOF | kubectl apply -f -
apiVersion: monitoring.coreos.com/v1
kind: ServiceMonitor
metadata:
  name: argocd-metrics
  namespace: monitoring
  labels:
    release: kube-prometheus-stack
spec:
  selector:
    matchLabels:
      app.kubernetes.io/name: argocd-metrics
  endpoints:
    - port: metrics
  namespaceSelector:
    matchNames:
      - argocd
EOF


# argocd-server 메트릭 호출
kubectl exec -it -n default nginx -- curl argocd-server-metrics.argocd.svc:8083/metrics
...

k get svc,ep -n argocd -l app.kubernetes.io/name=argocd-server-metrics
NAME                            TYPE        CLUSTER-IP     EXTERNAL-IP   PORT(S)    AGE
service/argocd-server-metrics   ClusterIP   10.96.55.189   <none>        8083/TCP   91m

NAME                              ENDPOINTS                           AGE
endpoints/argocd-server-metrics   10.244.1.18:8083,10.244.3.22:8083   91m

k get svc -n argocd argocd-server-metrics -o yaml | k neat | yq
...
  ports:
    - name: metrics
      port: 8083
  selector:
    app.kubernetes.io/name: argocd-server

kubectl get pod -n argocd -l app.kubernetes.io/name=argocd-server
NAME                            READY   STATUS    RESTARTS   AGE
argocd-server-8b767f58c-pd2dj   1/1     Running   0          92m
argocd-server-8b767f58c-qwk7z   1/1     Running   0          92m

# ServiceMonitor 생성
cat <<EOF | kubectl apply -f -
apiVersion: monitoring.coreos.com/v1
kind: ServiceMonitor
metadata:
  name: argocd-server-metrics
  namespace: monitoring
  labels:
    release: kube-prometheus-stack
spec:
  selector:
    matchLabels:
      app.kubernetes.io/name: argocd-server-metrics
  endpoints:
    - port: metrics
  namespaceSelector:
    matchNames:
      - argocd
EOF


# repo-server 메트릭 호출
kubectl exec -it -n default nginx -- curl argocd-repo-server.argocd.svc:8084/metrics
...

# ServiceMonitor 생성
cat <<EOF | kubectl apply -f -
apiVersion: monitoring.coreos.com/v1
kind: ServiceMonitor
metadata:
  name: argocd-repo-server-metrics
  namespace: monitoring
  labels:
    release: kube-prometheus-stack
spec:
  selector:
    matchLabels:
      app.kubernetes.io/name: argocd-repo-server
  endpoints:
    - port: metrics
  namespaceSelector:
    matchNames:
      - argocd
EOF


# 나머지 ServiceMonitor 생성
cat <<EOF | kubectl apply -f -
apiVersion: monitoring.coreos.com/v1
kind: ServiceMonitor
metadata:
  name: argocd-applicationset-controller-metrics
  namespace: monitoring
  labels:
    release: kube-prometheus-stack
spec:
  selector:
    matchLabels:
      app.kubernetes.io/name: argocd-applicationset-controller
  endpoints:
    - port: metrics
  namespaceSelector:
    matchNames:
      - argocd
---
apiVersion: monitoring.coreos.com/v1
kind: ServiceMonitor
metadata:
  name: argocd-dex-server
  namespace: monitoring
  labels:
    release: kube-prometheus-stack
spec:
  selector:
    matchLabels:
      app.kubernetes.io/name: argocd-dex-server
  endpoints:
    - port: metrics
  namespaceSelector:
    matchNames:
      - argocd
---
apiVersion: monitoring.coreos.com/v1
kind: ServiceMonitor
metadata:
  name: argocd-redis-haproxy-metrics
  namespace: monitoring
  labels:
    release: kube-prometheus-stack
spec:
  selector:
    matchLabels:
      app.kubernetes.io/name: argocd-redis-ha-haproxy
  endpoints:
    - port: http-exporter-port
  namespaceSelector:
    matchNames:
      - argocd
---
apiVersion: monitoring.coreos.com/v1
kind: ServiceMonitor
metadata:
  name: argocd-notifications-controller
  namespace: monitoring
  labels:
    release: kube-prometheus-stack
spec:
  selector:
    matchLabels:
      app.kubernetes.io/name: argocd-notifications-controller-metrics
  endpoints:
    - port: metrics
  namespaceSelector:
    matchNames:
      - argocd
EOF

#
kubectl get servicemonitors -n monitoring | grep argocd
argocd-applicationset-controller-metrics         12s
argocd-dex-server                                12s
argocd-metrics                                   11m
argocd-notifications-controller                  12s
argocd-redis-haproxy-metrics                     12s
argocd-repo-server-metrics                       2m47s
argocd-server-metrics                            4m8s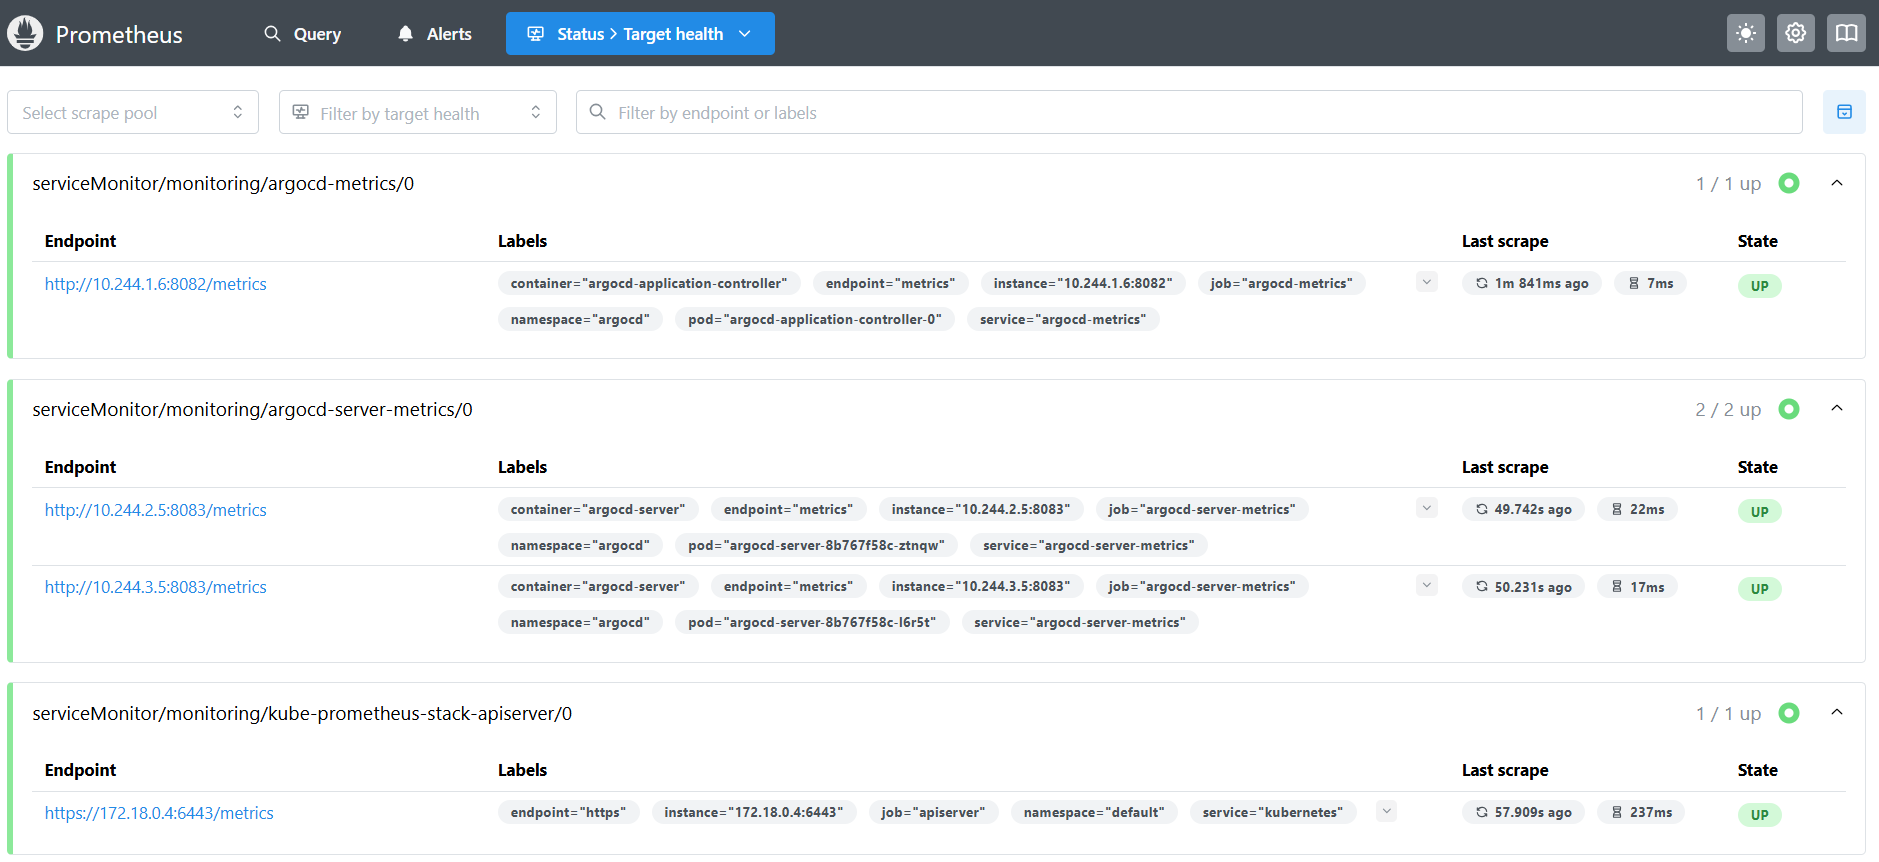

3. 그라파나 대시보드 추가 후 확인 - Dashboard
- 애플리케이션 생성
# guestbook helm 차트 애플리케이션 생성
cat <<EOF | kubectl apply -f -
apiVersion: argoproj.io/v1alpha1
kind: Application
metadata:
  name: guestbook
  namespace: argocd
  finalizers:
  - resources-finalizer.argocd.argoproj.io
spec:
  project: default
  source:
    helm:
      valueFiles:
      - values.yaml
    path: helm-guestbook
    repoURL: https://github.com/argoproj/argocd-example-apps
    targetRevision: HEAD
  syncPolicy:
    automated:
      enabled: true
      prune: true
      selfHeal: true
    syncOptions:
    - CreateNamespace=true
  destination:
    namespace: guestbook
    server: https://kubernetes.default.svc
EOF- 그라파나 웹 접속 후 대시보드 Import → examples/dashboard.jsonargoproj/argo-cd 코드 내용 복사 후 추가

4. 운영 시 주요 메트릭 - Docs
- Argo CD는 동기화를 수행하기 위해 리포지터리 서버와 컨트롤러를 사용한다. 이 둘은 가장 중요하게 모니터링해야 할 대상.
OOKKilled
- 시간이 지나면서 리포지터리와 컨트롤러의 의미 있는 메트릭은 Argo CD에서 노출되는 것이 아니라 노드 운영체제에서 컨테이너가 너무 많은 리소스가 사용하려고 할 때 나타나는 메모리 부족 OOM, Out-Of-Memory 에 의한 종료 현상이다.
- 이는 컨테이너에 충분한 리소스가 설정돼 있지 않거나 병렬 처리에 너무 큰 리소스가 할당된 경우에 발생한다.
- Argo CD 공식 문서에서는 OOM이 발생할 수 있는 경우와 병렬 처리를 줄이기 위해 사용하는 매개변수를 잘 설명하고 있다 - Docs
- argocd-repo-server매니페스트를 생성하는 fork/exec 구성 관리 도구입니다.
- argocd-repo-server fork/exec config management tool to generate manifests.
- 메모리 부족이나 OS 스레드 수 제한으로 인해 fork가 실패할 수 있습니다.
- --parallelismlimit 플래그는 동시에 실행되는 매니페스트 세대 수를 제어하고, OOM으로 인한 종료를 방지하는 데 도움이 됩니다.
- argocd-repo-server매니페스트를 생성하는 fork/exec 구성 관리 도구입니다.
- 리포지터리 서버의 경우 동시에 너무 많은 매니페스트가 적용된 경우 발생할 수 있다.
- 다음 쿼리를 사용해 이런 이벤트에 대한 알림을 받을 수 있다.
- 지난 5분 동안 컨테이너가 다시 시작됐거나 마지막으로 종료된 이유가 OOMKilled 인지 여부를 확인한다 - Link
sum by (pod, container, reason) (kube_pod_container_status_last_terminated_reason{})
* on (pod,container) group_left
sum by (pod, container) (changes(kube_pod_container_status_restarts_total{}[1m]))- 이런 알람을 일주일에 한 두 번 정도 받는다면 몇 주 정도 지켜봐도 괜찮다.
- 만약 리포지터리 서버나 컨트롤러에서 하루에도 두 번 이상 발생한다면 조치를 취해야 한다.
- 조치 방법은 다음과 같다.
- 디플로이먼트나 스테이트풀셋의 레플리카 숫자를 증가시킨다. 그래서 애플리케이션 동기화가 발생해 부하가 다른 인스턴스로 분산.
- 컨테이너의 CPU와 메모리 리소스를 더 높게 할당한다.
- 리포지터리 서버의 --parallelismlimit 매개변수 값과 컨트롤러의 —-kubectl-parallelism-limit 매개변수의 값을 줄인다.
- OOM은 컨트롤러가 애플리케이션의 상태를 조율하기 위해 수행해야 하는 작업량과 관련이 있다.
- 따라서 며칠 동안 배포 작업이 없다면 이런 문제가 발생하지 않을 수 있지만, 여러 애플리케이션을 동시에 동기화하기 시작하면 OOM 경고를 받을 수 있다.
- 이 경우 시스템에서 정의한 로드 메트릭과의 상관관계를 확인해야 한다.
백업 → 복원
1. 백업(argocd cli 활용)
# argocd 서버 (http) 로그인
ARGOPW=UOn2CEkg0c4RCfQU
argocd login localhost:8080  --username admin --password $ARGOPW --insecure

# 확인
argocd cluster list
argocd app list

# 백업 생성
argocd admin export -n argocd > backup.yaml
cat backup.yaml | head
cat backup.yaml | wc -l
    1421
2. 다른 클러스터 생성
#
kubectl config get-contexts
CURRENT   NAME         CLUSTER      AUTHINFO     NAMESPACE
*         kind-myk8s   kind-myk8s   kind-myk8s

#
kind create cluster --name myk8s2 --image kindest/node:v1.32.8 --config - <<EOF
kind: Cluster
apiVersion: kind.x-k8s.io/v1alpha4
nodes:
- role: control-plane
  extraPortMappings:
  - containerPort: 31000
    hostPort: 31000
  - containerPort: 31001
    hostPort: 31001
  - containerPort: 31002
    hostPort: 31002
  - containerPort: 31003
    hostPort: 31003
- role: worker
- role: worker
- role: worker
EOF

# 설치 확인
kubectl config get-contexts
CURRENT   NAME          CLUSTER       AUTHINFO      NAMESPACE
          kind-myk8s    kind-myk8s    kind-myk8s
*         kind-myk8s2   kind-myk8s2   kind-myk8s2

#
kubectl get node -v=6 --context kind-myk8s
kubectl get node -v=6 --context kind-myk8s2
cat ~/.kube/config

kubectl get pod -A --context kind-myk8s
kubectl get pod -A --context kind-myk8s2


# alias 설정
alias k8s1='kubectl --context kind-myk8s'
alias k8s2='kubectl --context kind-myk8s2'

# 확인
k8s1 get node -owide
k8s2 get node -owide
3. 다른 클러스터 생성 시 오류 발생

- t3.large 인스턴스의 리소스 부족 (2 vCPU, 8GB RAM)
- 이미 4개의 Kind 노드가 실행 중인 상황에서 추가 클러스터 생성 시도
- 인스턴스 타입 변경 후 해결
4. 새 클러스터에 argo ha 설치
# alias 설정
alias k8s1='kubectl --context kind-myk8s'
alias k8s2='kubectl --context kind-myk8s2'

#
k8s2 apply -f resources/namespace.yaml
k8s2 apply -f resources/install.yaml -n argocd

# 확인
watch -d kubectl get pod -n argocd --context kind-myk8s2
kubectl port-forward svc/argocd-server -n argocd 8081:80 --context kind-myk8s2

#
k8s2 get secret -n argocd argocd-initial-admin-secret -o jsonpath='{.data.password}' | base64 -d ; echo
g8UrwxrIHs-nW4FI
open https://127.0.0.1:8081 # 프로덕션의 경우 TLS인증서가 적용된 로드밸랜서 서비스로 오픈하자- 다른 클러스터에서 복원하기 or 기존 리소스 연결 - Youtube
# 다른 클러스터에 argocd 서버 (http) 로그인
ARGOPW2=g8UrwxrIHs-nW4FI
argocd login localhost:8081  --username admin --password $ARGOPW2 --insecure

# 확인
argocd cluster list
argocd app list

# 다른 클러스터에서 복원하기
argocd admin import -n argocd - < backup.yaml
import process started argocd
/ConfigMap argocd-cm in namespace argocd updated
/ConfigMap argocd-rbac-cm in namespace argocd updated
/ConfigMap argocd-ssh-known-hosts-cm in namespace argocd updated
/ConfigMap argocd-tls-certs-cm in namespace argocd updated
/Secret argocd-secret in namespace argocd updated
/Secret creds-2828116958 in namespace argocd created
argoproj.io/Application argocd in namespace argocd created
{"level":"info","msg":"Warning: metadata.finalizers: \"resources-finalizer.argocd.argoproj.io\": prefer a domain-qualified finalizer name including a path (/) to avoid accidental conflicts with other finalizer writers","time":"2025-11-02T18:31:27+09:00"}
argoproj.io/Application guestbook in namespace argocd created
/Secret creds-1757135808 needs pruning
Import process completed successfully in namespace argocd at 2025-11-02T18:31:27+09:00, duration: 284.528292ms

#
k8s2 get pod -A
NAMESPACE            NAME                                                READY   STATUS    RESTARTS   AGE
argocd               argocd-application-controller-0                     1/1     Running   0          9m15s
argocd               argocd-applicationset-controller-694b4774cd-7rn6f   1/1     Running   0          9m15s
argocd               argocd-dex-server-66585dc685-b5trr                  1/1     Running   0          9m15s
argocd               argocd-notifications-controller-7c584f65cc-28cp8    1/1     Running   0          9m15s
argocd               argocd-redis-ha-haproxy-7487b954d9-bntbj            1/1     Running   0          9m15s
argocd               argocd-redis-ha-haproxy-7487b954d9-hshdm            1/1     Running   0          9m15s
argocd               argocd-redis-ha-haproxy-7487b954d9-v2dtx            1/1     Running   0          9m15s
argocd               argocd-redis-ha-server-0                            3/3     Running   0          9m15s
argocd               argocd-redis-ha-server-1                            3/3     Running   0          7m42s
argocd               argocd-redis-ha-server-2                            3/3     Running   0          6m56s
argocd               argocd-repo-server-74b54f7cb-9hh65                  1/1     Running   0          9m15s
argocd               argocd-repo-server-74b54f7cb-kn6w2                  1/1     Running   0          9m15s
argocd               argocd-server-8b767f58c-c99rl                       1/1     Running   0          9m15s
argocd               argocd-server-8b767f58c-qpmxb                       1/1     Running   0          9m15s
guestbook            guestbook-helm-guestbook-6585c766d6-ttkw2           1/1     Running   0          2m45s
kube-system          coredns-668d6bf9bc-6flwk                            1/1     Running   0          16m
kube-system          coredns-668d6bf9bc-nxw4t                            1/1     Running   0          16m
kube-system          etcd-myk8s2-control-plane                           1/1     Running   0          16m
kube-system          kindnet-9kwgt                                       1/1     Running   0          16m
kube-system          kindnet-bvsd6                                       1/1     Running   0          16m
kube-system          kindnet-gnjjx                                       1/1     Running   0          16m
kube-system          kindnet-kl7jv                                       1/1     Running   0          16m
kube-system          kube-apiserver-myk8s2-control-plane                 1/1     Running   0          16m
kube-system          kube-controller-manager-myk8s2-control-plane        1/1     Running   0          16m
kube-system          kube-proxy-8gv66                                    1/1     Running   0          16m
kube-system          kube-proxy-cdgwh                                    1/1     Running   0          16m
kube-system          kube-proxy-mnc7p                                    1/1     Running   0          16m
kube-system          kube-proxy-v7rcv                                    1/1     Running   0          16m
kube-system          kube-scheduler-myk8s2-control-plane                 1/1     Running   0          16m
local-path-storage local-path-provisioner-7dc846544d-m2m9z 1/1 Running 0 16m- 주의! admin 계정의 암호도 기존 k8s 정보로 변경됨!
- 다른 클러스터에 복구 확인
- 리소스 삭제
kind delete cluster --name myk8s ; kind delete cluster --name myk8s2'Kubernetes' 카테고리의 다른 글
| Kubernetes CI/CD Study 1기 | 6주차 ArgoCD 3/3 (0) | 2025.11.21 |
|---|---|
| Kubernetes CI/CD Study 1기 | 5주차 ArgoCD 2/3 (0) | 2025.11.10 |
| Kubernetes CI/CD Study 1기 | 3주차 #2 Jenkins + ArgoCD (0) | 2025.11.01 |
| Kubernetes CI/CD Study 1기 | 3주차 #1 Jenkins + ArgoCD (0) | 2025.10.31 |
| Kubernetes CI/CD Study 1기 | 2주차 #1 : Helm (0) | 2025.10.22 |